Archive for the ‘form builder’ Category
« Older Entries Newer Entries »
How to Add a Waiver, Liability Release or Other Contractual Agreement to a Form
The Agreement form widget allows you to add a waiver, liability release, agreement, or any other contract (terms & conditions, privacy statement, policy) to a form.

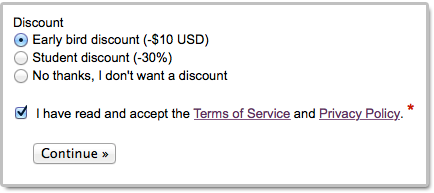
The Agreement widget is intended to be combined with a required checkbox and an e-signature to capture a person’s consent on an online registration form or any other digital contract. Please try this demo.
- A user can read the agreement inline in a scrollable area
- The text can be popped out to a larger window and even launched full screen
- We provide print and download buttons in the pop-up window
- The text shown in agreement widget allows links and basic formatting: bold, italics, underlining, ordered and unordered lists. Here is a waiver example with formatted text.
- Agreements are currently limited to 20,000 characters, please contact us if you need more.
Agreements are only available with the new generation of FormSmarts forms. You can set your account to the new forms in the Settings tab of the Form Builder.
Posted on Jan 22nd, 2016 in form builder.
2 Comments
Tags: digital contract, form design, howto
Checkbox List vs. Checkbox
The form builder provides both standard checkboxes and a dedicated checkbox list widget. Let’s review when you should use one or the other.
Checkbox List
As illustrated below, a checkbox list is made of a question (field name in the form builder) and a number of checkboxes. Use a checkbox list whenever multiple choices are allowed in a list of items, as often occurs in online surveys and many other types of forms.

Checkbox
When you only need a single yes/no answer, a simple checkbox is all you need. For example, the field Subscribe to FormSmarts Demo mailing list on this mail list signup form uses a checkbox rather than a checkbox list to allow the user to subscribe to the mailing list.
Required Checkbox for Disclaimers & Waivers
Use a required (non-optional) checkbox whenever the form must have a disclaimer/waiver area where the person must “check” that they “agree to” before the form will allow for success submission. The checkbox text supports links and basic formatting.
Posted on Jan 27th, 2015 in form builder.
Post a Comment
How to Organize Your Forms in the Form Builder
As the year ends, we’ve updated the form builder to improve how users can organize their forms.

- Forms can now be classified into categories. You can set a category both when creating a new form and editing existing forms.
- A new function allows customers to filter forms shown in the Forms Tab of the form builder by category or enabled/disabled status.
We know those FormSmarts members who have created a number of forms along the years will appreciate this new feature. As always, we would very much appreciate your thoughts and feedback.
Happy holidays from the FormSmarts Team. We wish you a wonderful upcoming 2015.
Posted on Dec 22nd, 2014 in form builder.
1 Comment
Introducing Multi-User Accounts
FormSmarts supports accounts with multiple users, allowing an account owner to give invited users access to selected online forms.

How to Enable Multiple User Accounts
- Set up an account alias
- Create users
- Manage user permissions
Set Up an Account Alias
Before allowing sub-users to sign in to FormSmarts, you first need to set up an alias for your account. The alias must be unique and easy for users to memorize. A good choice is probably your organization or department’s name. Users will need to enter the account alias on the log in screen.
To create an account alias, visit the Account Overview panel of your account.
Create a User
To create a user, head to the User Management Dashboard.
- Users sign in to FormSmarts with their email address, account alias and password
- Before creating a user, add their email address to your account in the Settings Tab of the Form Builder and verify it
- Users can change their password in the Security Settings panel of their account if they know their current password
- The account administrator can reset a user’s password in the User Management Dashboard.
Manage User Permissions
For each form, you can grant a user permissions to:
- access individual form entries online or download a PDF (e.g. from the link in email notifications)
- download form attachments (file uploads)
- generate Excel reports
- add tags and notes to a form entry
- edit or delete a form entry
You can also give a user account-level permissions to:
- renew your subscription or upgrade your account (billing permissions)
To set account-level permissions, please contact Support.
How to Sign In as an Invited User
We’ve updated the log in screen to allow all FormSmarts members to sign in on the same page. Account owners (aka account admins) can sign in in the usual way with their email address and password. Invited users also need to enter the account alias provided by their account admin as shown in this video.
Multiple users are available with our Business Plus package and above.
Posted on Jul 10th, 2014 in collaboration, form builder.
Post a Comment
Tags: business, collaboration, form attachment, form results, form to excel, form to pdf, howto, team, user
Introducing Form Builder v 3.0
Version 3 of the form builder introduces a number of new functions to the Forms Tab.
Rows in the Forms Tab are now selectable. Simply click on a row to select the corresponding form. That form will become your working form; the form which input fields are listed in the Fields Tab. Other actions like viewing a form, editing it, enabling a previously disabled form and grabbing the form’s HTML code snippet or URL will also make that form your working form. Your working form is saved across form builder sessions provided you use the same browser.

A new Duplicate button in the equally new toolbar now allows you to create a copy of the working form, thereby deprecating the Form Cloning Tool.
We’ve added a “+” button that takes the user straight to the New Form section. This will be most useful to customers with a large number of forms. To avoid cluttering the user interface, the “+” button only shows up when the New Form section is not entirely visible and would require the user to scroll down.
Finally we’ve streamlined the navigation between the Forms and Fields tabs, providing direct access to the fields of any form by double-clicking on the relevant row in the Forms Tab.

The most obvious change to the Fields Tab is a new toolbar above the list of input fields. Besides the new “+” button, allowing you to scroll down to the new field section, the toolbar allows you to directly access form-level functions in the Fields Tab: you can now view the form you’re working on, edit it, and get its URL or HTML code while in the process of adding fields, without needing to go back and forth between the Fields and Forms tabs.
Please let us know the changes you like and (more importantly) those you don’t like, and feel free to suggest any ideas that would further improve the form builder.
Posted on Sep 25th, 2013 in form builder.
Post a Comment
How to Track the Source of Leads
If you use online forms for lead generation, you will want to know the source of form submissions: from which page of your site a form was submitted, which social network or site the visitor came from, or which marketing campaign led the prospect to you.

You can track the source of leads received via form submissions with the fs_ctxval context parameter, giving it a unique value for each source or campaign you wish to track. In this article, we show you how. If you need help setting this up, let us know.
Example 1: Form Accessed by Its FormSmarts URL
The simplest way to publish a form online is to allow your customers to directly access the form by its FormSmarts URL. To track the source of form responses, create a unique URL for each source or campaign:
- https://formsmarts.com/form/lqh?fs_ctxval=Facebook-May-2013
- https://formsmarts.com/form/lqh?fs_ctxval=Newsletter-May-12-2013
- https://formsmarts.com/form/lqh?fs_ctxval=ABC+Conference+2013 (tip: create a QR code with this URL and print it on posters, flyers and stickers)
As you would expect, context values are collected by FormSmarts and shown in notification emails, online & PDF reports, exports to Excel and web API callbacks.
Example 2: Form Embedded into Your Site
If you manually inserted the code snippet for the same form into multiple pages of you site, follow instructions in this section to track leads. If you added the form to your site template, skip to the next section (for WordPress sites) or the one after (for other template-based sites).
Edit each web page where you embedded the form and locate the code snippet in the HTML source. Add the context value after lay=1 (or lay=2), as in the code highlighted below:
<iframe width="540" height="481" src="https://formsmarts.com/form/lqh?mode=embed&lay=1&fs_ctxval=Summer+2013+Conference+Registration+Page" scrolling="auto" marginwidth="0" marginheight="0" vspace="0" hspace="0" allowtransparency="true" frameborder="0" style="overflow-x:hidden"><a href="https://formsmarts.com/form/lqh">Can't see the form? Click here</a>.</iframe>
Alternatively, grab a fresh copy of the code snippet from the form builder, edit the code as described, then add it to your site in the usual way.
Example 3: Tracking Leads on a WordPress Site
If you added a form to the template of your WordPress site, you can track the URL of the page a form was submitted from with PHP.
- In your WordPress template, replace the form’s HTML snippet by the PHP code below
- Paste the form’s code snipped given by the form builder between the single quotes as shown.
<?php
$snip = ''; // Paste form embedding code between single quotes
$url = get_permalink();
$re = "/[^\w\s,()\[\]*\/:\-.?]+/";
$ctx = urlencode(substr(preg_replace($re, "", $url), 0, 150));
print(str_replace("mode=h5embed", "mode=h5embed&fs_ctxval=".$ctx, $snip));
?>
Example 4: Tracking Leads on Any Site with JavaScript
You can do the same on any other sites with JavaScript:
<script>
var snip = ''; // Paste embed code here
var pth = document.location.pathname;
var re  = /[^\w\s,()\[\]*\/:\-.?]+/g;
var ctx = encodeURIComponent(pth.replace(re, '').substring(0, 150));
document.write(snip.replace("mode=h5embed", "mode=h5embed&fs_ctxval=" + ctx));
</script>
Notes
This feature is included with all Business plans. Context data may not contains non-alphanumeric characters other than “()[]*/:-.? ” and may not exceed 150 characters.
Posted on May 27th, 2013 in form builder.
2 Comments
Tags: business, email notification, form to excel, form to pdf
How to Lead People to Online Forms from Printed Material
Here are two easy tips to increase online form conversion from paper material: bridge the offline-online gap by allowing people to register for your next event, pay their membership fee, or sign up for your newsletter on the spot from any poster, brochure or printed document.
You are probably aware that you can easily share a form with your user base by email or on social networks using the FormSmarts.com URL that comes with each and every web form. What you may not know is that FormSmarts has two features that allow you to share online forms on printed material.
Using QR Codes & Short Form URLs
You can and should take advantage of the dramatic increase of the number of smartphones and tablets in the last few years to give people a convenient way to access your forms on the spot with their smartphone (or tablet) by either scanning a QR code that will lead them straight to your form or by typing a short URL (for those users that don’t yet have a QR code scanner app on their device).
You’ll find the QR code and short URL (e.g. f8s.co/lqh) of each of your forms in the Form Publishing Options screen of the online form builder.
Printed material where you should consider printing the QR code and short URL of your forms include: posters, invitations, printed newsletters, ads, brochures, job specifications, tags,… and even t-shirts.
Send us a picture of printed media where you use a FormSmarts QR code or short URL and you could win yourself a free Pro subscription! The best three entrants will be chosen on Jul 31, 2012 and will get a 1 year Pro subscription and their picture published on FormSmarts.
Posted on Jun 25th, 2012 in form builder.
Post a Comment
Tags: accessibility, howto, mobile form, usability
How to Integrate with FormSmarts API
The Event Notification API allows you to have FormSmarts send a machine processable ‘push’ notification message to a script on your website (or for that matter to any URL) to process the information that has just been submitted through one of your online forms. You can use the Event API (a.k.a. Web Hooks) to integrate FormSmarts with your database, website or any online service or application.
How to Integrate
Whereas this feature is mainly targeted at developers, creating a script that does something useful with the data received from FormSmarts is actually not difficult. The API is fully documented with examples in PHP.
- You first need to create a program/script to process form data and upload it to your web server. Data is sent in JSON format, which is supported natively by all modern programming languages.
- Then register the script’s URL with FromSmarts
- Whenever a form is submitted, FormSmarts will send the data submitted through the form as well as other data pertaining to the form response (e.g. payment information if the form involves a payment) to the URL you have registered.
Have a Great Idea?
If you have a great idea about how you could use FormSmarts API, let us know: we have several Business Starter subscriptions to give away.
Posted on May 31st, 2012 in form builder.
2 Comments
Tags: API, automation, business, howto, payment integration
Engage Users via Twitter & Facebook to Increase Form Conversion
FormSmarts allows you to better engage with your user community by adding a social component to your online forms. The assumption with social networks is that a user is more likely to perform an online action such as filling out a form, registering for an event or sign up for a class if she knows that her friend or colleague has already done so.
Online Forms Get Social
For each form, FormSmarts allows you to set up a message template that will be used to post an update to social networks when the form is submitted. The message can incorporate any information entered on the form.
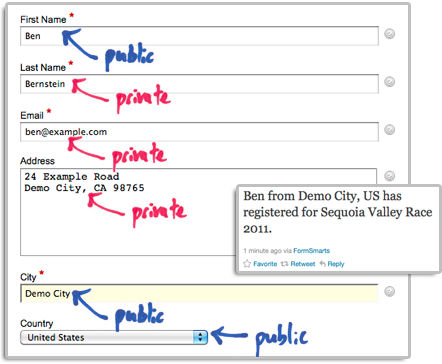
The user’s expectation when filling out online forms is that the information submitted will only be disclosed to the form owner, and you clearly need to ensure you don’t leak personal information (more about this in the last section). We define two types of input fields on a form. Those which will be populated by information which—taken out context—is so general that it can be safely disclosed, and those which should be kept private. In the example below, we deem First Name, City and Country as public, while all other fields are deemed private.
How to Set Up FormSmarts to Post Twitter Updates
First connect your Twitter account with FormSmarts to allow FormSmarts to post tweets on your behalf. You will be taken to Twitter for authentication and asked to authorize FormSmarts to post updates using your account. You will only need to do this once. Note that FormSmarts will not have access to your Twitter password. Once this is done, Twitter will send you back to FormSmarts.
Next click on Twitter Feed Setup in the Form Details screen of the form builder. Enter a short text using placeholders $1, $2, $3,… where you want the value of the corresponding input field to be inserted. Use $1 for the value of the first input field, $2 for the second, etc., in the order fields appear on the form.

Posting Updates to Your Facebook Wall
When someone submits a form, FormSmarts can post an update to your Facebook wall via the Twitter App for Facebook. First set up FormSmarts to post updates to Twitter as described in the previous section, then add the Twitter App to your Facebook page or profile. We will add native support for Facebook if there is demand—please let us know here. (Note: if you ended up here while looking for information on integrating an online form to Facebook, read this).
Respecting the Privacy of User Information
Protecting the information of your users is of paramount importance. When someone submits his information via an online form, he does it with the implicit understanding that his personal information will not be disclosed.
- Add a privacy note on the form (like on this demo) to ensure people understand that some none-personal information will be posted to social networks. Say what information will be published.
- Make sure you’re using the correct placeholder (e.g. $1, $2,…) in the message template. Remember that $1 will be replaced by the value of the first input field in the order they appear on the form, $2 will be replaced by the value of the second input field, etc.
- If you change the order of fields on the form, don’t forget to update the message template with the correct placeholder name.
- Always test the form after setting up a Twitter feed or changing field order.
To further prevent the leak of confidential information, FormSmarts will not publish Twitter updates for SSL secure online forms, even if this has been set up through the online form builder.
How to Disable a Twitter Feed
If you no longer want FormSmarts to post a Twitter update when a form is submitted, simply erase the message template in the Twitter Feed Setup screen (pictured above) and save changes.
Posted on Dec 13th, 2011 in form builder.
1 Comment
Tags: facebook, form builder, form recipient, form results, form submission, pro, twitter
How to Customize the Look of Your Forms with CSS
The online form builder allows you to easily change the layout and colors of your forms when these are embedded into your website. This article discusses how to further customize the look of your online forms by providing your own CSS stylesheet. You can create one (or more) CSS stylesheet for each form.
Disclaimer
The feature discussed in this article is UNOFFICIAL. It is NOT PART OF ANY FORMSMARTS COMMERCIAL OFFERS and we do not provide direct support for it. Feel free to post questions at the bottom of this page. Changing the layout of a form may prevent it to display consistently across browsers.
Verify Your Site & Upload a Logo
To be able to use your own CSS stylesheet, your first need to verify your site and upload a site logo. Uploading a logo creates a website profile on FormSmarts and will allow you to provide your own CSS stylesheet. The logo will be shown on the standalone version of your forms and also on PayPal if you’re using Advanced Payment Integration.
Create a CSS Stylesheet
The CSS code in your stylesheet will be loaded after the default FormSmarts CSS, so any instructions specified in it will override the default. We give a few examples of customizations in the Example section below. More will follow.
Update the Embed Code on Your Site
In the HTML snippet given in the Form Publishing Info screen of the form creator, change the query string portion of the URL from mode=embed&lay=1 to mode=embed&lay=1&style=form.css, where form.css is the path to the CSS file relative to the root of your website. For example, if your website’s URL is http://www.example.com, the CSS file should be at http://www.example.com/form.css.
CSS Styling Examples
Changing the Font and Color of Headings
h2{
font-family:serif;
font-size:14px;
color:orange;
}
Changing the Layout of a Form to Multiple Columns
Logical sections defined by headings can be made into separate columns using the following CSS code and changing the iframe width accordingly.
#section_1{
width:350px;
float:left;
}
#section_2{
width:350px;
float:right;
}

Posted on Nov 21st, 2011 in form builder.
21 Comments
Tags: embed, form design, howto, usability, widget