How to Create a Digital Contract with Agreements
You can add a digital contract to a form with the Agreement form control. An Agreement allows your customers to read and keep a copy of contracts included on a form.
Forms that allow people to register for an event or purchase a service online invariably require the seller to describe the terms of the service provided in a contract and ask the buyer to read and accept the agreement before proceeding with their registration or purchase.

Contractual agreements binding both parties often include a liability release or waiver, terms & conditions and a privacy statement.
The Agreement (shown above) is a form control dedicated to this purpose. It allows:
- The form owner to edit and publish a contract with automatic versioning
- Form respondents to comfortably read the contract and keep a copy of it
Publishing a Contract
To create or edit an Agreement, visit to the Fields tab of the form builder. The text of an agreement supports links and basic formatting: bold, italics, underlining, and bullet points.
Updating an Agreement: Versioning
When you update an Agreement, one of two things happens depending on whether it has binding parties. An Agreement has binding parties if at least one person submitted the form that holds the Agreement.
- If the contract already binds you with at least one form respondent, a new version of the contract/agreement is automatically published. Subsequent form submissions will use the new version of the contract, while previous versions still apply to past form responses.
- If the contract is not binding you with any customers, for example because you are still working on the form design and it isn’t live yet, you can update it without publishing a new version.
- All versions of an agreement with binding parties are kept online for the lifetime of the form, even if the agreement is deleted. They are removed if the form is deleted.
Agreements are currently limited to 20,000 characters, please contact us if you need to add longer contractual documents to a form.
User Perspective
Comfortable Reading
Users can read the contract in a scrollable area of the form, open it in a larger window for comfortable reading (using the Pop Out button), and also view it full screen.
Keeping a Copy of Contracts
Form respondents can download a copy of the agreement for their reference or print it in the dialog accessible with the Pop Out button.
In addition, opt-in and automated confirmation emails and payment confirmation emails contain a link to the permanent URL of the version of the agreement that applied when the person submitted the form. PDF receipts and printouts also show the shortened URL of the agreement.

The URL and shortened URL of each version of an agreement are valid for the lifetime of the form.
Signing Digital Contracts
A signature captures a person’s consent and agreement to a contract.
You can allow your customers to sign a digital contract with an E-Signature, as illustrated above. Please feel free to try our demo:
Including a Contract in Printed & PDF Form Responses
FormSmarts doesn't provide the body of contracts in the email notification we sends to form recipients for clarity. We show a link and a shortened URL (useful if the message is printed) instead.
Customers can access form submissions online and show agreements inline with the Expand button (screenshot below).

Posted on Aug 2nd, 2021 in form builder.
1 Comment
Tags: digital contract
How to Add Text to Form Responses
As online forms evolve to become digital contracts and documents e-signed online, we've updated Text Blocks to give customers more control over what to display in form responses, confirmation emails, and PDF receipts.
Adding Text & Links to a Form
You can insert chunks of text on a form with two form controls: Text Blocks and Agreements. Text Blocks let you to give directions and specify contractual statements on the form itself, while agreements provide a dedicated form control to allow users to view larger contracts in a scrollable section of the form and keep a copy of it.
Choosing the Text Shown in Form Responses
When we introduced Text Blocks in the early days of FormSmarts, the main purpose was to allow customers to provide instructions and comments on their forms. Form respondents only needed directions while they were filling out a form, so we didn't provide a way to show text blocks in form responses sent to form recipients and available online or in confirmation emails and PDF receipts.

Today, many customers use forms as fillable digital contracts with online signatures, so we've updated Text Blocks to allow members to pick which sections of text they want to display and which ones are just directions for the user that don't need to appear in form submissions.
When you create or edit a text block, toggle on Show in form responses (see screenshot above) to display text blocks in the copy of the submitted data given to both parties:
Form Respondents
- Form review and confirmation pages
- Opt-in and automated confirmation email, payment confirmation email
- PDF receipt
Form Recipients
- Notification emails
- Online form responses
- PDF form responses
This option is not available with all types of accounts.
Setting a Pricing Rule with a Text Block

One use of text blocks is to specify a pricing rule on PayPal forms. Text blocks provide an easy way to set a single registration fee on a form and to allow users to enter an item quantity with a Quantity Box.
Unlike other text blocks, those specifying a fee or amount of money are always displayed, for all types of accounts that support payment integration, even if Show in form responses is toggled off.
Posted on Jul 21st, 2021 in form builder.
Post a Comment
Tags: digital contract, payment integration, paypal form, signature
Let Users Choose to Whom a Form Is Sent
FormSmarts allows you to set up a form so the response is sent to a different person depending on the option the respondent picks on the form.
Consider the following scenarios:
- A business has three locations and wants to allow customers to contact or submit an application to any of them
- A non-profit would like to set up the contact form on their site so people can send a message to the relevant officer like the treasurer or chairperson.
- A company needs to allow clients to submit a Sales and Customer Support inquiry on the same form
When someone submits a form, FormSmarts usually sends a notification to all email targets of a form, but you can change this behavior with a message routing rule. Let's use the first example to illustrate how to do this.
Create a Form
We've created the simple form shown below to support this example. Feel free to try it.

Add Emails to the Form Builder
Sign in the form builder and add the name and email address of each location in the Email Accounts section of the Settings tab. Make sure you name locations exactly as you want them to appear on the form.

Change the Target Emails of the Form
Once all email addresses are verified, use the icon showing a pen in the Forms tab to edit the form. Select all three email addresses in the dropdown in the Submit Actions panel and save.
Update the Notification Routing Rule

Edit the form again and click Update email routing policy to open the Routing Policy dialog. Select User-Selected Recipient and save changes.

You'll notice that a new dropdown list was added to the form to allow from respondents to select who they want to send their inquiry to.
We've renamed it to Select a Location and moved it to the top of the form. You can also change the form control to radio-buttons if you want to draw users attention to the selector and ensure respondents choose the correct location. Try the resulting form here.
Posted on Jun 16th, 2021 in form builder.
Post a Comment
Protect the Confidentiality of Form Responses with Encrypted Email
FormSmarts Encrypted Email (S/MIME) allows you to protect the confidentiality of the data submitted through your forms, while keeping the convenience of receiving form responses by email.
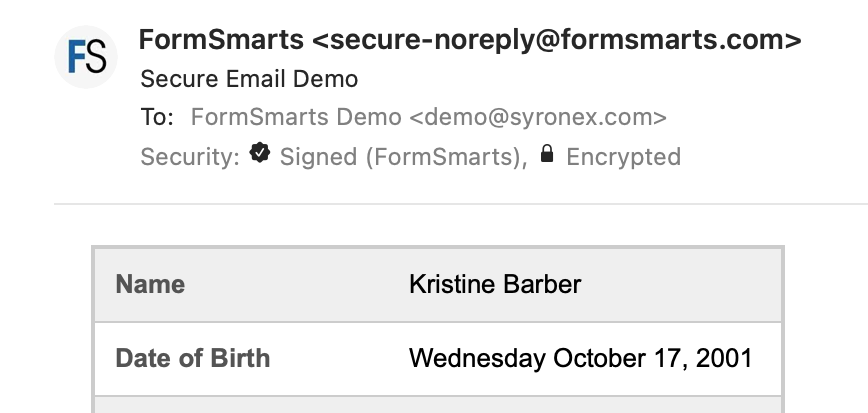
FormSmarts encrypted email uses asymmetric encryption (also known as public-key cryptography) to encrypt a message before it is sent in such a way that only the form recipient can decrypt it. The email message itself is encrypted, not just the connection used to deliver it to its destination.
With encrypted email, a form response is encrypted in FormSmarts' backend and only decrypted by the email app on your computer or phone.
FormSmarts secure email is based on the Secure/Multipurpose Internet Mail Extensions (S/MIME), an Internet standard that is supported by most desktop and mobile email apps.
Should I Use Encrypted Email for My Forms?
Any form that collects personal identifiable information (PII) like Social Security Numbers, health or financial data should be a prime candidate for being delivered by encrypted email.
S/MIME encrypted email is often an alternative to Secure Access, which requires form recipients to log in to FormSmarts to access form responses.
How Does Encrypted Email Compare with Standard Email?
| Encrypted Email | Standard Email | |
|---|---|---|
| Message | Encrypted | Not encrypted |
| Connection | Encrypted | Usually encrypted |
| Permanent Storage | Encrypted (message is only decrypted in your inbox) | May be encrypted |
How Can I Start Using S/MIME Email?
All you need to start receiving form submissions by secure email are:
- An email software or app that supports S/MIME (most do)
- A S/MIME certificate from a Certificate Authority (CA), which you can get free from the CA listed here after verifying your email address
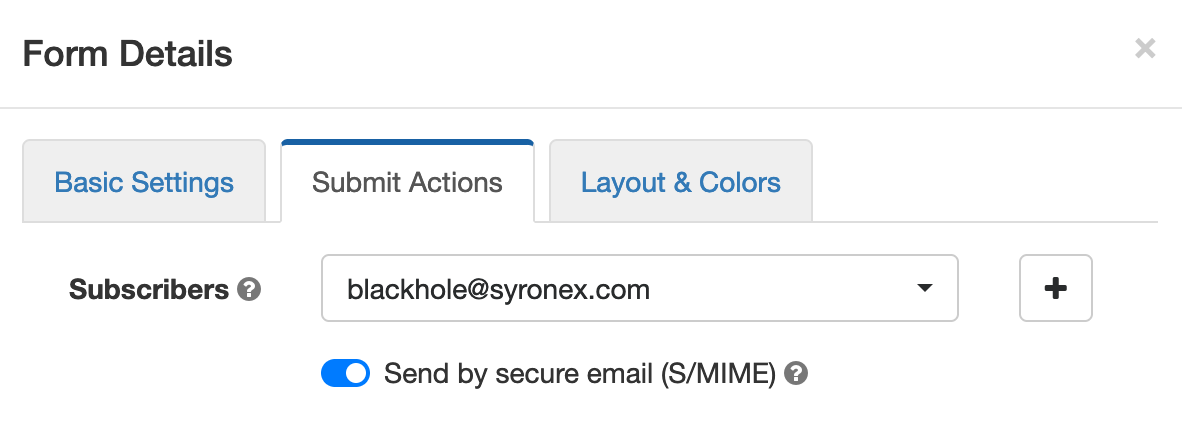
You then need to install the S/MIME certificate and register it with FormSmarts:
- Install the certificate on the devices where you want to access encrypted messages
- Send an email digitally signed with the certificate to FormSmarts from one of the devices where you've installed the certificate.
- Edit each of the forms you want to protect and toggle on Send by secure email (S/MIME) in the Submit Actions tab, as shown on the screenshot above.
Posted on Jun 2nd, 2021 in online form.
Post a Comment
Tags: email notification, form results, privacy, secure form
Automated Form Confirmation Email
FormSmarts autoresponder allows you to send an automatic email confirmation when someone submits one of your forms.

To start sending a confirmation email to form respondents, sign in to the form builder, edit the form, and toggle on Send confirmation email in the Submit Actions tab shown above.
Form Confirmation Emails
The confirmation email option is only available with the default Show confirmation message Submit Action and when you redirect form users to your site. Other types of email confirmations are sent with other submit actions.
Payment Forms
When someone submits a registration form or any other form that involves a payment, FormSmarts sends instead a payment & submission confirmation email. A payment confirmation email is always sent as soon as the payment goes through, there is no need to set it up. You can customize the message text as discussed in the section below.
Confirmation Email On Request On the Summary Page of a Form
The Summary Page option (Show summary with print, email & PDF options in the On Submission drop-down list) allows users to choose whether they want to request an email confirmation or download a PDF receipt.
Edit the Email Message
No matter what types of confirmation emails (autoresponder, payment confirmation or opt-in email confirmation), you can modify the text at the top of the message.
The confirmation email also includes a copy of the information submitted (this is optional for autoresponder messages) and a QR code. You can scan the QR code with your phone to check in attendees at an event or access the form response on FormSmarts to review its payment status and associated notes, check it’s authenticity, etc.
Calendar Invite for Event Registration Forms
 email attachment")
When you create an event registration form, please remember to add the details of the event to your form so FormSmarts can include a calendar invite in the email notification.
A calendar invite is an email attachment in a standard format (ICS) that allows the email recipient to easily add the event to their calendar. Invites are supported by Outlook on Windows, Apple mail and Calendar on Mac OS X, and the Gmail (pictured above) and Google Calendar apps on iOS and Android. Feel free to try this demo.
Note: Payment confirmation emails will only support calendar invites from mid-May 2021. We will announce the release on Twitter and Facebook, please follow us for updates.
Reply-To Email Address
You can designate a public email address in the Contact Info section of your account.
If set, we use your public email as the Reply-To address of confirmation emails. This allows recipients to reply directly by clicking the Reply button of their email app.
Public email address changes may take up three hours to propagate to all your forms.
Email Sender Name
The name of the sender is derived from the company or organization name set in your account.
Changes may take up three hours to propagate to all your forms.
Posted on May 3rd, 2021 in form builder.
2 Comments
Tags: confirmation email, e-ticket
How to Share a Form with Others
If you ever shared your password with a collaborator so they can download form attachments or view a report, read on. You should instead invite them to your account and share the form with them.
How Do I Invite Someone to My Account?
You invite others to join your account by creating a user for them. Once someone has joined your account, you can share a form with them and allow them to perform actions like:
To create a user, first add the person’s email address to the Settings tab of the form builder. Once they’ve verified their email, head to the user management dashboard of your account.
Enter the user’s first and last name, select their verified email address, and click Create User. We’ll email them to let them know they can now log in to FormSmarts, but we won’t give them their auto-generated password: please send it either by IM or voice call.
How Do I Share a Form With a User?
To share a form with a user, tap Edit Permissions in the Actions menu corresponding to the user, as shown on the screenshot above.
Select the form you want to share at the bottom of the Edit Permissions screen (shown below) and click Share.
Toggle permissions on/off as needed to allow the user to perform specific actions only.

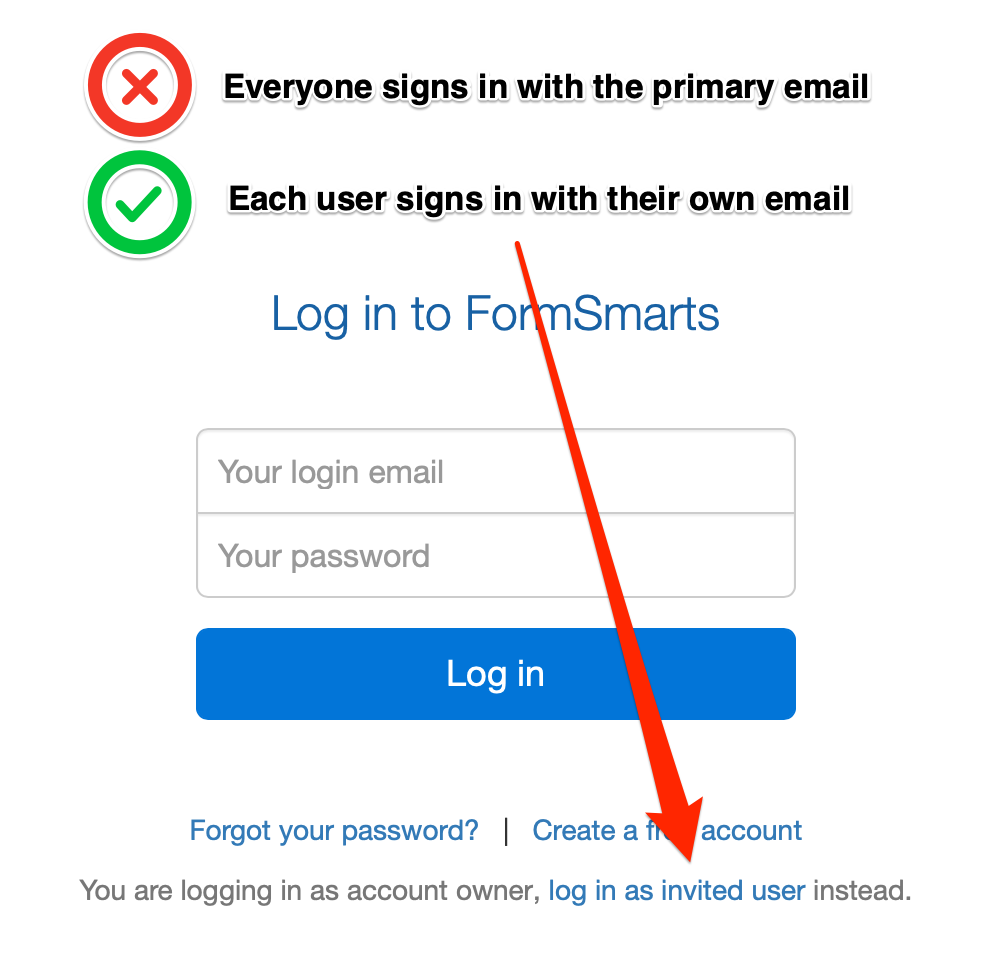
How Can Users Sign In?
To sign in to your account, a users must select Log in as Invited User on the log in page and enter your Account Alias in addition to their email and password.
Your Account Alias uniquely identifies your account on FormSmarts. You need to create an account alias to allow users to log in.
Posted on Mar 29th, 2021 in form builder.
Post a Comment
Tags: collaboration, form attachment, form recipient, team, user
Enable or Disable a Form at a Scheduled Date
The form builder allows you to configure a date and time in the future when a form will be enabled or disabled.
Click the ‘pause’ or ‘play’ icon corresponding to the form you would like to suspend/restore. Select the Schedule option:
- Choose whether you want to enable or disable the form
- Set the date and time when you want to the form to be enabled or disabled (form changes can only be scheduled at the top of the hour)
- Select a timezone if the date & time you’ve entered are in a timezone different from the timezone of you account. You can update your timezone in your account.

A few uses for this workflow:
- Configure a registration form to open and close registrations for an event at a preset date and time
- Specify an application period for an application form
- Set up a form so it is only available online at specific hours (e.g. weekdays 9am-10am) or days (e.g last day of the month) to support workflows, policies, and internal reporting requirements within your organization
The form builder interface currently only allows us to schedule events at a specific date and time, but FormSmarts also supports recurring scheduled actions. Consider a policy that expense claims must be submitted weekly every Friday from 12pm to 5pm. We can configure the expenses claim form to be enabled every Friday at noon and disabled at 5pm via the API Console. If you need help with this, please contact Support.
Posted on Dec 7th, 2020 in form builder.
Post a Comment
How to Capture a User’s State or Province on a Form
FormSmarts' Country Subdivision selector allows you to easily capture a visitor's state, province or other administrative country subdivision on a form.
- The person's state, province, county, etc. is automatically preselected from their approximate IP address location, so the form control requires no or minimal action from the user
- The Country Subdivision (CSD) selector works in all countries and territories worldwide
- The country subdivisions listed are those in use in each country: state in the US, India and Australia, province in Canada, prefecture in Japan, land in Germany, county or borough in the UK, …
- Please try this demo.
How to Select a Subdivision of Another Country
When we ask a user to provide their state or province on a form, we usually want to collect their state or province of residence, which is most likely (but not always) a subdivision of the same country they are submitting the form from.
For instance, if we need to get a visitor's country of birth or travel destination, this might not be the case, so we need to allow users to select an administrative subdivision in another country. We do this by adding a Country Selector before the Country Subdivision selector, as illustrated below.

If a user changes the country selected, the list of subdivisions is updated accordingly. To allow more than one set of country & subdivision selectors on a form, a country selector is associated with the closest country subdivision selector it precedes.
For example, if a user changes their Country of Birth above, only the country subdivisions in the State/Province of Birth selector will be updated, those in the State/Province of Residence won't be affected.
To ensure a form works in all scenarios, we recommend you always add a Country Selector on a form whenever you include a Country Subdivision selector. Remember: because the country is automatically preselected, adding a Country Selector adds little if any friction/complexity to a form.
Posted on Sep 25th, 2020 in form builder.
Post a Comment
Introducing the New Account Dashboard
A major refresh of the account section of the site introduces several new tools and capabilities:
- Easily create sub-users and share forms with them with the User Management dashboard
- Review activity in your account in the new Account Activity pane
- Invited users now have their own account dashboard
Contact Information
Many customers rely on FormSmarts to receive timely form notifications critical to their organization. Unfortunately, we’ve been in the past left without any ways to contact some members after all email addresses in their account bounced our emails.
The Contact Information panel of the account dashboard now allows you to set a secondary email address and mobile phone number we will use in situations were we are unable to contact you via the primary email address associated with your account (i.e. your login email).
To set a secondary email, select one of the verified email addresses in your account, or add a new email in the Settings Tab of the Form Builder, verify it, then go back to the account dashboard to set the new address as your secondary email.
If your organization gets its email service as part of a web hosting package, we recommend using your personal email (e.g. Gmail account) as a secondary email.
To set a phone number, enter your cell phone number including the international dialing code (e.g. +1, +44,…). FormSmarts will send you a text message with a code to verify your number. Enter the verification code in the space provided and tap Verify to verify your number, then Update Contact Info to save the new number.
User Management Dashboard
The User Management Dashboard illustrated above allows you to view and manage existing users in your account, create new ones, and change their permissions on individual forms.
Click the button showing a vertical ellipsis to access the Actions menu for the corresponding user.
You can:
- Edit a user’s permissions on your forms and share new forms with them
- Change the email address associated with a user
- Reset a user’s password
- Turn off a user’s two-factor authentication
- Suspend a user
- Permanently delete a user
Create a User
To create a new user, enter their name and select their email address in the list of verified emails in your account. If needed, click the button showing a plus sign to add and verify a new email address.
Click Create User button.
The newly created user doesn’t have any permissions on any of your forms but has implicit permissions. They can, for instance, submit Private Forms.
Share a Form with a User & Edit Form Permissions
Tap the Edit Permissions option in the Actions menu of a user to launch the User Permissions settings.
To allow a user to access submitted data for a form, first share the form with them: select (or search for) a form in the list and click Share.
FormSmarts will give the user the necessary permissions to view a single form entry online, download a copy in PDF, view uploaded documents (form attachments), and add notes and tags to a form entry.
You can adjust permissions to additionally authorize the user to edit a form submission and generate a spreadsheet with aggregated form responses.
Account Activity
The new Account Activity panel allows you to review and audit the session history of all users who have accessed your account in the last thirty days.
A separate table lists Administrator Sessions and User Sessions.
Sign a User Out
Should you suspect or become aware of an unauthorized access to your account while it is still taking place, you can immediately sign the user out and invalidate their session with the Log Out of Other Sessions and Log User Out buttons.
- Click Log Out of Other Sessions to immediately invalidate all administrator sessions other than the one you are currently using
- Select a user in the list of users with an active session and click Log User Out to immediately log them out
Invited User Dashboard
FormSmarts sub-users can also access the account dashboard to perform actions and view information relevant to them:
- View a list of forms you’ve shared with them and actions you’ve allowed them to perform
- Review their recent account activity to check no one else has accessed their account
- Change their password
- Set up two-factor authentication
Posted on Aug 3rd, 2020 in form builder.
Post a Comment
Tags: collaboration, file upload, form attachment, form builder, form to pdf, team, user
How to Set Up a Conditional Form Notification Email Based on a User’s Answer
Conditional Notifications allow a form owner to choose when to receive an email notification based on the value of a field or other conditions on the answer the user provides on a form.
Let’s see how we can benefit from this feature in practice with two examples.
First, consider a questionnaire where we ask customers to rate and give feedback about their experience with various aspects of a service. We’re going to send out invitations for customers to take part in the survey and collect their responses on the cloud. When the survey period is over, we’ll generate an Excel report with the aggregated answers of all participants for analysis. In this scenario, there is clearly no point in sending an email for each and every form submission.

But we wouldn’t want to miss an opportunity to talk to a customer promptly if they indicate on the form they have unfulfilled needs or concerns to address. This is where Conditional Notifications come handy: we want to send an email notification to the Customer Support team only when a customer indicates they need to speak to someone.

We can define the Conditional Notification rule to send an email if a specific checkbox is checked as illustrated above, or when at least one aspect of the service is rated ‘Bad’.
When Should You Use Conditional Notification?
Online forms typically support one of two workflows:
- Form responses are collected “unsupervised” then the aggregated data set is processed or analyzed: this workflow relies on FormSmarts’ Excel report feature to generate a spreadsheet, it doesn’t involve email notifications
- Someone needs to attend to each and every form response, which is time-sensitive, must be processed individually and for which a reply must be sent to the submitter.
Conditional Notification allows FormSmarts members to add an exception to the first workflow by specifying a set of situations where a notification is sent, providing a bridge to the second workflow.
Rules can apply to any properties of a form response: value of input fields, type of form control (e.g. ‘radio button’), field ID, etc and may include logic operators, conditions, boolean operations,… to support a wide range of use-cases.
Second Example: A Screening Questionnaire
In the context of the current COVID-19 pandemic, an employee screening questionnaire provides us with another practical example of a situation where we can use a Conditional Notification to help screen employees prior to returning to work.
The screening questionnaire lists a number of questions describing COVID-19 symptoms to which employees have to reply by ‘Yes’ or ‘No’. All employees have to submit a screen questionnaire, but the sponsor of the questionnaire should only by notified by email if an employee replies ‘Yes’ to any of the screening questions.
When an employee submits their screening questionnaire, the Conditional Notification rule checks the value of all radio buttons on the form and sends a notification if at least one has the value ‘Yes’.
How to Set Up a Conditional Notification
To set up a Conditional Notification:
- Define a Rule: Conditional Notification rules are defined with a formal language for which there is currently no visual rules builder. Until we provide such a tool, contact Support with details of the precise conditions under which you want to receive an email notification so we set up the conditional notification rule for you. Please remember to provide us with the URL of the form.
- Enable conditional notifications: Once we’ve set up the rule for you, edit the form and tap Update email routing policy in the Submit Actions tab of the form builder. Select the Conditional Notification routing policy and save.

Other Email Routing Policies
By default, all destination emails you’ve set up for a form get a copy of every form response. You can change this behavior by setting a different email Routing Policy.
FormSmarts currently has the following Routing Policies:
- Multicast: Every email subscriber gets a copy of every form entry (default).
- User-Selected Recipient: User selects the recipient on the form. Typical use: sending customer inquiries to the relevant person or department.
- Round-Robin: Each subscriber receives form entries in turn. Typical use: sharing workload between collaborators.
- Conditional Notification: Only send a notification if conditions you’ve set on form data are satisfied.
Posted on Jul 9th, 2020 in form builder.
Post a Comment
Tags: conditional logic, conditional notification, routing policy
About the Form Builder Blog
Categories
- booking (1)
- collaboration (6)
- event registration (3)
- file upload (2)
- form builder (52)
- form handler (9)
- form spam (5)
- HTML form (11)
- mobile form (1)
- online form (9)
- payment form (13)