Posts Tagged ‘e-ticket’
Why You Should Add a Calendar Invite to Registration Confirmation Emails
A calendar invitation is a type of email attachment that allows the person to easily add an event to their calendar, often by just accepting a prompt on their phone.
When you create an event registration form, you should always customize the confirmation email and set up a calendar invitation with the details of your event.
Calendar invites are supported by most mail and calendar apps. They typically provide a seamless experience, allowing users to import the calendar entry with your event details by simply accepting a prompt on their phone or computer.
Adding a calendar entry helps people organize their time and save the date of your event. And of course, reminds them to attend!
Calendar invitations are supported by Microsoft Outlook, Apple Mail and Calendar on iOS and Mac OS, and the Gmail and Google Calendar apps on Android, iOS and on the web.
Feel free to try this demo and add the test event to your calendar.
Setting Up a Calendar Invitation for an Event
FormSmarts supports calendar invitations with the confirmation emails associated with all types of forms: the registration and payment confirmation emails we send on payment forms, standard auto-responder emails, and the opt-in confirmation emails users can request on the summary page of a form.

To add a calendar invite to an event registration confirmation email:
- Sign in to the form builder and find the registration form for the event
- Click the button showing a pencil to edit it
- In the Submit Actions tab, click or tap into the Confirmation Email Text box
- Edit the confirmation email text as needed
- Click the button showing a calendar (outlined with a red circle on the image above) to set up an event calendar invitation
Edit Event Information
FormSmarts needs some information about your event to create the calendar invite:
- The event title, which is pre-filled with the form’s title
- The event start date, time, and timezone
- The event location (or URL for an online event)
- The event organizer email. Note that the organizer email is shared in the invite, so use the public email address of the your organization if you have privacy concerns.
- Finally, the organizer name and the event end date and time are optional.

Keep Event Details Up-to-Date
Calendar invites are linked to a specific one-time event, so unlike most form settings, they are not inherited when you make a copy of a form.
Remember to add your event details when you create a new registration form or update them if you use the same form for several events.
Posted on Feb 6th, 2023 in event registration.
Post a Comment
Tags: confirmation email, e-ticket, payment
Automated Form Confirmation Email
FormSmarts autoresponder allows you to send an automatic email confirmation when someone submits one of your forms.

To start sending a confirmation email to form respondents, sign in to the form builder, edit the form, and toggle on Send confirmation email in the Submit Actions tab shown above.
Form Confirmation Emails
The confirmation email option is only available with the default Show confirmation message Submit Action and when you redirect form users to your site. Other types of email confirmations are sent with other submit actions.
Payment Forms
When someone submits a registration form or any other form that involves a payment, FormSmarts sends instead a payment & submission confirmation email. A payment confirmation email is always sent as soon as the payment goes through, there is no need to set it up. You can customize the message text as discussed in the section below.
Confirmation Email On Request On the Summary Page of a Form
The Summary Page option (Show summary with print, email & PDF options in the On Submission drop-down list) allows users to choose whether they want to request an email confirmation or download a PDF receipt.
Edit the Email Message
No matter what types of confirmation emails (autoresponder, payment confirmation or opt-in email confirmation), you can modify the text at the top of the message.
The confirmation email also includes a copy of the information submitted (this is optional for autoresponder messages) and a QR code. You can scan the QR code with your phone to check in attendees at an event or access the form response on FormSmarts to review its payment status and associated notes, check it’s authenticity, etc.
Calendar Invite for Event Registration Forms
 email attachment")
When you create an event registration form, please remember to add the details of the event to your form so FormSmarts can include a calendar invite in the email notification.
A calendar invite is an email attachment in a standard format (ICS) that allows the email recipient to easily add the event to their calendar. Invites are supported by Outlook on Windows, Apple mail and Calendar on Mac OS X, and the Gmail (pictured above) and Google Calendar apps on iOS and Android. Feel free to try this demo.
Note: Payment confirmation emails will only support calendar invites from mid-May 2021. We will announce the release on Twitter and Facebook, please follow us for updates.
Reply-To Email Address
You can designate a public email address in the Contact Info section of your account.
If set, we use your public email as the Reply-To address of confirmation emails. This allows recipients to reply directly by clicking the Reply button of their email app.
Public email address changes may take up three hours to propagate to all your forms.
Email Sender Name
The name of the sender is derived from the company or organization name set in your account.
Changes may take up three hours to propagate to all your forms.
Posted on May 3rd, 2021 in form builder.
2 Comments
Tags: confirmation email, e-ticket
Personalize the Payment Confirmation Email
FormSmarts now allows customers1 to change the text part of the confirmation email we send to form users once their payment has been confirmed, as highlighted below.
If you use FormSmarts for online event registration forms, edit the confirmation message to remind attendees of the date and time of the event, provide information about the venue location, and ask them to print a copy of the message or have it ready for inspection on their phone on the date of the event.
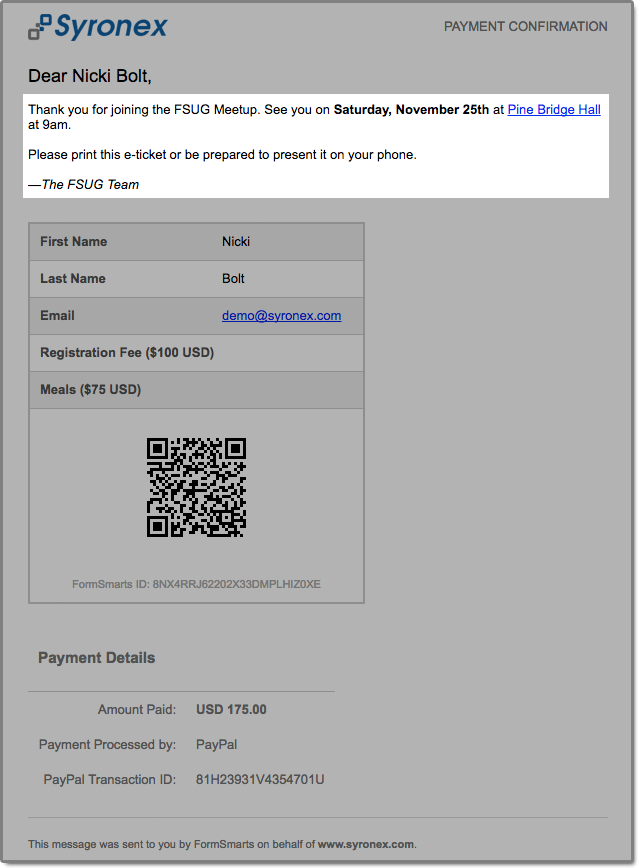
To edit the confirmation message, log in to the form builder and click/tap the pen icon corresponding to the form you would like to edit, then visit the Submit Actions tab.
You can emphasize a section of the text with bold or italics and you may include links and bullet points. The text can be formatted using the buttons provided or with the same Wiki-like syntax you can use elsewhere on your forms.
Use the Preview button to visualize the formatted output of the message.
As always, we value your feedback about this feature.
Note: If you have verified your site and uploaded the logo of your organization to FormSmarts, it will appear at the top of the message.
1 The confirmation email can only be customized with a Business Plus account or above.
Posted on Sep 22nd, 2017 in payment form.
4 Comments
Tags: confirmation email, e-ticket
How to Issue an Invoice or Support Check & Cash Payments
Your can allow form users to get an invoice by specifying prices, fees and quantities directly on a form. When FormSmarts detects an amount of money on a form, we compute the total amount and show it on the confirmation page, the PDF receipt, and in the confirmation email.
FormSmarts helps you generate invoices and manage check and cash payments by showing the total amount due on the printable Summary Page of a form and in the confirmation email and PDF receipt that users can get on that page.
- Use this to generate an invoice when someone submits an order form
- If you’re using our popular payment form feature to collect online payments on your membership and registration forms, chances are that some of your customers will want to pay by check, cash on site or by any other offline payment methods. Use this feature to offer an offline payment option for your online payment forms.
When a form is set up to show a Summary Page when submitted, users may:
- Request a confirmation email
- Download a PDF receipt
- Print a copy of the information submitted with the form

Fees and priced items must be formatted with the FormSmarts payment integration syntax.
As illustrated above, the printout, PDF receipt and confirmation message all include a QR code to help you process payments more reliably and effectively.
Check Payments
- Ask users to enclose a printout of the Summary Page with their check
- Scan the QR code with any phone or tablet to access the corresponding form entry on FormSmarts
- Update the form entry’s payment status with a tag and add a note to record the check number
Cash Payments on Site
The Summary Page can also help you manage cash payments by allowing guests to show their confirmation email or PDF receipt (a.k.a. e-ticket) on their phone (or their printed receipt), that staff can scan to update the registration on FormSmarts. Since the amount due also appears in form response notification emails and PDFs, check-in staff can also reconcile e-tickets with the list of notification emails or registration PDFs even if there is no network connectivity.
How to Make an Offline Payment Form
- Create an online payment form with fees formatted as documented
- When you’re satisfied with the result, make a copy of the form with the Duplicate Form button ( icon) in the Forms Tab of the form builder
- Rename the form and set On Submission to “Show summary with print, email & PDF options” in the Submit Actions tab of the Form Details screen.
The Summary Page supports the same payment-related features as payment forms (except those for recurring payments), including discounts and discount codes.
Can I Accept Online & Offline Payments on the Same Form?
One of the benefits of FormSmarts payment integration is that we won’t notify you until the person has paid so you don’t have to check this yourself each time. If you have a form allowing both online and offline payments, you won’t know which customers have paid online, so you’ll have to review each and every form response.
For this reason, we recommend that you create a copy of the form specifically for check payments and use the Summary Page setup described in the previous section, especially if there are several charges and fees on the form. You’ll then only have to track payments for entries pertaining to that form. You can make a copy of a form in a click with the Duplicate Form button in the upper right-hand corner of the form builder.
Offering a Check Payment Option on an Online Payment Form
If you are making a simple payment form that has a single payment option, you can alternatively include a check payment option on the form using radio buttons or a dropdown list with two options:
Registration Fee ($30 USD)
Registration Fee (pay by check)
If the user doesn’t select the online payment option, FormSmarts will skip the payment step and send you the form entry immediately.
Note that people paying by check won’t receive any confirmation email.
Posted on Aug 21st, 2017 in payment form.
2 Comments
Tags: e-ticket, payment, pdf receipt, summary page