How to Create an Online Form
FormSmarts allows anyone to create a form quickly and easily with our interactive online form builder. The video below shows how to build a simple contact form. Follow the detailed instructions in this guide to create a more complex form, such as a survey or online membership form.
Advanced topics of the form builder like payment integration, form attachments and email recipient management are outside of the scope of this document. Visit the Help section of the website for an extensive coverage of these topics.
Create a Form
To create a form, visit the form builder section of the website. You can access the form builder with the My Forms link at the top right-hand corner of every page. The form builder will walk you through the three steps needed to generate a fully functional web form in minutes and add it to your site:
- Choose a name and title for the form in the Forms tab of the form builder
- Add input fields to the form in the Fields tab of the form builder
- Grab the form's URL or embedding code to integrate the form onto your site
Sign In to FormSmarts
First, sign in to the online form builder using the email address registered on your account and your password. If you haven't got an account yet, create an account now. Make sure you visit the link in the email message we'll send you to activate your account. You won't be able to log in unless your account has been activated.
You are now ready to create an online form.- Enter a friendly form name, for your own use
- Enter a title for your new form. The title should be short and descriptive.
- Next, optionally enter a return URL. This is the URL (i.e. web address) on your website where users will be sent to after the form has been submitted.
- Finally, you may optionally add form filling instructions. Any text you enter will appear at the top of the form. Instructions may include links and basic formatting.

Hit the Create Form button.
Add Input Fields
You now need to populate the form with input fields, where users will be able to enter information.Notice that we've now switched to the Fields tab of the form builder. The Fields tab lists all fields attached to the form, and allows you add new fields, edit fields, and change the order fields appear on the form.

To add fields:
- First, select an input widget. If you are building a simple contact form you will only need single-line Text Boxes (i.e. HTML text control) and multi-line Text Areas (i.e. HTML textarea). FormSmarts also supports the other types of HTML form input fields for users creating more complex online forms. You'll find advice on choosing the correct input field below.
- Enter a field name. This is the name/label of the input field like First Name or Email. This may also be a question e.g. How would you rate the service?
- Next, for text boxes only, choose which content form users are allowed to enter in the field. For example, you should select Email for an email field and Positive Number for somebody's weight. This defines which characters and format are accepted in that input field. Selecting the correct type is important to allow form validaton. Refer to the table below for guidance. Note that the form builder can often automatically pre-select the relevant Allowed Content based on the field's name.
- Specify whether the field is optional or not. Users won't be able to submit the form without providing a value for all required input fields.
- Last, optionally enter a field description. The description should indicate the field's intended content to help the user. For example, the description of a “Message” field could be “Your message to the webmaster”.
Now that you've added input fields, the form is fully operational. You can try it, publish it online and start using it.
Want to collect form entries on FormSmarts and download an aggregated Excel report? Remember to enable form data storage for each of your form!
Field Data Types (aka ‘Allowed Content’) Reference Table
| Data Type | Example Use | Description |
|---|---|---|
| Letters | person's name, profession | Field may only contain letters A to Z, spaces, and hyphens “-” |
| Letters + Numbers | postal address, zip code, phone number | Field may only contain letters, numbers, commas, question marks, spaces, and hyphens “-” |
| email address | A single email address | |
| URL | URL | A single (URL) web address. Only HTTP is currently supported for the protocol part of the URL. |
| Positive Integer | number of items purchased, age, year | Up to 9223372036854775807 |
| Number | price | Any valid number, positive or negative, up to 9999999.99 |
| Date | date of birth, booking date | A valid date. Displays a date picker. |
| Phone Number | phone or fax number | Any local or international phone number. |
| Country | a country | Shows the standard list of countries. Note that the country of residence of the visitor is automatically pre-selected. |
| Any Text | comment | Any alpha-numeric character and punctuation. Only use this input field type when no other type applies. |
How to Edit a Form
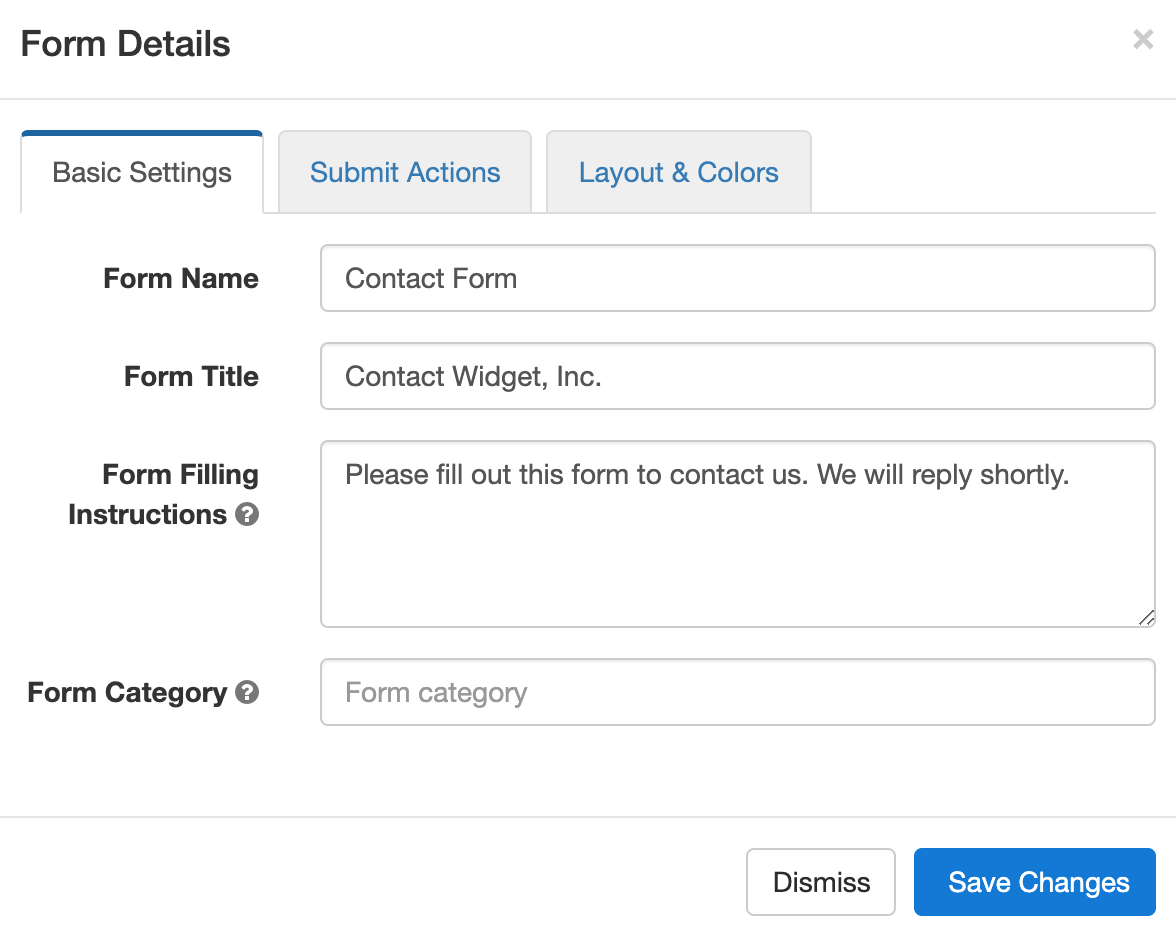
To edit a form, visit the Forms Tab of the form builder and click or tap the pen icon corresponding to the form you want to modify. The Form Details screen of a form lets you change all its properties.
The Basic Settings tab allows you to edit a form's name, title, form filling instructions and category.

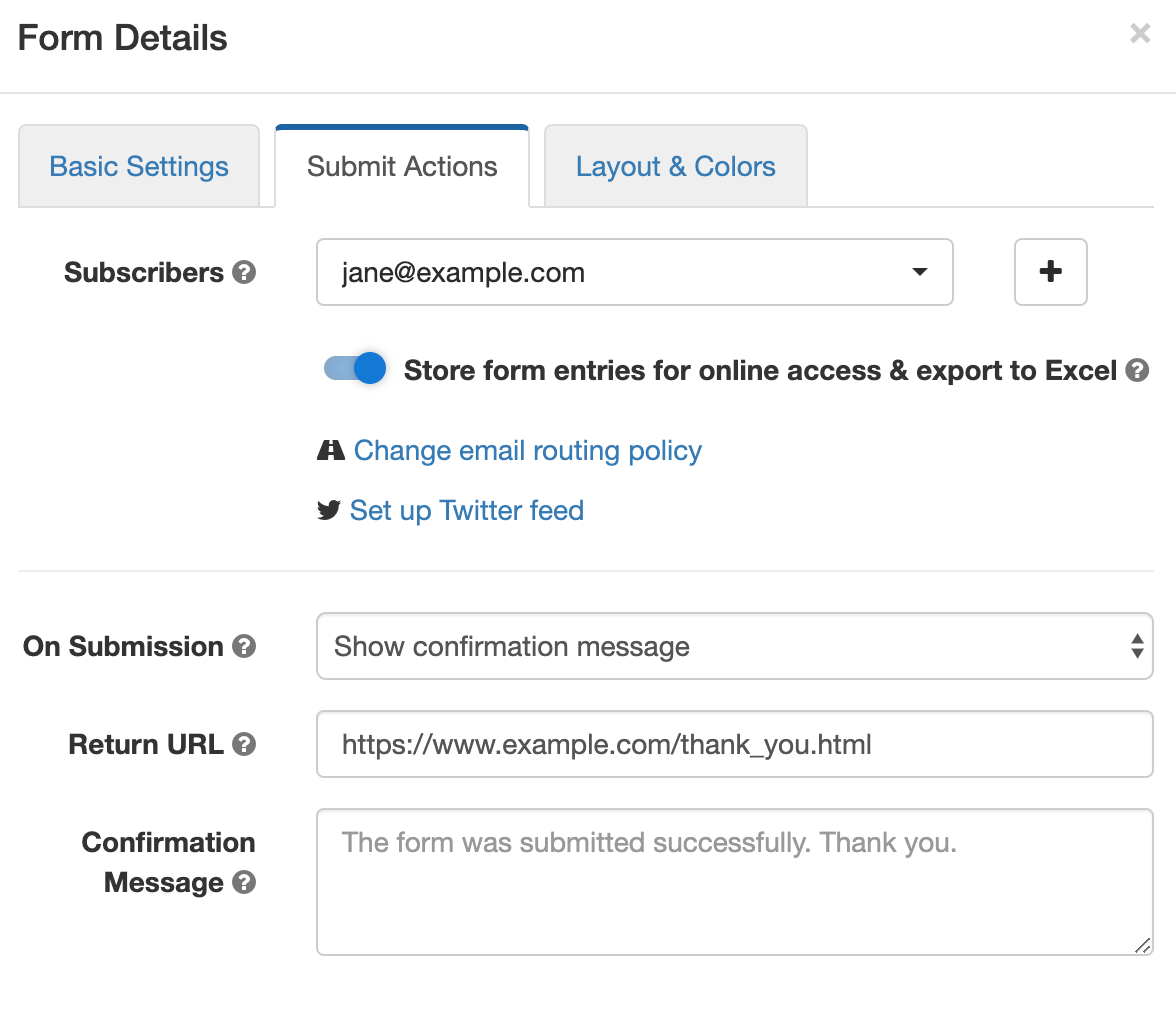
Visit the Submit Actions tab to change the destination emails of the form, stop or resume storing form responses on FormSmarts for online access and export to excel, and change the form's email routing policy.
The Submit Actions tab also allows you to change the main action performed when a form is submitted: from simply showing a confirmation (thank you) message — the default, to collecting a payment (integrate with PayPal) or redirecting the user to your website.
This is also where you would change a form's return URL and confirmation message, and edit the text of the confirmation email sent by FormSmarts when a payment form is submitted and paid.

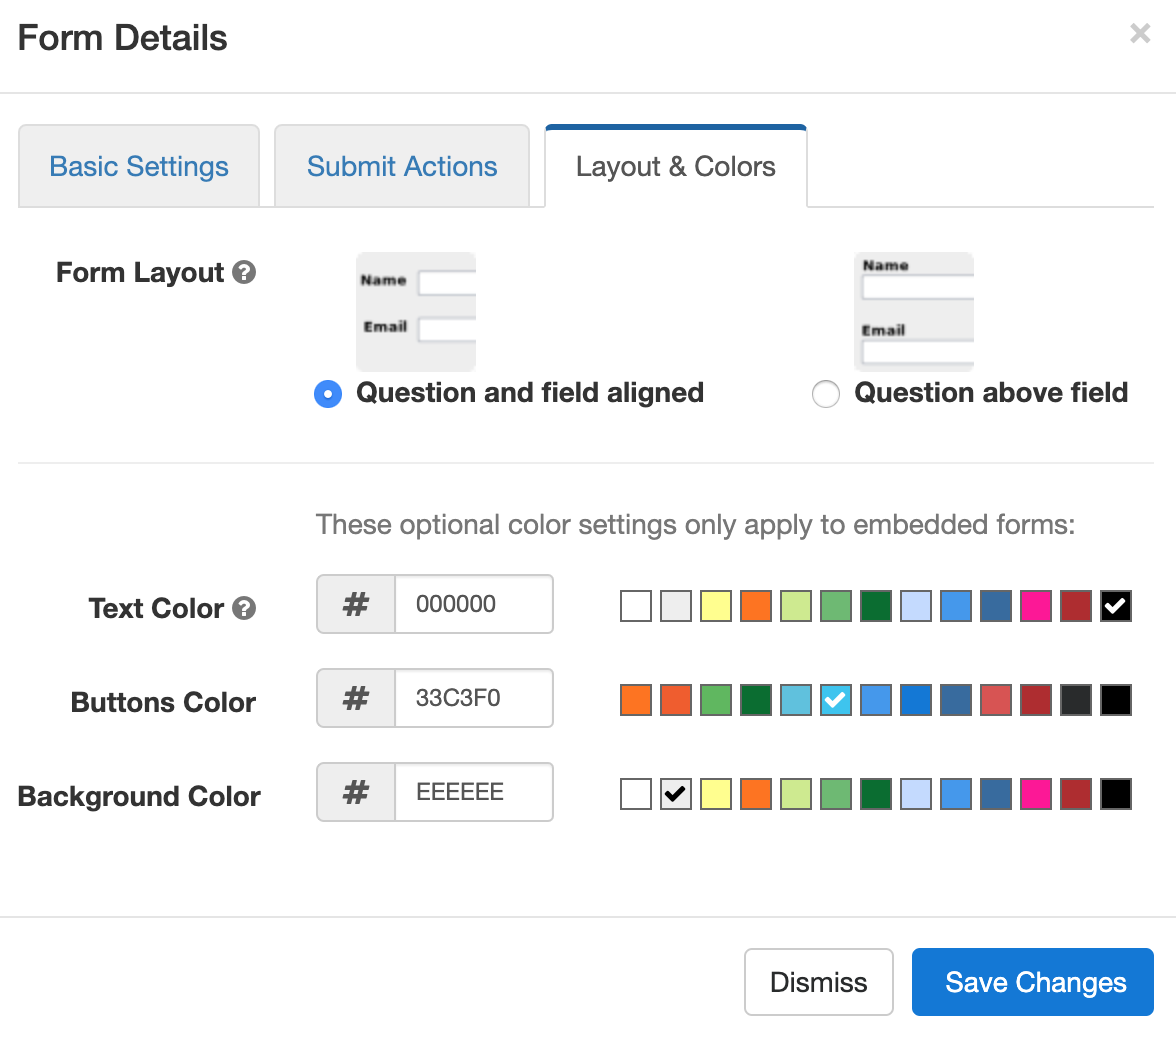
Head to the Layout & Colors tab to switch form layouts and change the colors of a form and of its buttons.
How to Duplicate a Form
You can create a copy of a form in the Forms Tab of the Form Builder:- Select the form you would like to copy in the list
- Click the duplicate button in the upper-right hand corner of the Form Builder, as illustrated below.

How to Delete a Form
You may delete a form in the Forms tab. Click on the icon corresponding to the form you wish to remove, and confirm. Deleted forms cannot be recovered and all stored entries and form attachments will also be delete. If you only need to temporarily suspend a form, disable it as explained in the next section.How to Temporarily Disable a Form

Editing, Reordering & Deleting Fields
Editing an Input Field
To edit the details of a field, visit the Fields tab of the form builder and click on the icon corresponding to the field you wish to modify.For each of field, the Field Details screen lets you change all field properties. The form's name, description, data type, widget, and optional status can all be changed from that page.

Reordering Fields
You may sometimes need to change the order in which input fields appear on a form. In the list of fields, use drag & drop to move each field to the position you want.Deleting a Field
To remove an individual field, visit the Fields tab, and lick on the trash can icon corresponding to the field you wish to delete.Publish Your Forms
Because FormSmarts hosts your forms, publishing a form is as easy as posting a link. We give you two options to let your visitors access your forms: embedding and linking.Embedding a Form on a Page of Your Site
To embed forms on your website, simply copy the code snippet given in the Forms tab of the form builder into the HTML source of a page of your site. You will then need to upload that page to your web server in the usual way.Note that if you embed a form on your website:
- we won't be able to automatically adapt the form layout to the different types of browsers and devices, like cellphones & mobile devices and regular desktop browsers
- your form will not be available if your site is down or slow
Sharing a Form URL Online
Alternatively, you can simply post the FormSmarts-provided form URL or shortened URL anywhere you want on the web:- use the form URL to place a link on your website or blog
- share a link on Twitter, Facebook, etc.
- use the form on ebay to communicate with potential sellers
- include the form URL in emails (restrictions apply)
Sharing a Form Offline
FormSmarts provides a QR code for each form in the Form Publishing Options screen of the form builder:- Add the QR code on posters and documents so users can scan it with their phone and directly access the form
- Also print the form's shortened URL on paper documents
Review Optional Settings
You may optionally customize your web forms in the Settings tab of the form builder.Setting the Destination Email Address of a Form
When you make a new form, it sent to your login email address by default. If you would like form responses to be sent to a different email address or want to have them sent to multiple email recipients, you will first need to add the email addresses to your account. You will then be able to change the recipients of a particular form in the Forms tab of the form builder.Setting a Form Owner Name
You can increase form users trust and confidence by verifying the ownership of your site. FormSmarts will then display your verified site URL on your forms.Brand Your Forms
We advise you to brand your forms with your own logo whenever your visitors will be accessing forms by their FormSmarts URL. Your logo will then be displayed in the top left corner of your forms, thus increasing their visual appeal and user recognition.Choosing the Right Form Control
Part of designing effective an form is selecting the right input field widget, a.k.a form controls. Here are some tips to help you choose.Text Field
- Use a text input field when you expect a short, one line answer
- Example use: name, email
Text Area
- Use a textarea for open questions, or when you expect a long, multi-line answer
- Example use: comment, message
Radio Botton
- Use radio-buttons to provide a range of predefined values
- Example: rating (good, average, bad)
- For more than three or four options, a drop-down list may be more suitable
- Can be used for yes/no questions instead of a checkbox
- If the field is optional, the first item of the list is selected by default
Drop-Down List
- Use a drop-down list (HTML select field) to provide a range of predefined answers
- Example: referral/how did you find us?
- Use preferably if there are many options, or if the description of each option spans several words
- Do not use for yes/no questions
- We currently do not support multiple selections. Use checkboxes instead if you need multiple selections.
- If the field is optional, the first item of the list is selected by default
Checkbox
- Use for statements the user must agree to
- If the the check box is mandatory (i.e. not optional), the user won't be able to submit the form unless the box is checked
- Example use: Subscribe to the newsletter
- You can use radio-buttons instead to give more weight to the choice
- Checkboxes are unchecked by default
- If you want to ask a question and provide a list of options for the answer, use a checkbox list instead.
Checkbox List
- Use a check-box list to provide a question with a list of yes/no answers (i.e. checked/unchecked) where the user may select multiple answers
- If the check-box list is set as optional, users will be able to submit the form without selecting any answers
- If the check-box list is required (i.e. not optional), users will not be able to proceed unless they have checked at least one box in the list
- Checkboxes are unchecked by default.
Form Attachment
- The file upload widget allows users to attach a picture or document to a form.
Electronic Signature
- The electronic signature widget allows a user to sign a form online.
Agreement
- Use an agreement widget when you need the person filling out a form to agree to a (usually lengthy) statement on a form
- Good for waivers, liability releases, contracts (terms & conditions, privacy statement) and policies
- Users can read the agreement document in a scrollable area on the form, pop it out to a larger window or read it full screen as needed.