Archive for June, 2008
How to Lay Out Form Input Fields
Your goal as a web publisher is maximize the number of (legitimate) respondents to your forms. A first step towards this goal is to lay out your forms in a way that is intuitive to users, makes forms faster to fill in, and minimizes form validation errors.
It follows four points you should consider when designing a web form:
- choose the most appropriate input field widget for the situation
- group fields together within logical sections
- place multi-line text input fields (textarea in HTML) towards the bottom of the form
- group optional fields together at the bottom of the form
The first point is discussed in details in FormSmarts documentation.
The second point commends, for example, that when you ask people about their contact details, you group all relevant fields (first name, last name, email,…) together. We found that most form designers tend to do that right. The form builder will in the future allow users to define different logical (and visual) sections within web forms.
Multi-line text input fields obviously tend to take longer to fill in than other input fields. They require more effort, thinking and typing, so place them after other fields. Visitors will be less inclined to abandon the form altogether if they have already spent time completing the first part of the form.
The last point is about grouping optional fields together at the bottom of the form. This allows people to quickly review the remaining questions, and skip the fields they don’t want to fill in or don’t apply to them. This may of course conflict with grouping fields within logical sections. In that case, place optional fields at the end of each logical section.
We’ve now enabled comments, and we warmly welcome your thoughts and feedback about this post. if you’re reading this by email, just click on the title to post a reply.
Posted on Jun 29th, 2008 in HTML form.
4 Comments
Tags: form builder, form design, howto, input field, web forms
Ever Wished You Could Reorder Fields?
The set of form-making operations supported by FormSmarts form builder was up to now almost complete, allowing to:
- create a form
- delete a form
- edit form properties (name, title, return URL, form filling instructions, recipient email account)
- add a form input field
- delete a field
- edit field properties (name, description, field type, input widget, optional/required)
The last unsupported operation was to allow users to easily change the order in which fields appear on a form. This is often needed to:
- group fields logically
- group optional fields together at the bottom of a form
- insert a field in a existing form
- move fields around to increase the visual appeal of a form
Reordering fields manually is tedious, as it involves deleting and re-creating fields.
No more. Reordering fields is now a trivial drag & drop: in the fields tab, drag the field you want to move, and drop it in the position you want.
As usual, we welcome your comments and suggestions about this feature.
Posted on Jun 20th, 2008 in form builder.
5 Comments
Tags: form builder, form design, input field
Text & Background Colors in Embedded Forms
As already mentioned in another post, we are soon going to allow FormSmarts users to customize the look of web forms. This applies in particular to embedded forms.
At this time, the form text color is black, and the form background is transparent. This leads to an issue when the page hosting the form has a black background. If you are affected by this problem, please contact us so we change the text color of your forms to white.
We welcome your suggestions about form look/style configuration options you would find useful, besides colors and border.
Posted on Jun 17th, 2008 in HTML form.
Post a Comment
Tags: embed, web forms, widget
Managing Email Accounts & Form Recipients
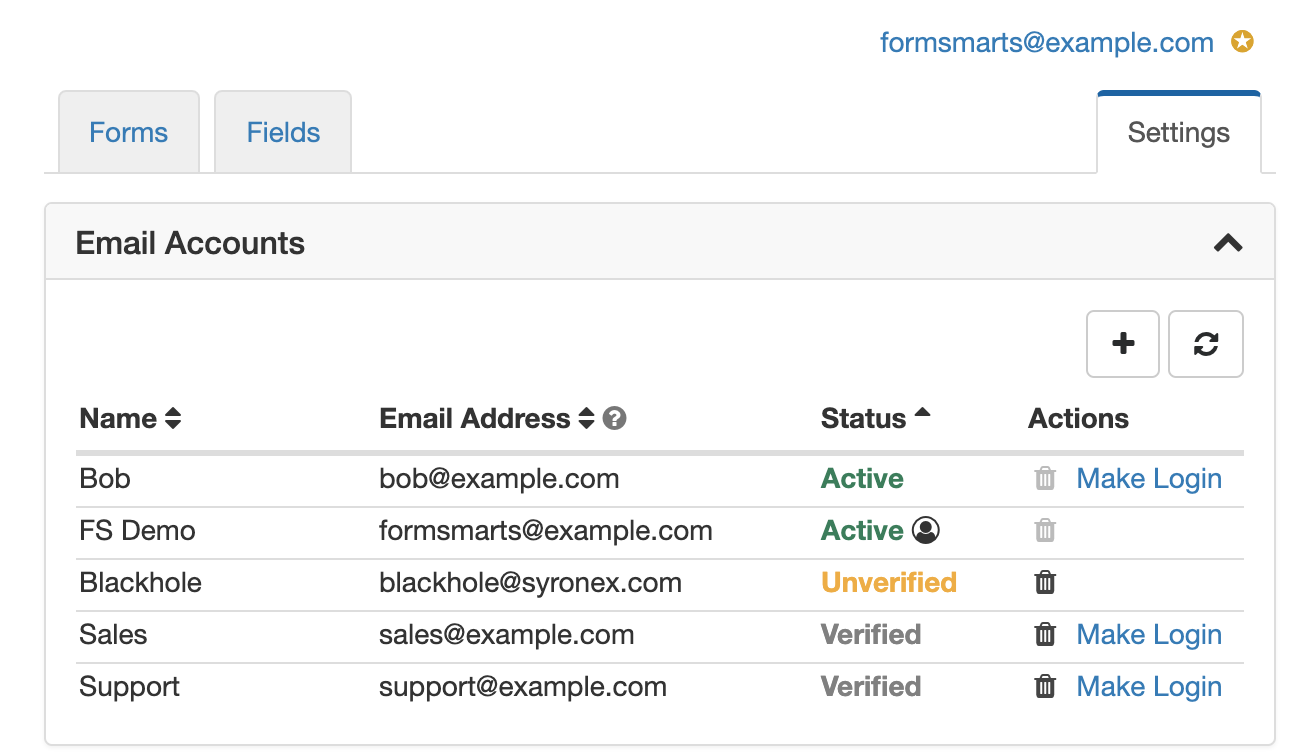
You can manage the email addresses linked to your FormSmarts account in the Settings tab of the online form builder, under Email Accounts.
Adding an Email Account to FormSmarts
Before you can start using an email address as the destination email of a form, you must add it to your account and verify it.
To add a new email account to FormSmarts, visit the Settings tab of the form builder. Click the Email Accounts link and enter a name and email address under Add an Account.
FormSmarts verifies that the owner of an email account agrees to his email being used by sending a verification link. Once the email account owner has visited the verification link, the status of that email address will change to Verified. Use the Refresh button to check if a newly added email account has just been verified. You can start using an email address as a form subscriber or as your FormSmarts login as soon as it shows as Verified.
Changing the Destination Emails of a Form
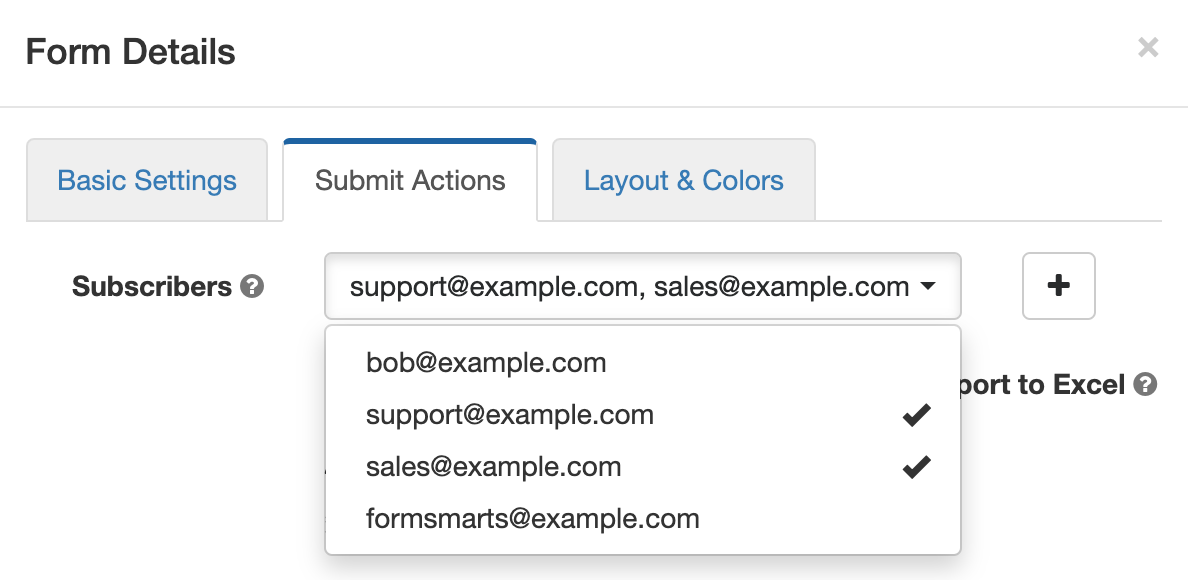
When you create a new form, responses are sent to your login email address by default. To have a form sent to another email account (or email accounts):
- Add a new email address to your account as described in the last section.
- Click on the icon showing a pen to edit the relevant form and check or uncheck email subscribers as required in the Submit Actions tab as illustrated on the screenshot above.
Note: An email address will only appear in the list after it has been verified (see previous section).
Changing Your Login Email
You can set any of the verified email addresses registered on your account as your FormSmarts login. Note however that you won’t be able to use an email address as you login if it’s already the login of another account.
A user icon is displayed next to your login email address.
Note: Any email addresses that you use as your login or form recipient has the Active status and cannot be removed (the corresponding trash can will be grayed out).
Removing an Email Address From Your Account
To remove an email address from your FormSmarts account, Visit the Email Accounts pane of the Settings tab and click on the trash can icon corresponding to the email address you want to remove.
Trash can icon grayed out? The trash can icon will be grayed out if the corresponding email address is still in use as a form recipient by at least one form or is the account’s login. To remove the email address, first edit each of the forms in the Forms tab and uncheck that email address under Form Subscribers (see screenshot above). Then go back to the Settings tab, refresh the list of email accounts, and click on the relevant trash can icon.
Give Feedback!
We welcome your feedback about this feature. This will help us improve it in the future.
Posted on Jun 16th, 2008 in form builder.
25 Comments
Tags: form builder, form recipient, form results
Changing a Form’s Recipient Email Address
We get many emails from users asking how they can modify the email address held on their FormSmarts account.
At this time, each FormSmarts account is bound to a single email address. The address is used both as the account username, and as the recipient of all the forms on the account.
We will soon be upgrading FormSmarts Form Builder to provide more flexible email address management.
Users will be able to:
- change the login email address
- specify a different recipient email address for each form
Posted on Jun 10th, 2008 in form builder.
2 Comments
Tags: email notification, form builder, form recipient, upcoming