Posts Tagged ‘form recipient’
How to Share a Form with Others
If you ever shared your password with a collaborator so they can download form attachments or view a report, read on. You should instead invite them to your account and share the form with them.
How Do I Invite Someone to My Account?
You invite others to join your account by creating a user for them. Once someone has joined your account, you can share a form with them and allow them to perform actions like:
To create a user, first add the person’s email address to the Settings tab of the form builder. Once they’ve verified their email, head to the user management dashboard of your account.
Enter the user’s first and last name, select their verified email address, and click Create User. We’ll email them to let them know they can now log in to FormSmarts, but we won’t give them their auto-generated password: please send it either by IM or voice call.
How Do I Share a Form With a User?
To share a form with a user, tap Edit Permissions in the Actions menu corresponding to the user, as shown on the screenshot above.
Select the form you want to share at the bottom of the Edit Permissions screen (shown below) and click Share.
Toggle permissions on/off as needed to allow the user to perform specific actions only.

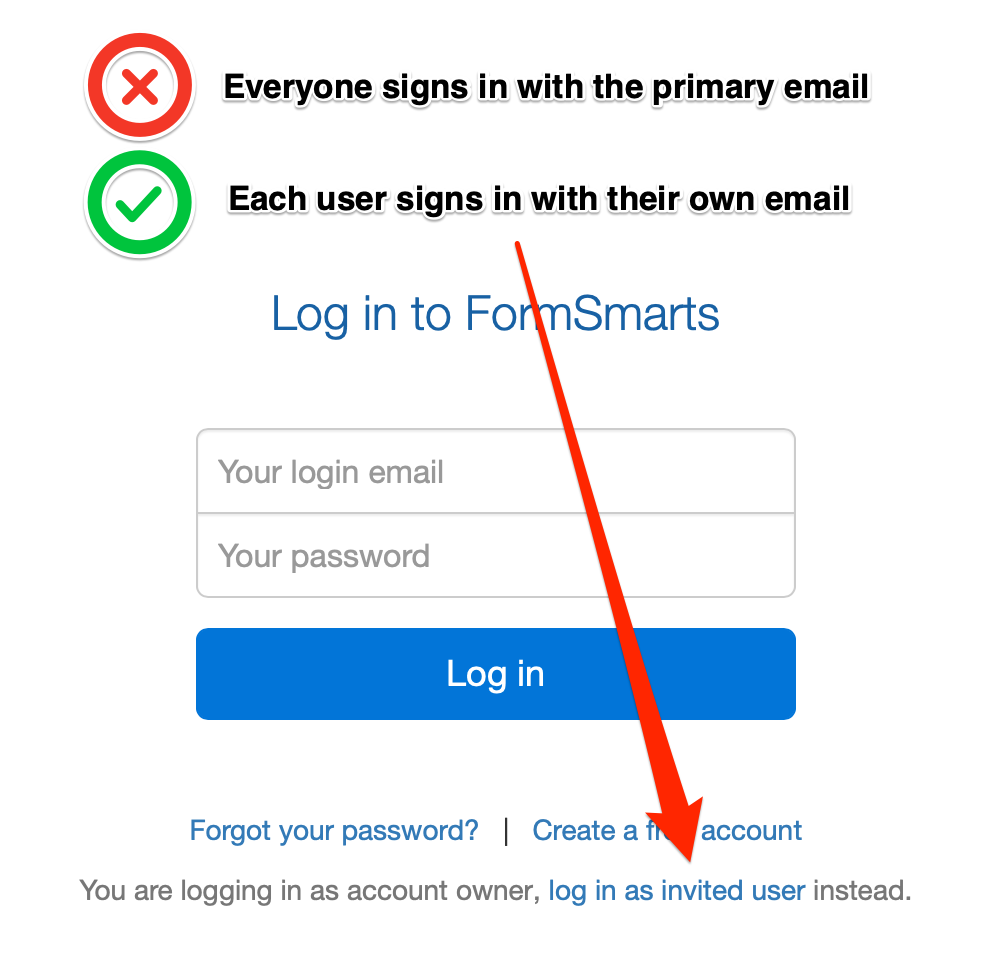
How Can Users Sign In?
To sign in to your account, a users must select Log in as Invited User on the log in page and enter your Account Alias in addition to their email and password.
Your Account Alias uniquely identifies your account on FormSmarts. You need to create an account alias to allow users to log in.
Posted on Mar 29th, 2021 in form builder.
Post a Comment
Tags: collaboration, form attachment, form recipient, team, user
Engage Users via Twitter & Facebook to Increase Form Conversion
FormSmarts allows you to better engage with your user community by adding a social component to your online forms. The assumption with social networks is that a user is more likely to perform an online action such as filling out a form, registering for an event or sign up for a class if she knows that her friend or colleague has already done so.
Online Forms Get Social
For each form, FormSmarts allows you to set up a message template that will be used to post an update to social networks when the form is submitted. The message can incorporate any information entered on the form.
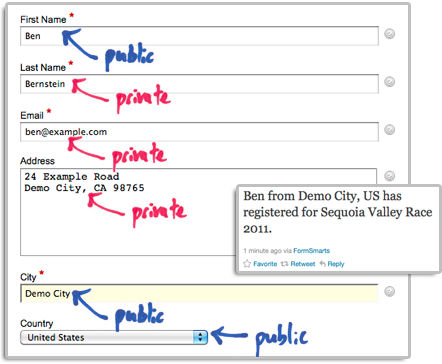
The user’s expectation when filling out online forms is that the information submitted will only be disclosed to the form owner, and you clearly need to ensure you don’t leak personal information (more about this in the last section). We define two types of input fields on a form. Those which will be populated by information which—taken out context—is so general that it can be safely disclosed, and those which should be kept private. In the example below, we deem First Name, City and Country as public, while all other fields are deemed private.
How to Set Up FormSmarts to Post Twitter Updates
First connect your Twitter account with FormSmarts to allow FormSmarts to post tweets on your behalf. You will be taken to Twitter for authentication and asked to authorize FormSmarts to post updates using your account. You will only need to do this once. Note that FormSmarts will not have access to your Twitter password. Once this is done, Twitter will send you back to FormSmarts.
Next click on Twitter Feed Setup in the Form Details screen of the form builder. Enter a short text using placeholders $1, $2, $3,… where you want the value of the corresponding input field to be inserted. Use $1 for the value of the first input field, $2 for the second, etc., in the order fields appear on the form.

Posting Updates to Your Facebook Wall
When someone submits a form, FormSmarts can post an update to your Facebook wall via the Twitter App for Facebook. First set up FormSmarts to post updates to Twitter as described in the previous section, then add the Twitter App to your Facebook page or profile. We will add native support for Facebook if there is demand—please let us know here. (Note: if you ended up here while looking for information on integrating an online form to Facebook, read this).
Respecting the Privacy of User Information
Protecting the information of your users is of paramount importance. When someone submits his information via an online form, he does it with the implicit understanding that his personal information will not be disclosed.
- Add a privacy note on the form (like on this demo) to ensure people understand that some none-personal information will be posted to social networks. Say what information will be published.
- Make sure you’re using the correct placeholder (e.g. $1, $2,…) in the message template. Remember that $1 will be replaced by the value of the first input field in the order they appear on the form, $2 will be replaced by the value of the second input field, etc.
- If you change the order of fields on the form, don’t forget to update the message template with the correct placeholder name.
- Always test the form after setting up a Twitter feed or changing field order.
To further prevent the leak of confidential information, FormSmarts will not publish Twitter updates for SSL secure online forms, even if this has been set up through the online form builder.
How to Disable a Twitter Feed
If you no longer want FormSmarts to post a Twitter update when a form is submitted, simply erase the message template in the Twitter Feed Setup screen (pictured above) and save changes.
Posted on Dec 13th, 2011 in form builder.
1 Comment
Tags: facebook, form builder, form recipient, form results, form submission, pro, twitter
Get Online Forms as HTML Email or PDF
The email format we use to send form responses is flexible and supported by all desktop, web-based, and mobile email clients. Plain-text emails however become tedious to read and process for long forms and when form results must be printed for processing, e.g. for mortgage application forms, quote request forms, and many types of forms in the insurance and real estate industries.
Get Form Responses in Rich-Text Format
FormSmarts users now have the option to have form submissions sent formatted as a table in a rich text (HTML) email.

The main advantages of HTML emails are:
- Form reports are shorter
- Look is more appealing online and printed
- Email addresses, web links, and callto links (e.g for Skype) will launch the relevant application when clicked, as long as the field type as been set correctly.
To start receiving form results in HTML, change the Email Format to HTML Email in the Settings tab of your account.
Customize the Subject of Form Response Emails
With Business accounts, the subject line of form response emails can be customized on a form-by-form basis via the API Console as explained in the API documentation. The subject line template may include parameters that will be replaced with the form’s name, its ID, the FormSmarts reference number of the form submission, or the value of a particular input field.
| Parameter | Description |
|---|---|
| $form_name | Form name |
| $form_id | Form ID, e.g. 196x for form http://f8s.co/196x |
| $fs_ref_num | The FormSmarts reference number of the form submission |
| $1, $2,… $n | The value of the nth input field. The data type of the field must be one of Letters Only, Letters+Numbers, Positive Integer, Number, Country, Date, or the value of a drop-down list, radio buttons or checkbox. |
Email subjects can’t be customized via the form builder at this time.
View Form Responses Online or Get a PDF Report
Business-level customers can view form data online and download a copy in PDF using the links located at the bottom of email notifications.
Note: This feature requires that data storage be enabled for each of the forms for which you would like to be able to access form responses online.

Download a PDF
To download a form response in PDF, use the Download PDF link at the bottom of the email notification. If you’ve deleted the message (or have turned off email notifications), generate an Excel report and locate the form entry. Use the link corresponding to the form entry to access it on FormSmarts and download a PDF.
View & Manage Individual Form Responses
FormSmarts allows users to view and manage each individual form entry online via the View online & add notes link in the email notification. If email notifications are turned off or you have deleted the message, download an Excel report and locate the form entry. Use the link corresponding to the form entry to access it on FormSmarts.
You can also work out the URL of a form response if you know its Reference Number: assuming the Reference Number of a form entry is QR6SADIWB4THC6H9S94635LA, its URL is https://f8s.co/e/2QR6SADIWB4THC6H9S94635LA.
Manage a Form Response
View a form response on FormSmarts add notes or comments about it, download a copy in PDF or delete it.
Form Response Metadata
In addition to form data, the page contains additional information that is not accessible by other means like the timestamp associated with the entry and the IP address and approximate location from where the form was submitted.
Posted on Jun 4th, 2009 in form handler.
15 Comments
Tags: email notification, form recipient, form results, form to pdf
Send Form Results to Multiple Email Addresses
We’ve updated FormSmarts form builder and form processing back-end to allow several email subscribers for each form. We’ll be releasing more subscription mechanisms later this month.
Before using an email address as a form recipient, you first need to add it to your account, and verify it. You can change the recipients of a form in the Form Details screen of your account.
The number of email subscribers allowed for each form depends on your plan.
Posted on May 31st, 2009 in form builder.
4 Comments
Tags: collaboration, form recipient, form results
Managing Email Accounts & Form Recipients
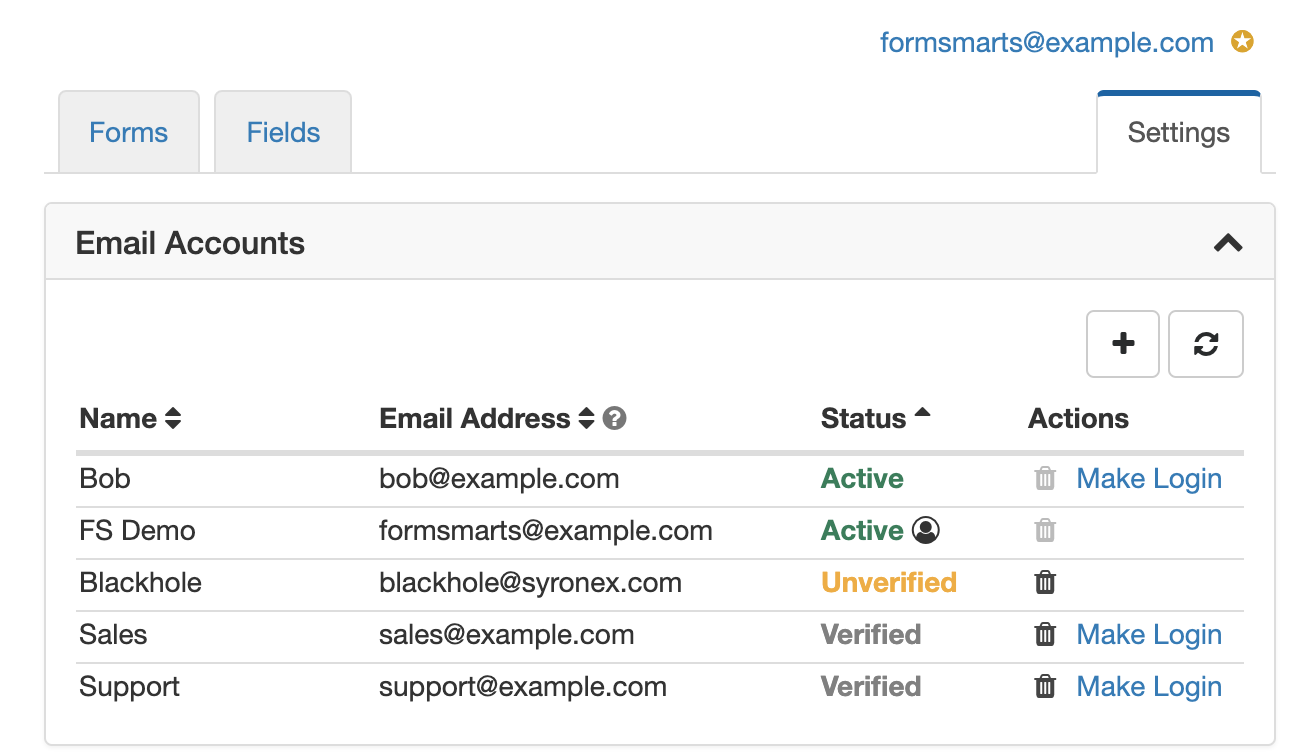
You can manage the email addresses linked to your FormSmarts account in the Settings tab of the online form builder, under Email Accounts.
Adding an Email Account to FormSmarts
Before you can start using an email address as the destination email of a form, you must add it to your account and verify it.
To add a new email account to FormSmarts, visit the Settings tab of the form builder. Click the Email Accounts link and enter a name and email address under Add an Account.
FormSmarts verifies that the owner of an email account agrees to his email being used by sending a verification link. Once the email account owner has visited the verification link, the status of that email address will change to Verified. Use the Refresh button to check if a newly added email account has just been verified. You can start using an email address as a form subscriber or as your FormSmarts login as soon as it shows as Verified.
Changing the Destination Emails of a Form
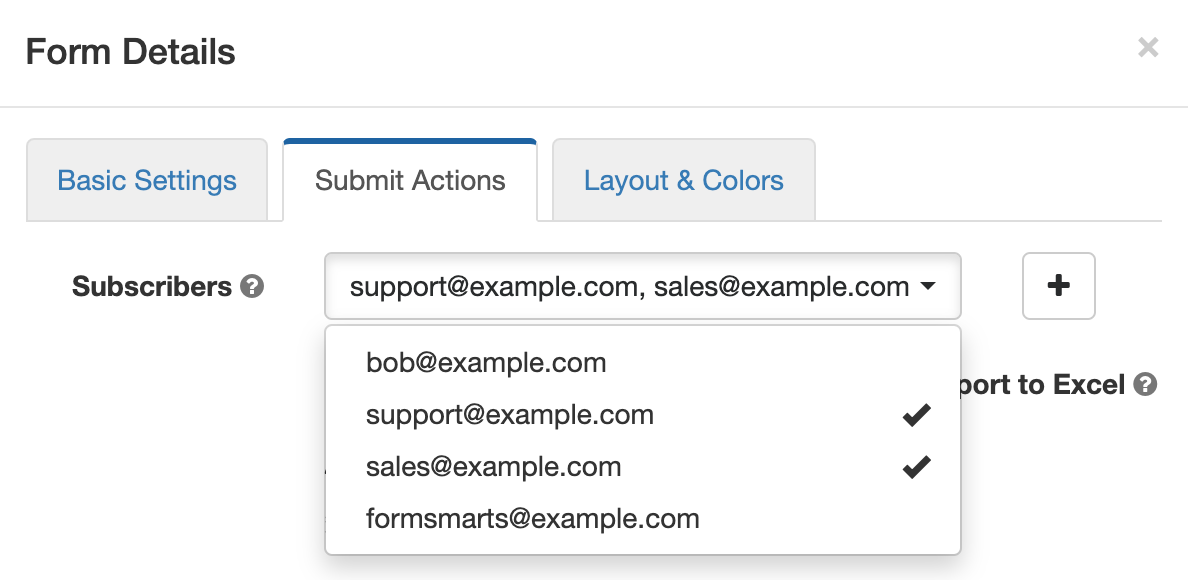
When you create a new form, responses are sent to your login email address by default. To have a form sent to another email account (or email accounts):
- Add a new email address to your account as described in the last section.
- Click on the icon showing a pen to edit the relevant form and check or uncheck email subscribers as required in the Submit Actions tab as illustrated on the screenshot above.
Note: An email address will only appear in the list after it has been verified (see previous section).
Changing Your Login Email
You can set any of the verified email addresses registered on your account as your FormSmarts login. Note however that you won’t be able to use an email address as you login if it’s already the login of another account.
A user icon is displayed next to your login email address.
Note: Any email addresses that you use as your login or form recipient has the Active status and cannot be removed (the corresponding trash can will be grayed out).
Removing an Email Address From Your Account
To remove an email address from your FormSmarts account, Visit the Email Accounts pane of the Settings tab and click on the trash can icon corresponding to the email address you want to remove.
Trash can icon grayed out? The trash can icon will be grayed out if the corresponding email address is still in use as a form recipient by at least one form or is the account’s login. To remove the email address, first edit each of the forms in the Forms tab and uncheck that email address under Form Subscribers (see screenshot above). Then go back to the Settings tab, refresh the list of email accounts, and click on the relevant trash can icon.
Give Feedback!
We welcome your feedback about this feature. This will help us improve it in the future.
Posted on Jun 16th, 2008 in form builder.
25 Comments
Tags: form builder, form recipient, form results
Changing a Form’s Recipient Email Address
We get many emails from users asking how they can modify the email address held on their FormSmarts account.
At this time, each FormSmarts account is bound to a single email address. The address is used both as the account username, and as the recipient of all the forms on the account.
We will soon be upgrading FormSmarts Form Builder to provide more flexible email address management.
Users will be able to:
- change the login email address
- specify a different recipient email address for each form
Posted on Jun 10th, 2008 in form builder.
2 Comments
Tags: email notification, form builder, form recipient, upcoming