Posts Tagged ‘form to pdf’
Safeguard Your Customers’ Data with Password-Protected PDFs
As the custodian of your customers’ sensitive information, it’s crucial to ensure that the data collected through your forms is well protected. FormSmarts offers a variety of options to help you safeguard form submissions.

Many businesses prefer to receive form responses via email for timely action. However, relying solely on standard email can expose you to several risks:
- Account Compromise: If your email account is hacked, someone could gain access to the data.
- Inadvertent Leaks: Anyone who has access to your phone or computer could accidentally expose a local copy of the data.
View Form Submissions Online
To mitigate these risks, FormSmarts provides an option to send notification emails that do not display the submitted data directly in the message. Instead, you can view the complete form entry online through a secure link. This requires signing in to your FormSmarts account, adding an extra layer of security.
Downloading Secure PDFs
If you prefer to download submissions as PDFs, FormSmarts allows you to password-protect these reports. This means anyone attempting to access the document will need the password, thereby safeguarding the data from unauthorized access on your devices and in your email.
Setting up password protection for PDF documents is straightforward:
- For forms sent only to your primary email address (the login email), create a unique PDF password (distinct from your FormSmarts password) and enable PDF protection.
- If your form is sent to multiple email addresses, create a sub-user for each recipient. They will need to sign in to FormSmarts to set up their own PDF password (again, the PDF password must differ from their FormSmarts password). Once everyone has created a PDF password, complete setup as directed.
Conclusion
FormSmarts also provides a third option: secure encrypted email. While slightly more complicated to set up, encrypted email provides additional benefits and a high level of protection.
By implementing these measures, you can better protect your customers’ data while maintaining efficient access and communication.
Posted on Oct 23rd, 2024 in online form.
Post a Comment
Tags: collaboration, form to pdf, security
Introducing the New Account Dashboard
A major refresh of the account section of the site introduces several new tools and capabilities:
- Easily create sub-users and share forms with them with the User Management dashboard
- Review activity in your account in the new Account Activity pane
- Invited users now have their own account dashboard
Contact Information
Many customers rely on FormSmarts to receive timely form notifications critical to their organization. Unfortunately, we’ve been in the past left without any ways to contact some members after all email addresses in their account bounced our emails.
The Contact Information panel of the account dashboard now allows you to set a secondary email address and mobile phone number we will use in situations were we are unable to contact you via the primary email address associated with your account (i.e. your login email).
To set a secondary email, select one of the verified email addresses in your account, or add a new email in the Settings Tab of the Form Builder, verify it, then go back to the account dashboard to set the new address as your secondary email.
If your organization gets its email service as part of a web hosting package, we recommend using your personal email (e.g. Gmail account) as a secondary email.
To set a phone number, enter your cell phone number including the international dialing code (e.g. +1, +44,…). FormSmarts will send you a text message with a code to verify your number. Enter the verification code in the space provided and tap Verify to verify your number, then Update Contact Info to save the new number.
User Management Dashboard
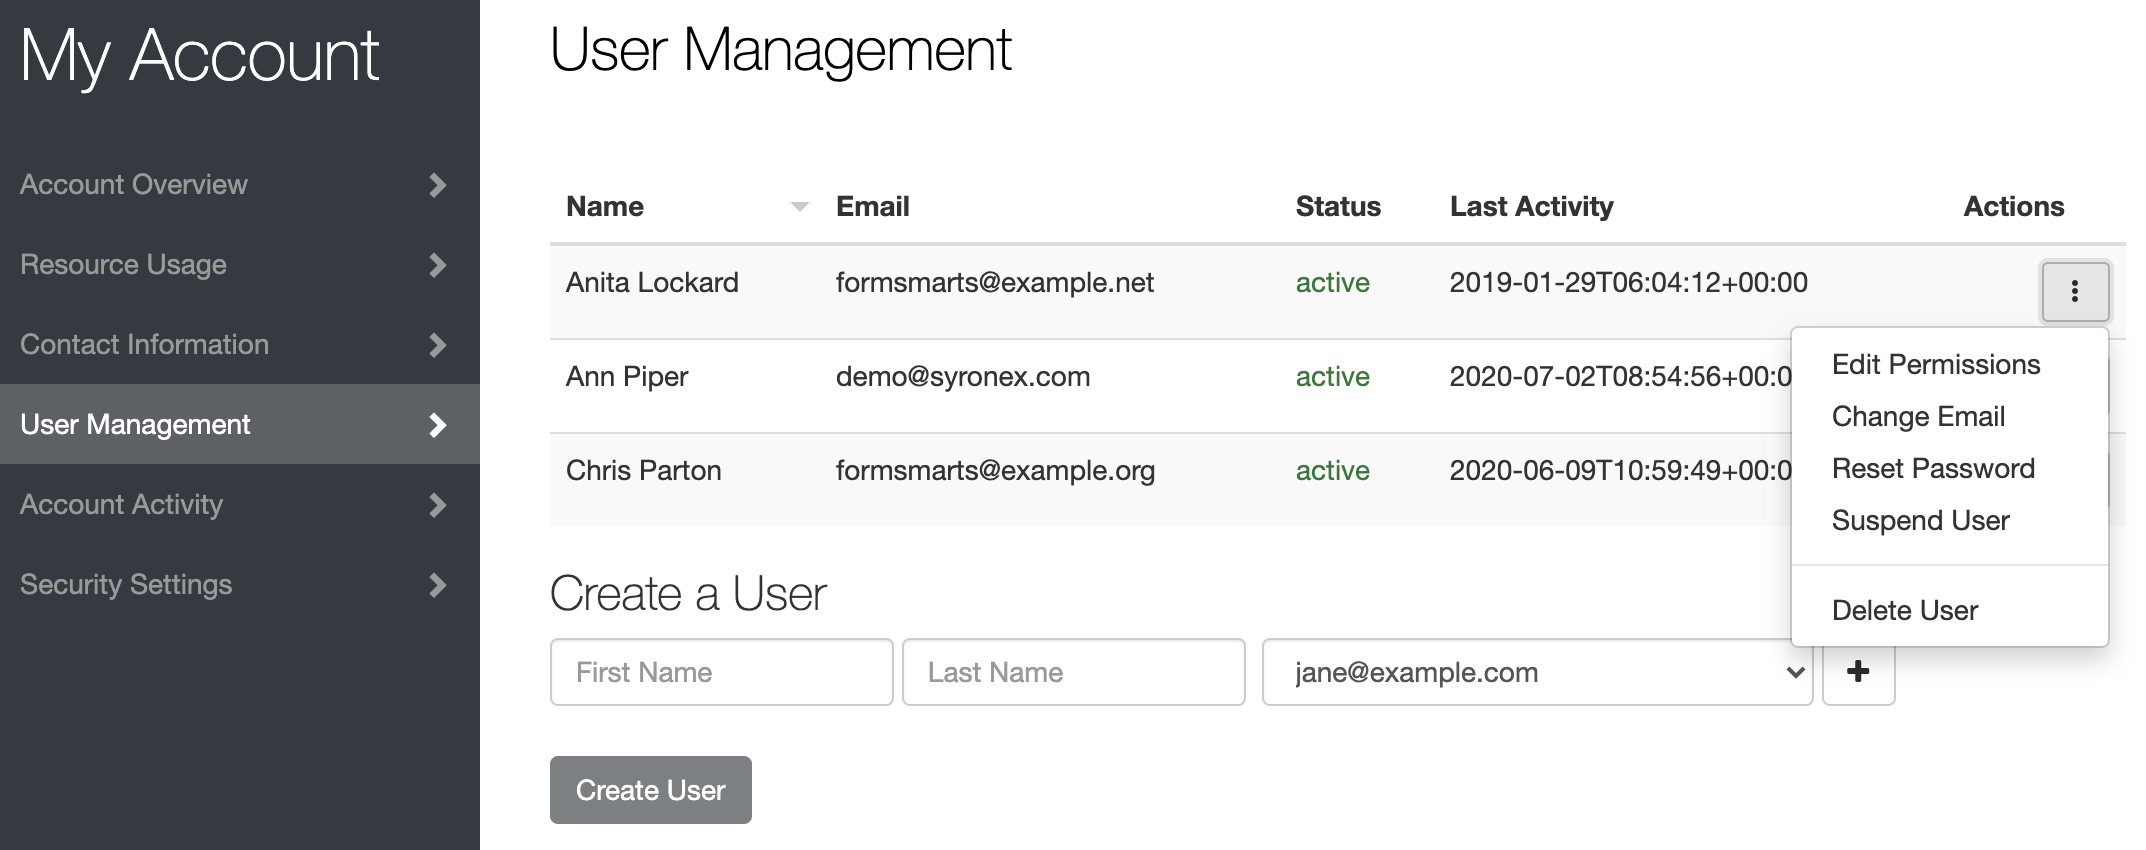
The User Management Dashboard illustrated above allows you to view and manage existing users in your account, create new ones, and change their permissions on individual forms.
Click the button showing a vertical ellipsis to access the Actions menu for the corresponding user.
You can:
- Edit a user’s permissions on your forms and share new forms with them
- Change the email address associated with a user
- Reset a user’s password
- Turn off a user’s two-factor authentication
- Suspend a user
- Permanently delete a user
Create a User
To create a new user, enter their name and select their email address in the list of verified emails in your account. If needed, click the button showing a plus sign to add and verify a new email address.
Click Create User button.
The newly created user doesn’t have any permissions on any of your forms but has implicit permissions. They can, for instance, submit Private Forms.
Share a Form with a User & Edit Form Permissions
Tap the Edit Permissions option in the Actions menu of a user to launch the User Permissions settings.
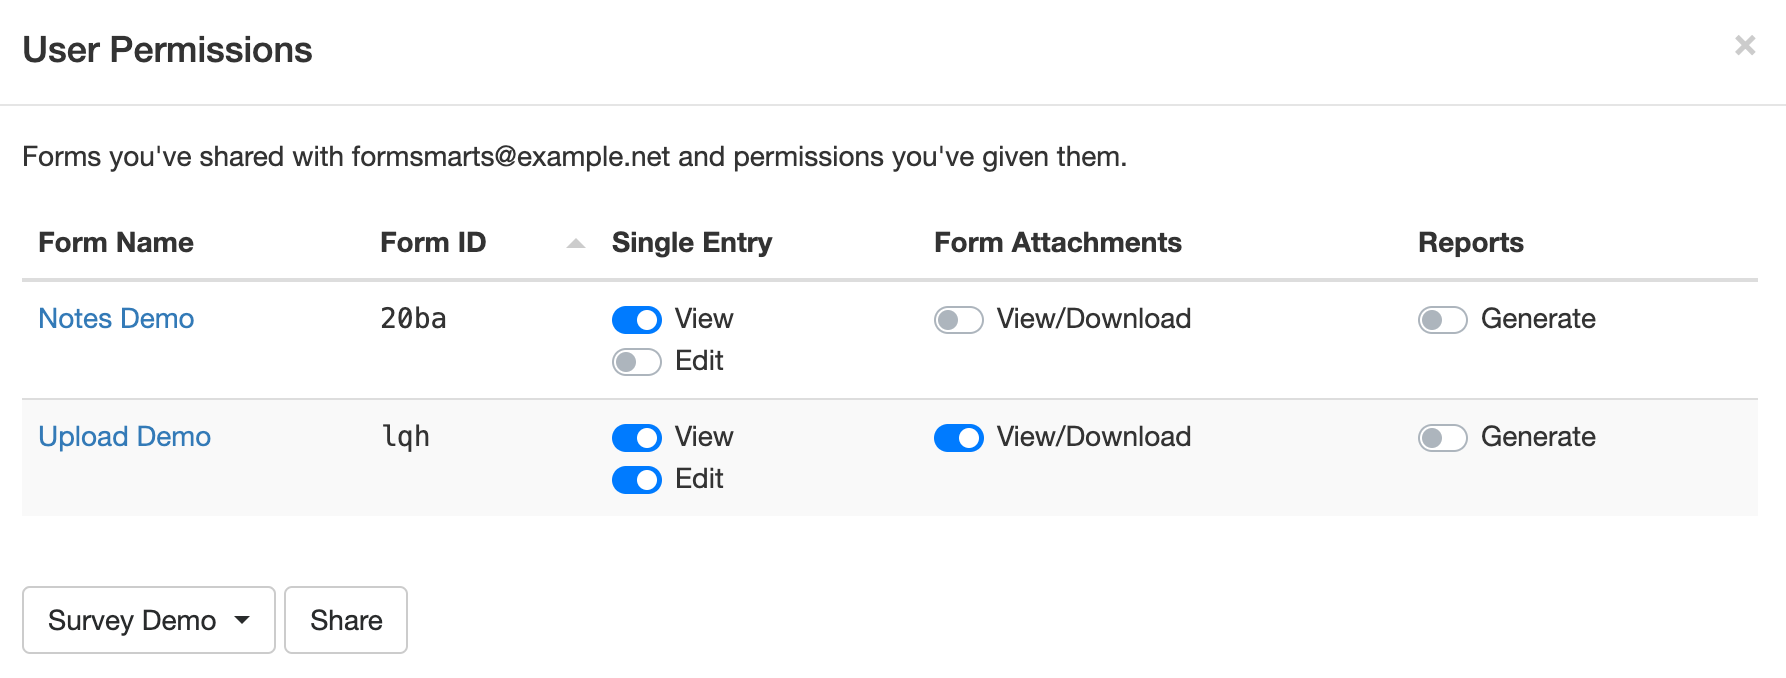
To allow a user to access submitted data for a form, first share the form with them: select (or search for) a form in the list and click Share.
FormSmarts will give the user the necessary permissions to view a single form entry online, download a copy in PDF, view uploaded documents (form attachments), and add notes and tags to a form entry.
You can adjust permissions to additionally authorize the user to edit a form submission and generate a spreadsheet with aggregated form responses.
Account Activity
The new Account Activity panel allows you to review and audit the session history of all users who have accessed your account in the last thirty days.
A separate table lists Administrator Sessions and User Sessions.
Sign a User Out
Should you suspect or become aware of an unauthorized access to your account while it is still taking place, you can immediately sign the user out and invalidate their session with the Log Out of Other Sessions and Log User Out buttons.
- Click Log Out of Other Sessions to immediately invalidate all administrator sessions other than the one you are currently using
- Select a user in the list of users with an active session and click Log User Out to immediately log them out
Invited User Dashboard
FormSmarts sub-users can also access the account dashboard to perform actions and view information relevant to them:
- View a list of forms you’ve shared with them and actions you’ve allowed them to perform
- Review their recent account activity to check no one else has accessed their account
- Change their password
- Set up two-factor authentication
Posted on Aug 3rd, 2020 in form builder.
Post a Comment
Tags: collaboration, file upload, form attachment, form builder, form to pdf, team, user
Introducing Multi-User Accounts
FormSmarts supports accounts with multiple users, allowing an account owner to give invited users access to selected online forms.

How to Enable Multiple User Accounts
- Set up an account alias
- Create users
- Manage user permissions
Set Up an Account Alias
Before allowing sub-users to sign in to FormSmarts, you first need to set up an alias for your account. The alias must be unique and easy for users to memorize. A good choice is probably your organization or department’s name. Users will need to enter the account alias on the log in screen.
To create an account alias, visit the Account Overview panel of your account.
Create a User
To create a user, head to the User Management Dashboard.
- Users sign in to FormSmarts with their email address, account alias and password
- Before creating a user, add their email address to your account in the Settings Tab of the Form Builder and verify it
- Users can change their password in the Security Settings panel of their account if they know their current password
- The account administrator can reset a user’s password in the User Management Dashboard.
Manage User Permissions
For each form, you can grant a user permissions to:
- access individual form entries online or download a PDF (e.g. from the link in email notifications)
- download form attachments (file uploads)
- generate Excel reports
- add tags and notes to a form entry
- edit or delete a form entry
You can also give a user account-level permissions to:
- renew your subscription or upgrade your account (billing permissions)
To set account-level permissions, please contact Support.
How to Sign In as an Invited User
We’ve updated the log in screen to allow all FormSmarts members to sign in on the same page. Account owners (aka account admins) can sign in in the usual way with their email address and password. Invited users also need to enter the account alias provided by their account admin as shown in this video.
Multiple users are available with our Business Plus package and above.
Posted on Jul 10th, 2014 in collaboration, form builder.
Post a Comment
Tags: business, collaboration, form attachment, form results, form to excel, form to pdf, howto, team, user
How to Track the Source of Leads
If you use online forms for lead generation, you will want to know the source of form submissions: from which page of your site a form was submitted, which social network or site the visitor came from, or which marketing campaign led the prospect to you.

You can track the source of leads received via form submissions with the fs_ctxval context parameter, giving it a unique value for each source or campaign you wish to track. In this article, we show you how. If you need help setting this up, let us know.
Example 1: Form Accessed by Its FormSmarts URL
The simplest way to publish a form online is to allow your customers to directly access the form by its FormSmarts URL. To track the source of form responses, create a unique URL for each source or campaign:
- https://formsmarts.com/form/lqh?fs_ctxval=Facebook-May-2013
- https://formsmarts.com/form/lqh?fs_ctxval=Newsletter-May-12-2013
- https://formsmarts.com/form/lqh?fs_ctxval=ABC+Conference+2013 (tip: create a QR code with this URL and print it on posters, flyers and stickers)
As you would expect, context values are collected by FormSmarts and shown in notification emails, online & PDF reports, exports to Excel and web API callbacks.
Example 2: Form Embedded into Your Site
If you manually inserted the code snippet for the same form into multiple pages of you site, follow instructions in this section to track leads. If you added the form to your site template, skip to the next section (for WordPress sites) or the one after (for other template-based sites).
Edit each web page where you embedded the form and locate the code snippet in the HTML source. Add the context value after lay=1 (or lay=2), as in the code highlighted below:
<iframe width="540" height="481" src="https://formsmarts.com/form/lqh?mode=embed&lay=1&fs_ctxval=Summer+2013+Conference+Registration+Page" scrolling="auto" marginwidth="0" marginheight="0" vspace="0" hspace="0" allowtransparency="true" frameborder="0" style="overflow-x:hidden"><a href="https://formsmarts.com/form/lqh">Can't see the form? Click here</a>.</iframe>
Alternatively, grab a fresh copy of the code snippet from the form builder, edit the code as described, then add it to your site in the usual way.
Example 3: Tracking Leads on a WordPress Site
If you added a form to the template of your WordPress site, you can track the URL of the page a form was submitted from with PHP.
- In your WordPress template, replace the form’s HTML snippet by the PHP code below
- Paste the form’s code snipped given by the form builder between the single quotes as shown.
<?php
$snip = ''; // Paste form embedding code between single quotes
$url = get_permalink();
$re = "/[^\w\s,()\[\]*\/:\-.?]+/";
$ctx = urlencode(substr(preg_replace($re, "", $url), 0, 150));
print(str_replace("mode=h5embed", "mode=h5embed&fs_ctxval=".$ctx, $snip));
?>
Example 4: Tracking Leads on Any Site with JavaScript
You can do the same on any other sites with JavaScript:
<script>
var snip = ''; // Paste embed code here
var pth = document.location.pathname;
var re  = /[^\w\s,()\[\]*\/:\-.?]+/g;
var ctx = encodeURIComponent(pth.replace(re, '').substring(0, 150));
document.write(snip.replace("mode=h5embed", "mode=h5embed&fs_ctxval=" + ctx));
</script>
Notes
This feature is included with all Business plans. Context data may not contains non-alphanumeric characters other than “()[]*/:-.? ” and may not exceed 150 characters.
Posted on May 27th, 2013 in form builder.
2 Comments
Tags: business, email notification, form to excel, form to pdf
Detailed Form Confirmation Page (Summary Page)
FormSmarts supports a number of options to complement the default confirmation page that is displayed when someone submits a form.
You can:
- Redirect form users to your site
- Allow form users to pay a registration fee via PayPal
- Show a detailed confirmation page where users can choose to receive a confirmation email or download a PDF receipt
Detailed Form Confirmation Page
The detailed confirmation page, also called Summary Page, shows a summary of the data submitted and allows form users to:
- Have a confirmation email sent to them
- Download a PDF receipt
- Print a copy of the form data.
Feel free to try this demo.
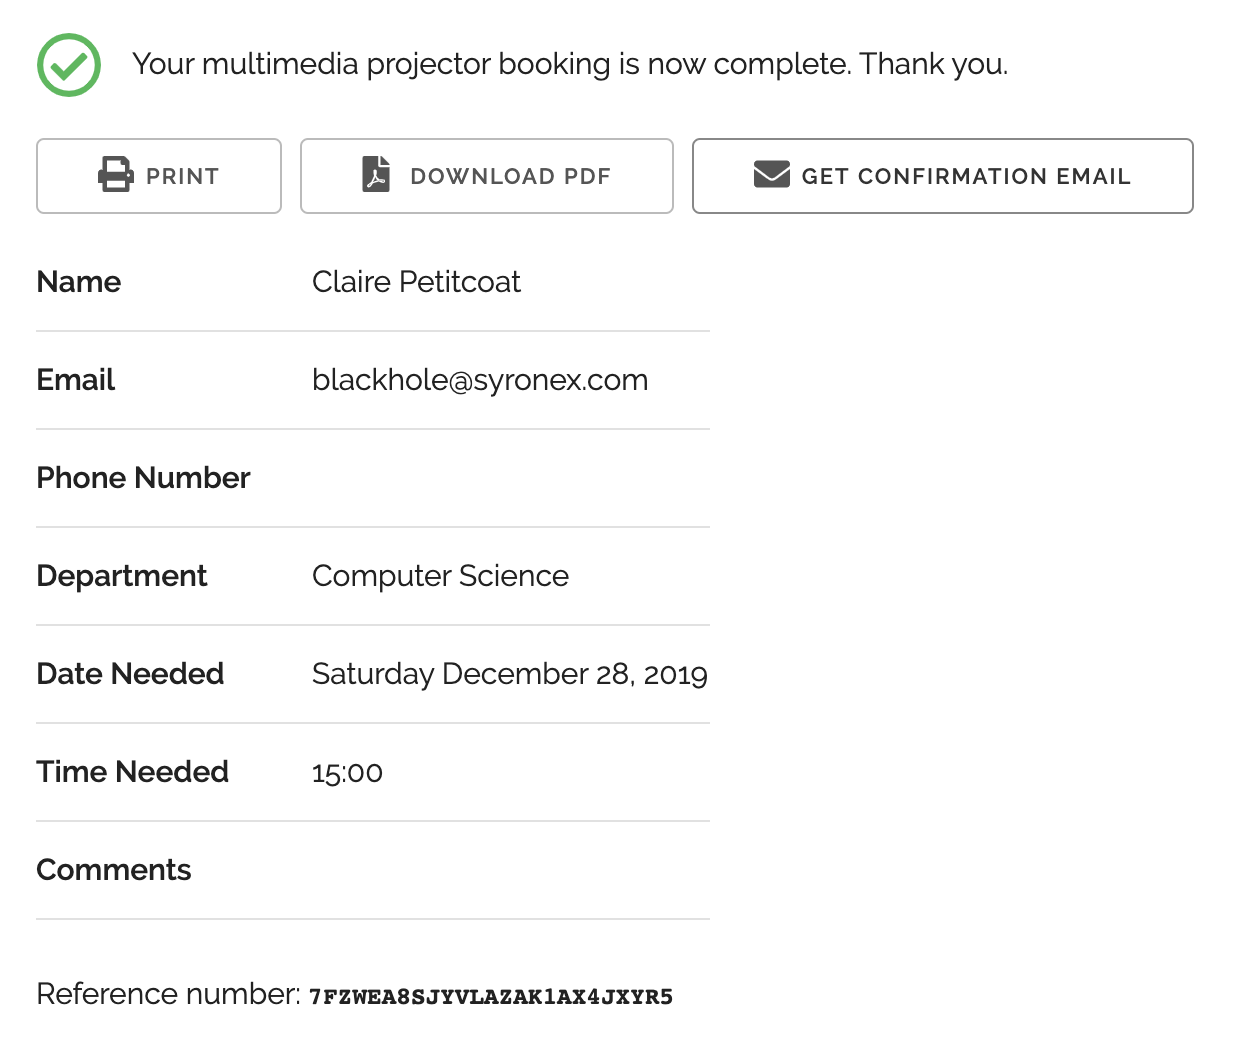
Use the summary page whenever you want users to be able to keep a copy of the information they’ve submitted or a proof of their submission.
- You can change the text at the top of the confirmation message and in the PDF receipt (not supported with all account types)
- The confirmation email, PDF and printable receipts show a total of any fees/prices on the form (see FormSmarts payment integration syntax) to allow members to create invoices and allow cash payments on-site.
PDF receipts may not display correctly in non Western-European languages (Russian, Chinese,…) unless the language is set explicitly with the lang parameter.
Setup Instructions

Visit the Forms Tab of the form builder and click the icon showing a pen to edit the corresponding form. Towards the bottom of the Form Details screen (pictured above), change the On Submission action to ‘Show summary with print, email & PDF options’.
Posted on Oct 12th, 2010 in form builder.
13 Comments
Tags: business, confirmation email, form submission, form to pdf, paypal form, pdf receipt, pro
How to Export an Online Form to Excel
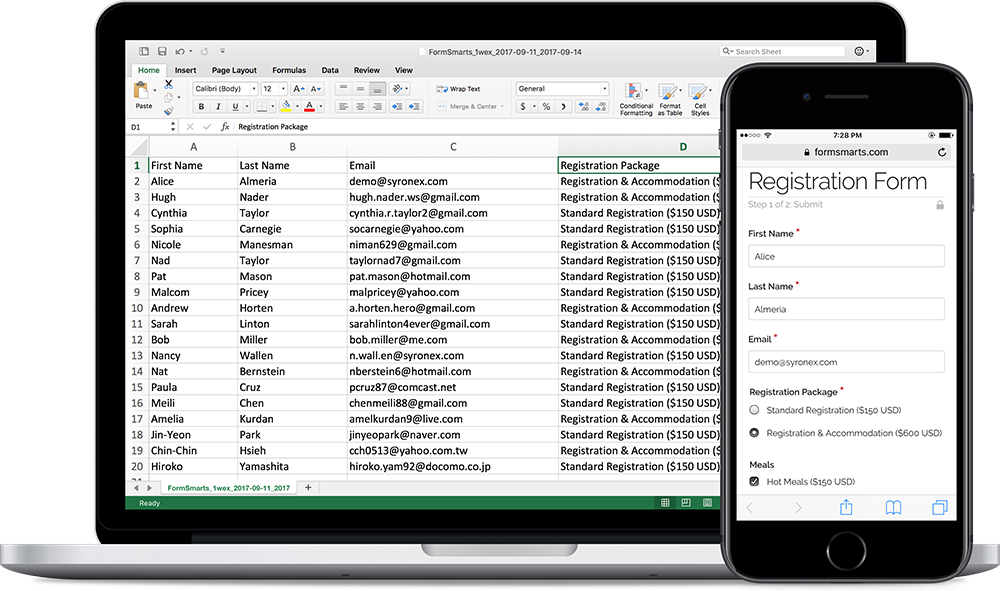
FormSmarts allows customers to collect online form responses on the cloud and export them to Excel. We also support a number of options to create custom reports.
Enable Form Data Storage for Export to Excel
Export to Excel requires that you turn on data storage for each of the forms for which you would like to use this feature.
For privacy reasons, form submissions were not saved on the cloud by default in the past. For Business accounts created after March 20, 2017, storage is now enabled by default. This does not apply to Pro accounts, for which storage is turned off by default and must be enabled for each form if needed. Note that the storage space available with Pro accounts is limited.
To enable stored form results and allow Excel reporting, visit the Submit Actions tab of the Form Details screen of each of the forms for which you would like to access form responses online, as shown in the video below.

You will then be able to download Excel reports from stored form responses in a few clicks with the report generator. Business-level members may also view individual form responses online and download a PDF Report.
To enable storage of form entries by default when you create a new form, check Turn on cloud storage for all new forms in the Settings Tab of the form builder. This option is only available in Business accounts and is turned on by default for accounts created after March 20, 2017.
This video shows how to set up a form to store form responses on the cloud for online access and export to Excel. Although it features an old version of FormSmarts, the information provided can still be used with the current version.
Updating Form Results
To ensure you get consistent and up-to-date data when you export form results as an Excel spreadsheet:
- If you find out a form response has incorrect or out-of-date information, edit it and amend the data
- After you submit a test run, remember to remove it.
Excel Report Generator Settings
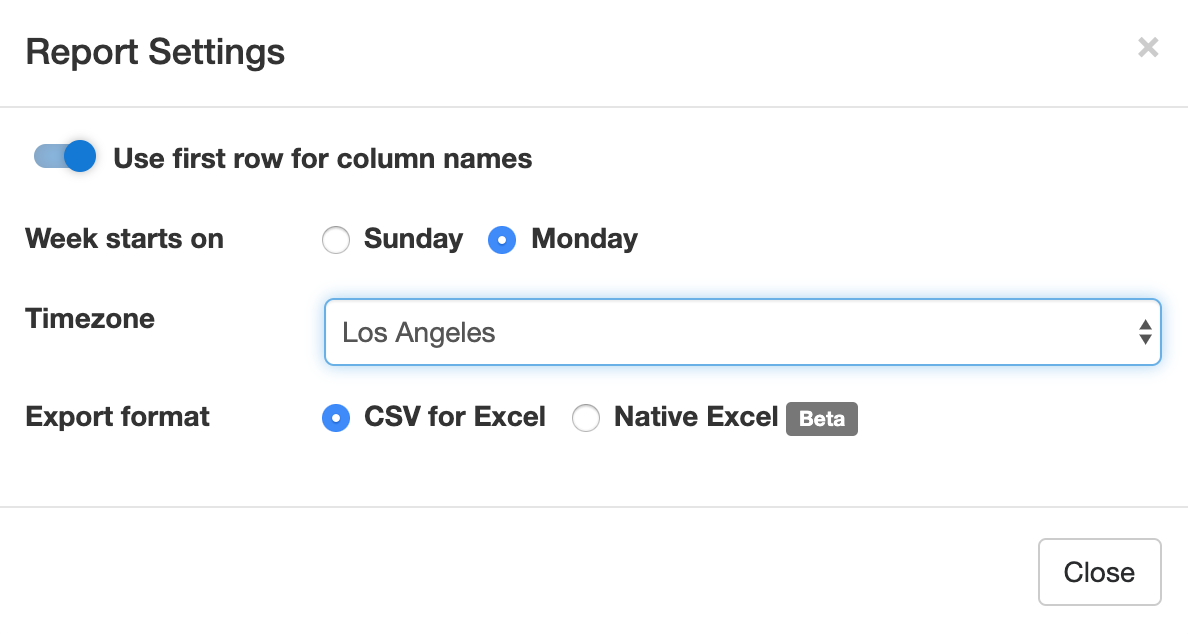
Show Field Names in the First Row
When toggled on, the first row of Excel spreadsheets shows the name of each field. This option is enabled by default.
Week Starts
The report generator allows you to specify the date range over which a report is generated by either picking a start & end date or choosing a preset period of time (This Week, Last Seven Days,…). For time periods that depend on the first day of the week (This Week, Last Week), we use the default first day of the week for your country (as set in your account). You can change the first day of the week with the Week Starts setting.
Select the Fields (Columns) Shown in the Spreadsheet

By default, Excel reports include:
- A column for each fields of a form
- Two columns for common metadata: the reference number of the form submission or a link to access it online, and the date and time the form was submitted
- Additional columns for payment details (payment forms only) and any context information passed to the form when it was submitted.
You can also create custom reports that only include the fields you need in the spreadsheet. To choose the fields/columns to include/exclude, check/uncheck the fields and metadata items listed in the Fields section of the Settings.
Time Zone
Preset time periods, date ranges and the form submission timestamp shown in Excel reports are now using your time zone (as defined in your computer settings). If you would like to generate a report using a different timezone, select the relevant city in the Timezone drop-down list. Note that the city selected by default may not be your city of residence, but it should be a city with the same UTC offset.
Filter Form Responses by Tags

If you have tagged form responses or a form has system tags set by FormSmarts when the form is submitted, you can create reports than only include form submission with the combination of tags and system tags you have specified.
You can for example create a report with all guests who registered and turned up at an event with the checked-in system tag. This tag is added when the event organizer checks-in attendees with the QR code in the confirmation email or PDF receipt.
Spreadsheet Format: CSV or XLSX
Choose a spreadsheet format from Comma-Separated Values (CSV) or native Excel (XLSX) format. We recommend you use the default CSV unless:
- Form submissions have data in a non-Western European language which doesn’t show correctly when you open the CSV spreadsheet
- Some of the characters like typographic curly quotes (‘, ’, “, ”) don’t display properly when you open the file with Microsoft Excel
If you experience one of these issues, download the report in Excel XLSX format. You can alternatively change the CSV text import settings in Excel as explained in the next section, or open the spreadsheet with another application like OpenOffice or Apple Numbers (on Mac OS X).
Importing an Excel Report When the Spreadsheet Contains Non-Western European Characters
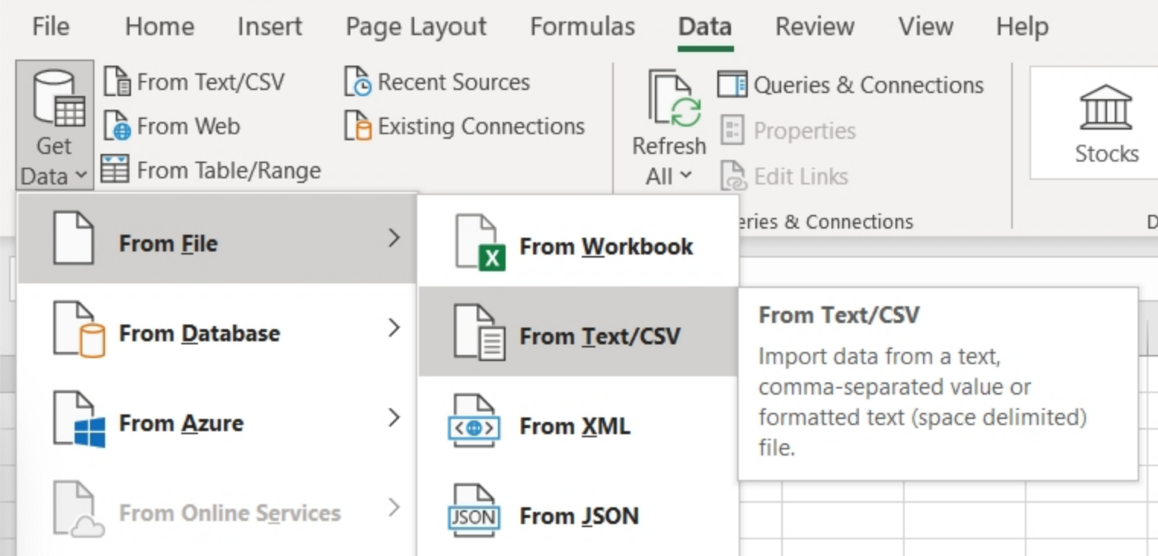
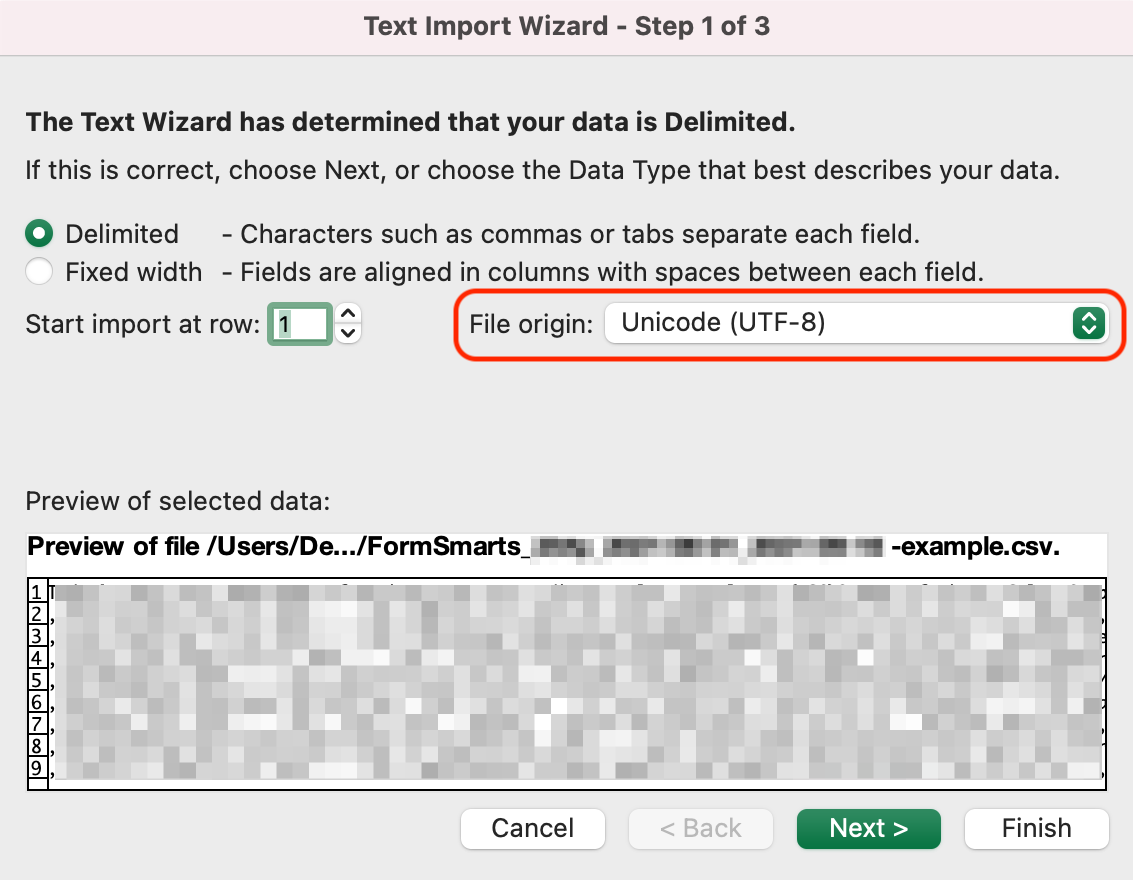
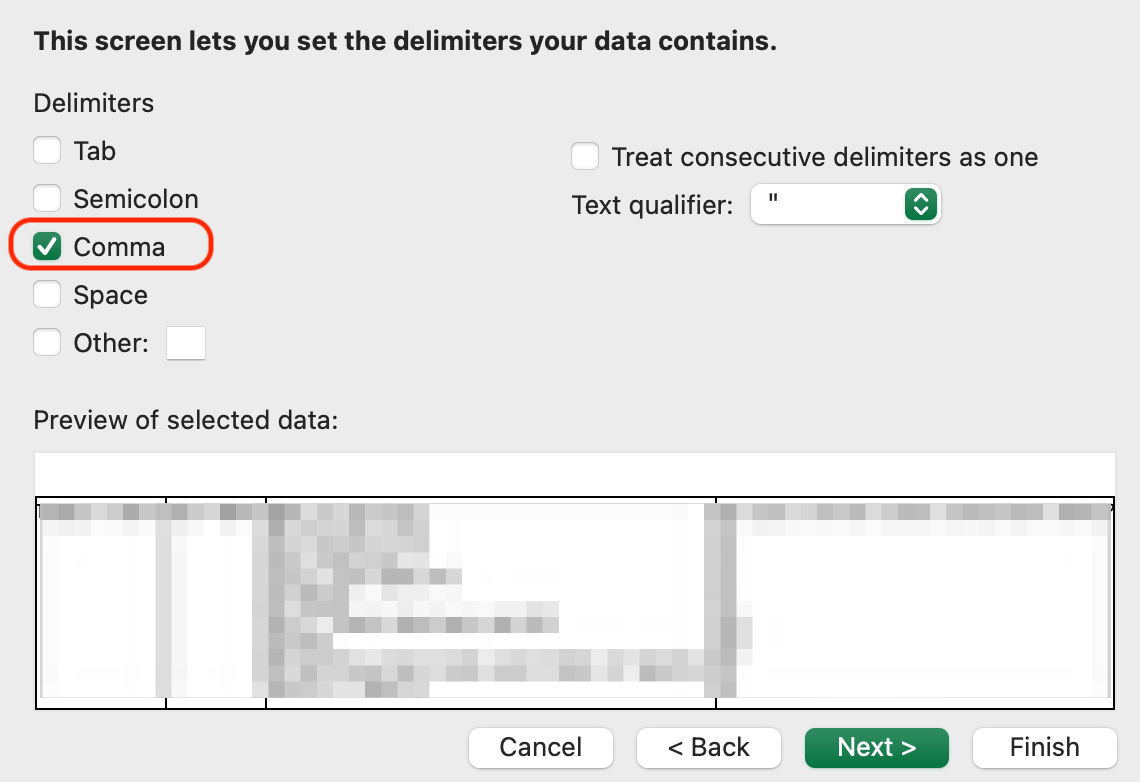
If an Excel (CSV) report contains text in a language other than English, you may need to change the character encoding to Unicode (UTF-8) in Excel’s Text Import Wizard, as illustrated below. The report may not display correctly for languages other than English unless the encoding is set to Unicode (UTF-8).
In the Data menu, click Get Data > From File > From Text/CSV
In Step 1 of the Text Import Wizard, set the file origin (character encoding) to Unicode (UTF-8):
In Step 2 of the Text Import Wizard, set the delimiter to Comma:
Posted on Jul 8th, 2009 in form builder.
17 Comments
Tags: excel, form results, form to excel, form to pdf
Get Online Forms as HTML Email or PDF
The email format we use to send form responses is flexible and supported by all desktop, web-based, and mobile email clients. Plain-text emails however become tedious to read and process for long forms and when form results must be printed for processing, e.g. for mortgage application forms, quote request forms, and many types of forms in the insurance and real estate industries.
Get Form Responses in Rich-Text Format
FormSmarts users now have the option to have form submissions sent formatted as a table in a rich text (HTML) email.

The main advantages of HTML emails are:
- Form reports are shorter
- Look is more appealing online and printed
- Email addresses, web links, and callto links (e.g for Skype) will launch the relevant application when clicked, as long as the field type as been set correctly.
To start receiving form results in HTML, change the Email Format to HTML Email in the Settings tab of your account.
Customize the Subject of Form Response Emails
With Business accounts, the subject line of form response emails can be customized on a form-by-form basis via the API Console as explained in the API documentation. The subject line template may include parameters that will be replaced with the form’s name, its ID, the FormSmarts reference number of the form submission, or the value of a particular input field.
| Parameter | Description |
|---|---|
| $form_name | Form name |
| $form_id | Form ID, e.g. 196x for form http://f8s.co/196x |
| $fs_ref_num | The FormSmarts reference number of the form submission |
| $1, $2,… $n | The value of the nth input field. The data type of the field must be one of Letters Only, Letters+Numbers, Positive Integer, Number, Country, Date, or the value of a drop-down list, radio buttons or checkbox. |
Email subjects can’t be customized via the form builder at this time.
View Form Responses Online or Get a PDF Report
Business-level customers can view form data online and download a copy in PDF using the links located at the bottom of email notifications.
Note: This feature requires that data storage be enabled for each of the forms for which you would like to be able to access form responses online.
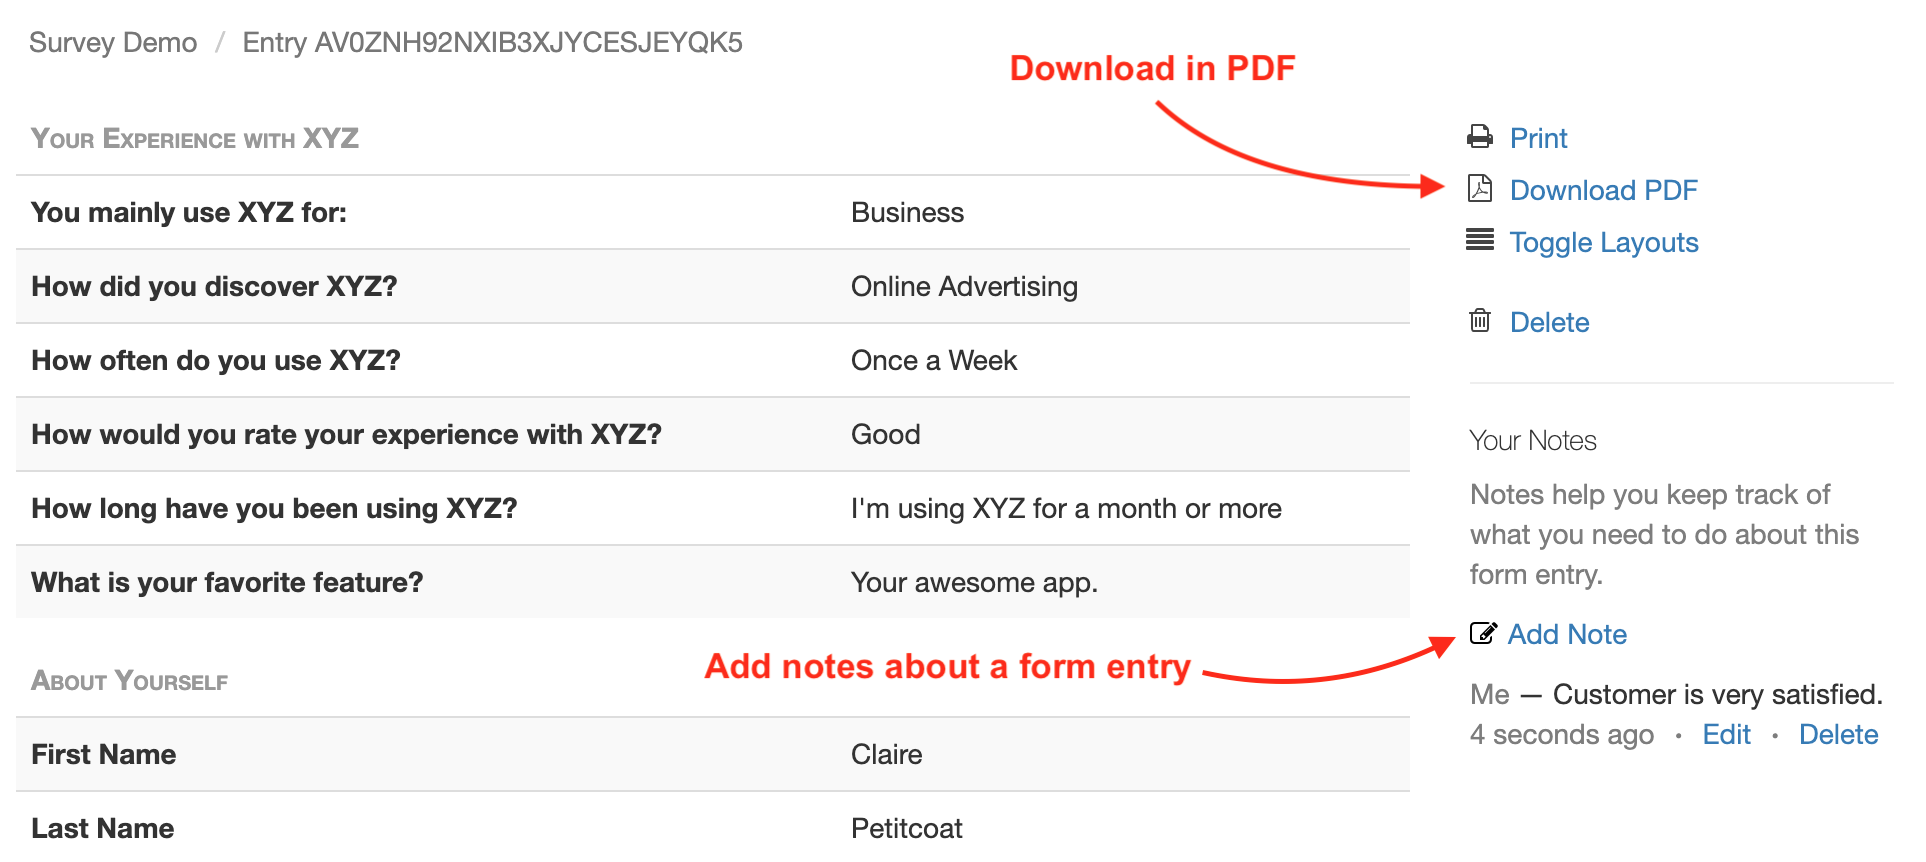
Download a PDF
To download a form response in PDF, use the Download PDF link at the bottom of the email notification. If you’ve deleted the message (or have turned off email notifications), generate an Excel report and locate the form entry. Use the link corresponding to the form entry to access it on FormSmarts and download a PDF.
View & Manage Individual Form Responses
FormSmarts allows users to view and manage each individual form entry online via the View online & add notes link in the email notification. If email notifications are turned off or you have deleted the message, download an Excel report and locate the form entry. Use the link corresponding to the form entry to access it on FormSmarts.
You can also work out the URL of a form response if you know its Reference Number: assuming the Reference Number of a form entry is QR6SADIWB4THC6H9S94635LA, its URL is https://f8s.co/e/2QR6SADIWB4THC6H9S94635LA.
Manage a Form Response
View a form response on FormSmarts add notes or comments about it, download a copy in PDF or delete it.
Form Response Metadata
In addition to form data, the page contains additional information that is not accessible by other means like the timestamp associated with the entry and the IP address and approximate location from where the form was submitted.
Posted on Jun 4th, 2009 in form handler.
15 Comments
Tags: email notification, form recipient, form results, form to pdf