Archive for the ‘payment form’ Category
PayPal & Stripe Fees Now in Excel Reports
Many FormSmarts members leverage our integration with PayPal and Stripe to charge fees on their online forms. Most members also export registrations, memberships, and other data from their forms to an Excel spreadsheet.
FormSmarts has traditionally provided details about payments including the amount paid and payment ID in reports.
In response to user needs, we now include the fees charged by the payment processor (PayPal or Stripe) in these Excel reports. This information is displayed in a new column titled “Payment Fee“. This update will allow customers to calculate the total net amount collected by applying a simple formula within Excel.

If you prefer not to have the payment fee details included in Excel reports, you can easily remove this information by accessing the Settings of the Report Generator and unchecking the Payment Fee field.
Posted on Jan 23rd, 2025 in payment form.
Post a Comment
Tags: excel, payment, paypal, stripe
How to Charge Recurring Fees with a Stripe Subscription
The Stripe integration supports two types of recurring payments: subscriptions and payments in installments. A subscription charges a customer at regular intervals until it is canceled, while a recurring payment in installments allows customers to pay in a set number of installments.
If you’re familiar with FormSmarts’ PayPal integration, the syntax for subscriptions and payments in installments remains the same. Simply add your Stripe API key to FormSmarts and set the form’s Submit Action to Integrate with Stripe.
Stripe Subscription
With Stripe, you can easily charge your customers a recurring membership or subscription fee. Once a customer has set up a Stripe subscription through FormSmarts, Stripe automatically charges them yearly, monthly, weekly, or even daily. The subscription runs indefinitely until cancelled.
In the example below, customers are charged $25 (Individual Membership) or $45 (Family Membership) monthly. They also have the option to make a donation each month.

Paying in Installments with Stripe
You can as easily allow your customers to pay in installments with Stripe. Once a customer has set up a Stripe subscription though FormSmarts, Stripe charges them for the installment amount monthly. In this example, individuals can choose to pay in two or four monthly installments.

Try Payment in Installments with Stripe
Advanced Recurring Payment Use Cases
Subscription for Multiple Products
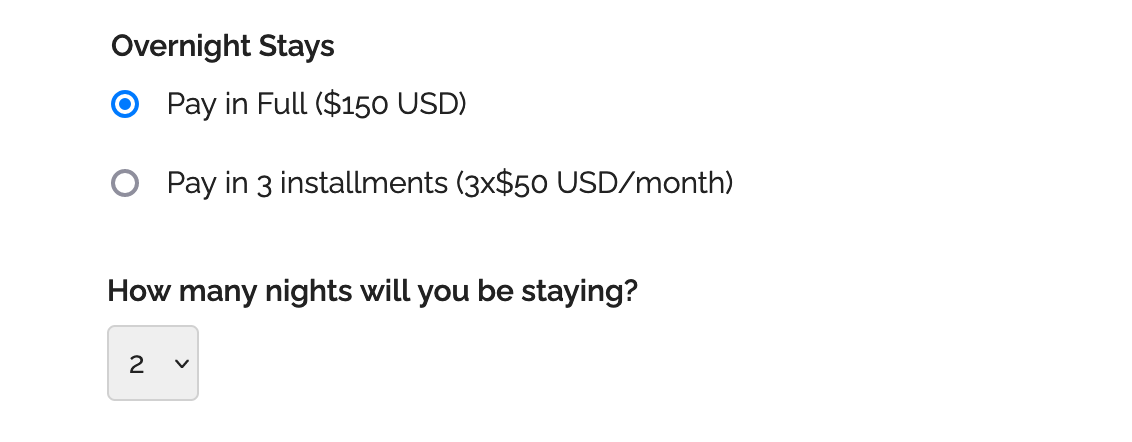
FormSmarts enables you to combine multiple recurring fees on a form, provided they have the same recurring period (i.e. yearly, monthly, …) and recurring times (number of installments). For instance, you could offer your customers options to pay in installments for both Days and Overnight Stays as shown on this demo. However, both must be paid in the same number of installments and recurring period (e.g., monthly in this example).
Recurring Donations
In addition to charging your customer recurring fixed amounts on a form, you can also invite them to make a donation with each payment by adding a donation box to the form. For instance, on the first demo presented on this page, we use a donation box to suggest our members make a monthly donation when they renew their membership. You can create multiple donation boxes to allow contributors to support different causes or projects.
Trial Subscriptions
The PayPal integration allows FormSmarts members to offer a trial period before a customer starts a paid subscription. However, we’ve noticed that few FormSmarts members ever use trials, so the Stripe integration doesn’t support them. If you need to use trials for your recurring payments, please reach out to our support team.
Posted on Dec 5th, 2024 in payment form.
Post a Comment
Tags: payment, payment integration, stripe
How to Create an Online Form With Stripe
Are you looking to streamline your online payment forms? With FormSmarts Stripe integration, accepting credit cards and collecting fees has never been easier.
To get started, simply follow these steps:
- Add fees to your form: Include the description, amount, and currency of each fee directly on your form. Check out our quick three-minute video tutorial for guidance. If you’ve used our popular PayPal integration, the format is the same.
- Integrate with Stripe: Edit your form and navigate to the Submit Actions tab in the Form Builder. Select Integrate with Stripe as shown on the screenshot below, and save your changes.

Stripe Configuration
To activate Stripe payments on your forms, you’ll need to add your Stripe API Key to FormSmarts. Don’t worry; this is a one-time setup unless you change your API Key.
Here’s how to do it:
- Log in to FormSmarts’ API Console.
- Select HTTP Method:
POST (Create). - Enter the Endpoint URL:
https://formsmarts.com/api/v1/integrations/stripe. - Open a new tab and access the Developers section of your Stripe account.
- Copy your Secret Key (or create a Restricted Key).
- Return to FormSmarts’ API Console and type
api_key =into the Request Data box - Paste your Stripe key as shown below and submit

That’s it! With FormSmarts Stripe integration, you can effortlessly accept payments and manage fees directly from your forms.
For additional information, please read the Stripe integration documentation. If you need help or have any questions, please feel free to post a comment below or contact us from the Help section of the website.
Posted on Jun 13th, 2024 in payment form.
2 Comments
Tags: payment integration, stripe
How to Accept Payments in Installments for Your Events
Allowing your customers to pay in installments on a form is as easy as collecting a one-off payment.
Consumers are increasingly demanding to be able to pay for goods and services in installments. If you organize an event that costs hundreds or thousands of dollars, you may have to provide an option for attendees to pay in several installments.
To offer a payment plan on a form, format the description of the fee, the number of installments and the amount of each installment as: Pay in 3 installments (3x$50 USD/month).
You can also propose weekly or bi-monthly installments or other payment plans that suit your needs. Remember to set up the form to collect a payment.
Payment Flow for Payments in Installments
The payment process for a payment in installments is slightly different from a standard payment:
- A registrants pays the amount of the first installment ($50 in this example) immediately when they submit the form
- When the payment goes through, FormSmarts sends the registration details to the destination emails of the form and also sends a confirmation email to the registrant
- The registrant is charged the same amount a month later and again the next month
- FormSmarts notifies form recipients of each installment payment
- You can view a registration and all associated payments on FormSmarts
Note that a payment plan is not a credit or buy now pay later scheme.
Payment in installments are not available with Starter accounts.
Posted on Jun 2nd, 2023 in payment form.
Post a Comment
Tags: payment, payment integration, paypal, paypal form
Adding Check & Cash Payment Options to a Payment Form
It’s now much simpler to allow form users who prefer not to pay online to pay later by check, cash on site or with their favorite payment app.
Most FormSmarts members who collect fees on their registration and membership forms want guests to complete the whole process online. If all guests register and pay online, the event organizer doesn’t need to manually verify everyone has paid the correct amount because we do this automatically.
But we know that a number of customers need to allow some guests to register online and pay later by check or cash on site. FormSmarts already allowed this, but we recommended using two separate forms, while customers understandably preferred that all guests register with the same form.

FormSmarts members can now provide a PDF/email invoice option on their payment forms. When this feature is enabled, guests can choose on the confirmation page of the form to either pay online via PayPal or get an invoice (screenshot above) to pay later by check, cash or with a payment app. Please try this demo and share your feedback in the comments section.
If you would like to allow guests to pay later/offline, toggle on Offer invoice option in the Submit Actions screen of the form builder shown below.

We don’t recommend turning on this feature unless you specifically need to allow guests to pay later, because you will then have to make sure that each and every form submission has been paid for:
- To track registrations paid online with PayPal, check that each registration shows payment details (amount paid, PayPal transaction ID) in the Excel report or email notification.
- To track cash and check payments, we suggest you tag form entries as “paid” when the person pays and document the corresponding payment with a note.
Posted on Apr 18th, 2022 in payment form.
Post a Comment
How to Create a Bill
FormSmarts offers a really simple way to create bills that customers can pay online: just create a billing form like the one below, then use a tool on FormSmarts.com each time you want to generate a bill for a specific client and amount.

Make a Billing Form
We only need to create the billing form once, we’ll then reuse it each time we need to create an invoice.
Here our example has two main input fields: an email field to uniquely identify the customer and a text box for the amount we want to bill them for. You can view and test the billing form. We’ve also made a slightly more elaborate example that allows a client to add a gratuity with a second amount box.
Note how both the Email and Amount Due fields are fixed: the values preset in the pre-filled URL can’t be changed by the client. We’ll cover how to do this in the next section, for now I need to explain how to set up the Amount Due input field so FormSmarts recognizes it as a fee to be paid by the bill recipient.
Add an Amount Box
- Add a Text Box form control (widget)
- Name the input field Amount Due ($ USD). The ‘Amount Due’ label can be whatever you prefer, but you must stick to the same format and specify the currency as shown.
- Set its Allowed Content value to Positive Number
- If you’ve already configured PayPal integration, you’re all set. Otherwise your need to associate your PayPal account with FormSmarts.
Create a Pre-Filled Bill
When you need to create a new bill, sign in to FormSmarts’ API Console to generate a new Pre-Filled URL with a fixed email and amount. Send the URL to the client in an email or text as a bill.
- Set the Method to
POST (Create) - Set the API Endpoint to
https://formsmarts.com/api/v1/forms/Form_ID/prefilled_url, replacing Form_ID with the ID of your form. - Enter the Request Data as illustrated below and described in the documentation, then submit.
https://formsmarts.com/form/2301?mode=h5, its Form ID is 2301.
Preset Values & Make Fields Read-Only
We enter the preset value of the email and amount fields under Request Data, and make sure those can’t be modified by the user:
- Pre-fill the first input field on the form (
pf_f1) with the value blackhole@syronex.com - Preset the second input field (
pf_f2) to 187.59 - Prevent the user from modifying either fields by making them read-only (
pf_ro1=1,pf_ro2=2)
pf_f1=blackhole@syronex.com
pf_f2=187.59
pf_ro1=1
pf_ro2=2
Find out more about how to pre-fill your forms and how to automatically generate pre-filled URLs if you need to create too many bills to do it manually.
Posted on Nov 18th, 2019 in payment form.
Post a Comment
Tags: bill, invoice, payment, paypal, pre-filled url
Personalize the Payment Confirmation Email
FormSmarts now allows customers1 to change the text part of the confirmation email we send to form users once their payment has been confirmed, as highlighted below.
If you use FormSmarts for online event registration forms, edit the confirmation message to remind attendees of the date and time of the event, provide information about the venue location, and ask them to print a copy of the message or have it ready for inspection on their phone on the date of the event.
To edit the confirmation message, log in to the form builder and click/tap the pen icon corresponding to the form you would like to edit, then visit the Submit Actions tab.
You can emphasize a section of the text with bold or italics and you may include links and bullet points. The text can be formatted using the buttons provided or with the same Wiki-like syntax you can use elsewhere on your forms.
Use the Preview button to visualize the formatted output of the message.
As always, we value your feedback about this feature.
Note: If you have verified your site and uploaded the logo of your organization to FormSmarts, it will appear at the top of the message.
1 The confirmation email can only be customized with a Business Plus account or above.
Posted on Sep 22nd, 2017 in payment form.
4 Comments
Tags: confirmation email, e-ticket
How to Issue an Invoice or Support Check & Cash Payments
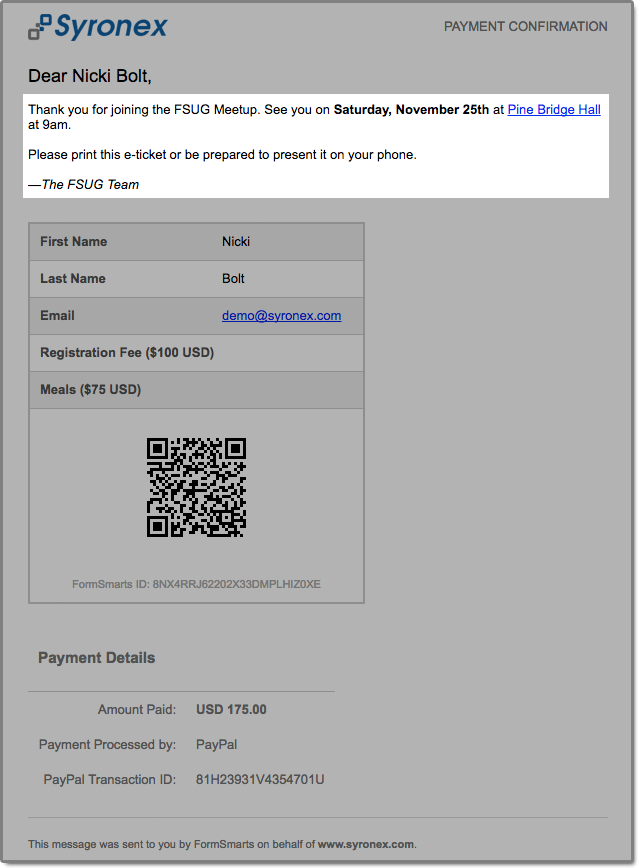
Your can allow form users to get an invoice by specifying prices, fees and quantities directly on a form. When FormSmarts detects an amount of money on a form, we compute the total amount and show it on the confirmation page, the PDF receipt, and in the confirmation email.
FormSmarts helps you generate invoices and manage check and cash payments by showing the total amount due on the printable Summary Page of a form and in the confirmation email and PDF receipt that users can get on that page.
- Use this to generate an invoice when someone submits an order form
- If you’re using our popular payment form feature to collect online payments on your membership and registration forms, chances are that some of your customers will want to pay by check, cash on site or by any other offline payment methods. Use this feature to offer an offline payment option for your online payment forms.
When a form is set up to show a Summary Page when submitted, users may:
- Request a confirmation email
- Download a PDF receipt
- Print a copy of the information submitted with the form

Fees and priced items must be formatted with the FormSmarts payment integration syntax.
As illustrated above, the printout, PDF receipt and confirmation message all include a QR code to help you process payments more reliably and effectively.
Check Payments
- Ask users to enclose a printout of the Summary Page with their check
- Scan the QR code with any phone or tablet to access the corresponding form entry on FormSmarts
- Update the form entry’s payment status with a tag and add a note to record the check number
Cash Payments on Site
The Summary Page can also help you manage cash payments by allowing guests to show their confirmation email or PDF receipt (a.k.a. e-ticket) on their phone (or their printed receipt), that staff can scan to update the registration on FormSmarts. Since the amount due also appears in form response notification emails and PDFs, check-in staff can also reconcile e-tickets with the list of notification emails or registration PDFs even if there is no network connectivity.
How to Make an Offline Payment Form
- Create an online payment form with fees formatted as documented
- When you’re satisfied with the result, make a copy of the form with the Duplicate Form button ( icon) in the Forms Tab of the form builder
- Rename the form and set On Submission to “Show summary with print, email & PDF options” in the Submit Actions tab of the Form Details screen.
The Summary Page supports the same payment-related features as payment forms (except those for recurring payments), including discounts and discount codes.
Can I Accept Online & Offline Payments on the Same Form?
One of the benefits of FormSmarts payment integration is that we won’t notify you until the person has paid so you don’t have to check this yourself each time. If you have a form allowing both online and offline payments, you won’t know which customers have paid online, so you’ll have to review each and every form response.
For this reason, we recommend that you create a copy of the form specifically for check payments and use the Summary Page setup described in the previous section, especially if there are several charges and fees on the form. You’ll then only have to track payments for entries pertaining to that form. You can make a copy of a form in a click with the Duplicate Form button in the upper right-hand corner of the form builder.
Offering a Check Payment Option on an Online Payment Form
If you are making a simple payment form that has a single payment option, you can alternatively include a check payment option on the form using radio buttons or a dropdown list with two options:
Registration Fee ($30 USD)
Registration Fee (pay by check)
If the user doesn’t select the online payment option, FormSmarts will skip the payment step and send you the form entry immediately.
Note that people paying by check won’t receive any confirmation email.
Posted on Aug 21st, 2017 in payment form.
2 Comments
Tags: e-ticket, payment, pdf receipt, summary page
How to Make a Membership Form
Did you know you can offer paid memberships through a simple online form?
If you thought offering online memberships was challenging because it involved a recurring payment each year (or month), you’d be wrong. Making a membership or subscription form with FormSmarts is (almost) as easy as making a one-time payment form.
Creating a Recurring Membership Form with FormSmarts

What Is a Recurring Membership?
Before discussing how to make a membership form, let’s first define what a membership is: A member of an organization or membership site may take part in the activities or otherwise claim the benefits exclusively offered by the organization or site to its members during the period of time covered by the membership (one year or month or any other period of time) by paying a membership fee. To remain an active member after the initial period of time, a member needs to pay again. Because most members want renew their membership, membership fees tend to be recurring payments.
When someone signs up for a recurring payment, also called subscription, they agree to be charged a fee at the time they subscribe and again after each period of time specified — until they cancel their membership.
How Can I Make a Subscription or Recurring Membership Form?
The short answer is: simply by writing “Recurring Membership ($100 USD/year)” on a form. FormSmarts will understand that the person filling out the form should be charged US$100 each year for a membership called “Recurring Membership”.
Like with other types of payment forms, you may add a recurring fee to a form in a radio button option, check box, drop-down list option or text block.
FormSmarts supports the following recurring periods and (optional) number of installments:
Recurring Period
- Recurring Monthly Subscription ($15 USD/month)
- Recurring 6-Month Membership ($60 USD/6 months)
- Recurring Yearly Membership ($100 USD/year)
- options: day(s), week(s), month(s), year(s)
Recurring Times/Number of Installments
- Quarterly Subscription (4 x $20 USD/3 months)
- Optional, if Recurring Times is not specified, the recurring payment runs until it is canceled
- Think of Recurring Times (4 in this case) as a number of installments
Multiple Recurring Fees
You may allow users to select more than one recurring fee on a form like on the membership form shown on the screenshot above (feel free to try the demo), but all fees must then have the same Recurring Period and Recurring Times.
When someone selects multiple fees, FormSmarts will charge them each time for the total amount.
Offering a Trial Period
Many membership sites offer new members a trial period allowing them to access the site at a low or no cost before having to pay the full membership fee. A fee with terms (i.e. Recurring Period and Recurring Times) different from the first recurring fee listed on a form is interpreted by FormSmarts as a trial period. Our membership form demo has a trial period.
Integration with Other FormSmarts Features

- If cloud storage is enabled, the details of a membership and all associated payments are listed on FormSmarts on the page corresponding to the initial form entry. A link is provided in every email notification.
- FormSmarts sends a confirmation email to the subscriber after each successful payment
- FormSmarts notifies the account owner when a recurring payment is received
Posted on Oct 20th, 2016 in payment form.
2 Comments
Tags: payment integration, paypal
How to Create a Recurring Donation Form
FormSmarts has long supported one-time donations as part of a dedicated donation form, together with other fees on a registration form, or even on a form using our SuperCart shopping cart.
We are pleased to announce that FormSmarts now also supports recurring donations. A recurring donation allows a contributor to sign up for a donation plan to give the same amount at regular intervals, typically every month or year.
Creating a Recurring Donation Form
- Add a text box with the field name formatted as My Donation ($ USD/month)
- Set the field’s Allowed Content (aka. data type) to Number
- In the Form Details screen of the form builder, set the On Submission option to Integrate with PayPal using advanced integration.
FormSmarts supports the following variations:
Recurring Period
- Cause Description ($ USD/month)
- Cause Description ($ USD/2 weeks)
- options: day(s), week(s), month(s), year(s)
Recurring Times
- Cause Description (12 x $ USD/month)
- Think of Recurring Times (12 in this case) as a number of installments
- If Recurring Times is not specified, the recurring donation runs until it is canceled
Contribution to Multiple Causes
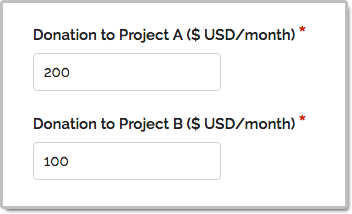
As illustrated on the screenshot above and in this demo, you may add multiple donation boxes to a form to give contributors the opportunity to choose the causes they wish to donate to and allow them to contribute to several causes in a single donation. In the example above, the donor is signing up to give a total of $300 each month; with $200 to support Project A and $100 going towards Projects B.
Posted on Oct 13th, 2016 in payment form.
Post a Comment
Tags: payment integration, paypal