Archive for the ‘collaboration’ Category
View and Test Your Forms Privately While They’re Disabled
To make your workflow smoother, we’ve updated how disabled forms behave. You can now tinker, test, and perfect your forms while they are disabled, allowing you to finalize your work without showing a “work in progress” to the public.
What’s New: Access Even When “Off”
Previously, a disabled form was inaccessible to everyone. Now, we’ve created a way for you and your team to work on them privately.
- Logged-In Access: If you are logged into FormSmarts, you can now view and submit disabled forms exactly as if they were live.
- Team-Wide Compatibility: This applies to the account admin and all users associated with the account.
- Standalone Only: This change specifically applies to the standalone version of your form. If you have the form embedded on your website, it will remain hidden from the public.
Identifying Disabled Forms
To help you keep track of a form’s status, we’ve added a status banner at the bottom of the form page. This banner identifies when a form is currently disabled, so you know you’re viewing it in a private testing capacity.

Quick Reminder: Managing Form Visibility
Here is a quick refresher on how to manage your form visibility settings:
- Manual Toggle: Enable or disable any form via the Forms tab in the Form Builder.
- Scheduling: Use the scheduling feature to automatically enable or disable forms at specific dates and times.
- Custom Messaging: When you disable a form, you can customize the message shown to public visitors (e.g., “Check back soon!” or “Registrations are now over”).
This update is designed to help you move from draft to live with more confidence and less friction.
Posted on Mar 27th, 2026 in collaboration, form builder.
Post a Comment
How to Make a Form You Can Save, Edit and Share
FormSmarts supports complex application forms that an individual may start to complete, save and come back to edit over the course of several weeks. They may also invite a partner, co-signer or customer to fill out part of the form.
Save & Resume Forms
Standard forms are are short and transactional. An individuals starts filling out a form and submits it within a few minutes.
FormSmarts also offers Save & Resume forms. Save & Resume forms are long-lived. A user may save a form and come back to edit it as much as needed for a period as long as 30 days.
Collaborative Submission
When a person saves a form, they can invite someone else to continue the same form entry.
This supports application like:
- Online applications and reports with multiple parties, where each person fills out and signs part of a form and any of the contributors can submit it
- Online applications for services like loans and insurances where an agent starts an application with a customer on the phone or online chat, then hands off the application to the customer for them to complete and submit.
Comparing Standard and Save & Resume Forms
The table below outlines the main benefits of the Save & Resume feature and compares Save & Resume forms to standard forms.
| Standard form | Save & Resume form | Save & Resume form with Submit for Review | |
|---|---|---|---|
| Submitter can come back to edit a form | No | Yes | Yes |
| Multiple individuals may complete a form together | No | Yes | Yes |
| Staff reviews forms before they are submitted permanently | No | No | Yes | Staff can edit form responses after they have been submitted | Yes | Yes | Yes |
Save & Resume forms have an optional Submit for Review workflow. When enabled, a member of your team needs to review and approve or reject each form submitted to ensure it complies with your requirements.
Posted on Apr 17th, 2023 in collaboration.
Post a Comment
Tags: collaboration, digital contract, esignature, team
How to Edit Submissions Made on Your Forms
There are occasionally situations when you need to amend the information submitted on a form:
- A customer reaches out after submitting a form, realizing they had entered incorrect information
- Some time after they registered for an event via one of your forms, an individual contacts you saying they had moved or changed phone numbers

Instead of asking the customer to submit the form again, find the reference number of the form submission and view it online, then use the Edit and Revision History buttons illustrated above to update the relevant data fields.
If you’re viewing the form entry on a mobile device, the Edit and Revision History buttons may be hidden to avoid cluttering the page. Tap Show Editing in the main menu to show the buttons.
Editing & Revision History
When you update a data field, the new value will show online, in PDF documents and in Excel reports. But it's important to understand that the original value submitted and all changes are kept on FormSmarts and can be viewed in the Revision History.
In the example below, we've changed the email address associated with a form entry where Sheryl was mistyped as Sherly, making the address invalid. The characters removed (crossed out with red background) and added (underlined with green background) are clearly visible.

Built for Teams
Each modification made to a form entry is associated with the FormSmarts user (account admin or invited user) who made it, allowing all users to know who made each change. In the example above, the amendment was made by the user viewing the changes, noted as Me. Other users would see that person’s name.
Regulatory & Compliance Considerations
Auditing and Compliance
When an individual submits an online form, they may be under contractual obligation to provide accurate information — or need to certify that the information submitted is true and accurate to the best of their knowledge.
Although FormSmarts allow members to alter the information originally submitted on a form, changes are made in such a way that we preserve the original value submitted and all changes made.
- Changes are append-only, they cannot be undone or retracted
- The precise change is preserved
- Each revision is associated with the user who made it
- A timestamp is kept for auditing
GDPR
If you are processing information about individuals in the European Union, use this feature to allow users to exercise their legal right to rectification (right to have inaccurate personal data rectified) under the GDPR regulation.
Posted on May 4th, 2020 in collaboration.
Post a Comment
Tags: form response, form results, form submission
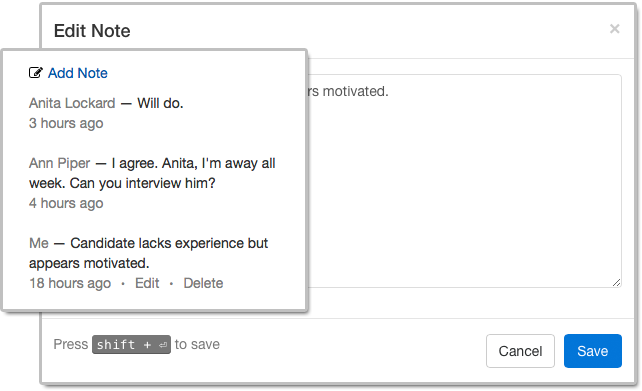
How Notes Can Help You Manage Form Entries
Notes help you keep track of what you need to do about a form entry. When you access an entry on FormSmarts, notes are listed alongside the information submitted.
Notes are especially useful for accounts with multiple users. A note is associated with the person who posted it and all users can see all notes, so notes allow a conversation between users centered around the form entry.
Who Can Benefit from Notes?
Customers who needs to process or review form responses one by one (e.g. application forms, order forms) can benefit from using notes to:
- Record a decision that was made about an entry and keep track of how a decision was reached
- Highlight elements that require further consideration
- Record the status of an application (“Pending Ann’s agreement.”) or registration (“Paid check, deposited today.”)
- Support a discussion between users about a form entry.
Even when form responses usually don’t need to be reviewed individually like with registration forms, notes can help document exceptions and incidents like “Chargeback after credit card was stolen. Paid by bank transfer.” or “Attendee changed to Jeanette Bowman”.
How to View Notes & Annotate a Form Entry
There are several ways to access a form entry online:
- Click the View online & add notes link in the email notification FormSmarts sends you when a form is submitted
- Use the links in the right-most column of Excel reports
- Scan the QR code from a confirmation email or PDF receipt provided by a customer.
Who Can Add Notes?
All users, both the account owner and invited users in the same account can add notes. If a forms was set up to send submissions to more than one person, a separate user should be created for each receiver so they can log in to FormSmarts and post comments.
- The account owner can create notes, edit their own notes, and delete anyone’s notes
- Invited users who were given access to individual entries pertaining to a given form can add notes and edit their own notes (and delete them provided they have write permission).
Closing Notes…
- Notes have keyboard shortcuts: Create a note with Alt + C, save it in the editor with Shift + Enter.
- If an entry is deleted, all notes associated with it are also removed.
Posted on Nov 1st, 2018 in collaboration.
Post a Comment
Tags: collaboration, email notification, form submission, team
Introducing Private Forms
Many FormSmarts members use our online forms within their organization, team or with external collaborators. With Private Forms, customers can now restrict who can submit a form to authorized users and identify the person who submitted each form entry.

Unlike other FormSmarts forms, a Private Form:
- can only be accessed and submitted by a user attached to the form owner’s account (find out how to add users to your FormSmarts account)
- each form entry is associated with the user who submitted it, who’s username is displayed in the email notification, PDF, online and Excel report.
Use a private form in any situations where you need to temporarily or permanently limit who can submit a form:
- To support internal processes within your organization
- To associate each form response with the identity of the person who submitted it
- To allow onsite or private registrations for a registration form once public registrations for an event are closed.
Please try out this demo with the following login info:
- Account Alias: formsmarts_demo
- Email: demo@syronex.com
- Password: <5RUh02K
To make a form Private, sign in to the API Console and submit a request to the Form API.
Posted on Feb 18th, 2016 in collaboration.
2 Comments
Tags: collaboration, secure form, team
Introducing Form Routing Policies
As part of FormSmarts collaboration features, we’re introducing Routing Policies. Routing policies (or routing rules) allow you to change the destination email address of a form each time it is submitted, depending on certain criteria.
Until recently the only option was for each email subscriber to receive a copy of the notification message when a form is submitted. FormSmarts now also supports alternative behaviors.
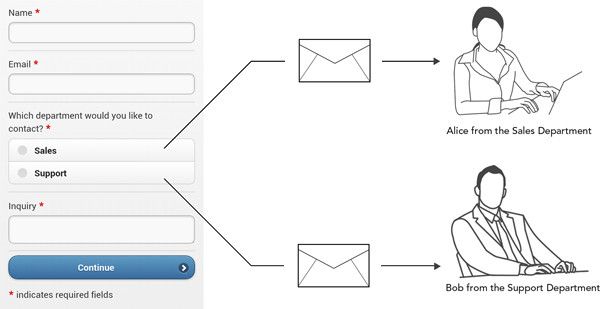
User-Selected Recipient
With User-Selected Recipient, users select to whom the form response is sent from a list on the form.
For example, a company might want to allow its customers to submit both sales and customer support inquires online. Customers should be able to choose on the form whether their inquiry is sent to the sales or customer support department.
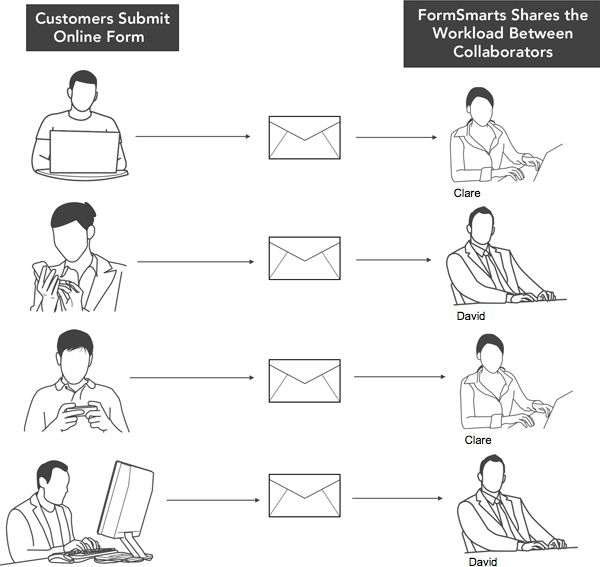
Round-Robin
With Round-Robin, form entries are sent to email subscribers in turn, thus automatically sharing the workload between collaborators in a team.
In the example below, four customers are submitting the same online form. The form was set up for round-robin routing between two colleagues, Clare and David. The first time the form is submitted it’s sent to Clare, the second time it’s sent to David, then to Clare again, then to David again, and so on.
Conditional Notification
A Conditional Notification rule allows you to choose whether to send an email notification based on the value of input fields or other conditions on the answer the user provides on a form.
This lets you filter form responses, sending only those that meet the conditions you've specified to someone in your team, while all responses (even those that were filtered out) are still available online and in Excel spreadsheets.
An example use of Conditional Notification during the COVID-19 pandemic is to make an employee screening questionnaire.
Setting Up a Form’s Routing Policy
This short video shows how to set up a routing policy.
To set up a routing rule:
- Visit the Forms Tab of the form builder and click on the icon showing a pen corresponding to the form you would like to edit
- In the drop-down list under Form Subscribers, check all email addresses that you would like to take part in the routing policy (participants)
- Save changes
- Click Change email routing policy and select the relevant policy
- Save changes
Posted on May 6th, 2015 in collaboration.
2 Comments
Tags: collaboration, team
Introducing Multi-User Accounts
FormSmarts supports accounts with multiple users, allowing an account owner to give invited users access to selected online forms.

How to Enable Multiple User Accounts
- Set up an account alias
- Create users
- Manage user permissions
Set Up an Account Alias
Before allowing sub-users to sign in to FormSmarts, you first need to set up an alias for your account. The alias must be unique and easy for users to memorize. A good choice is probably your organization or department’s name. Users will need to enter the account alias on the log in screen.
To create an account alias, visit the Account Overview panel of your account.
Create a User
To create a user, head to the User Management Dashboard.
- Users sign in to FormSmarts with their email address, account alias and password
- Before creating a user, add their email address to your account in the Settings Tab of the Form Builder and verify it
- Users can change their password in the Security Settings panel of their account if they know their current password
- The account administrator can reset a user’s password in the User Management Dashboard.
Manage User Permissions
For each form, you can grant a user permissions to:
- access individual form entries online or download a PDF (e.g. from the link in email notifications)
- download form attachments (file uploads)
- generate Excel reports
- add tags and notes to a form entry
- edit or delete a form entry
You can also give a user account-level permissions to:
- renew your subscription or upgrade your account (billing permissions)
To set account-level permissions, please contact Support.
How to Sign In as an Invited User
We’ve updated the log in screen to allow all FormSmarts members to sign in on the same page. Account owners (aka account admins) can sign in in the usual way with their email address and password. Invited users also need to enter the account alias provided by their account admin as shown in this video.
Multiple users are available with our Business Plus package and above.
Posted on Jul 10th, 2014 in collaboration, form builder.
2 Comments
Tags: business, collaboration, form attachment, form results, form to excel, form to pdf, howto, team, user