Posts Tagged ‘user’
The Form Builder Is Now Multi-User
The form builder is now multi-user. As a FormSmarts account administrator, you can give individual users in your account view or edit access to specific forms, so your team can collaborate on form building without needing the admin login.

Form Builder Access Permissions
To access the form builder, a user needs:
- The Read-only Access account permission, to open and view forms settings
- The Create New Form permission, if they should be able to create their own forms
When a user creates a form, they are implicitly given permissions to view and edit the form. But they aren’t given any access to completed form submissions. As the account administrator, you have to grant them the suitable permissions on form data if needed.
If you haven’t set up additional users on your account yet, see our guide on how to create a user.
Form Level Permissions
To view and edit a specific form in the form builder, a user needs the View Form and Edit Form permission, respectively.
You can manage these permissions, and see which forms each user has access to, from the User Management Dashboard (illustrated above).
What’s Still Admin-Only
While form building is now shared, a handful of account-level settings remain restricted to the main administrator:
- Changing the account’s login email address (a.k.a. admin email)
- Deleting a form
- Scheduling a form suspension or reactivation
- Disabling or enabling a drop-down list or radio button option (e.g. for early bird pricing)
- Turning cloud storage on or off for all new forms
- Changing email format from Rich Text (HTML) to Plain Text
Other Changes
Alongside the multi-user form builder, we’ve also rolled out:
- User-specific preferences
- The ability to set a default form color scheme
- The ability to set Secure Access on your forms
Head over to the User Management Dashboard to start assigning form access to your team. Please leave a comment below if you have any questions.
Posted on Jul 3rd, 2026 in form builder.
Post a Comment
Tags: collaboration, user
How to Share a Form with Others
If you ever shared your password with a collaborator so they can download form attachments or view a report, read on. You should instead invite them to your account and share the form with them.
How Do I Invite Someone to My Account?
You invite others to join your account by creating a user for them. Once someone has joined your account, you can share a form with them and allow them to perform actions like:
To create a user, first add the person’s email address to the Settings tab of the form builder. Once they’ve verified their email, head to the user management dashboard of your account.
Enter the user’s first and last name, select their verified email address, and click Create User. We’ll email them to let them know they can now log in to FormSmarts, but we won’t give them their auto-generated password: please send it either by IM or voice call.
How Do I Share a Form With a User?
To share a form with a user, tap Edit Permissions in the Actions menu corresponding to the user, as shown on the screenshot above.
Select the form you want to share at the bottom of the Edit Permissions screen (shown below) and click Share.
Toggle permissions on/off as needed to allow the user to perform specific actions only.

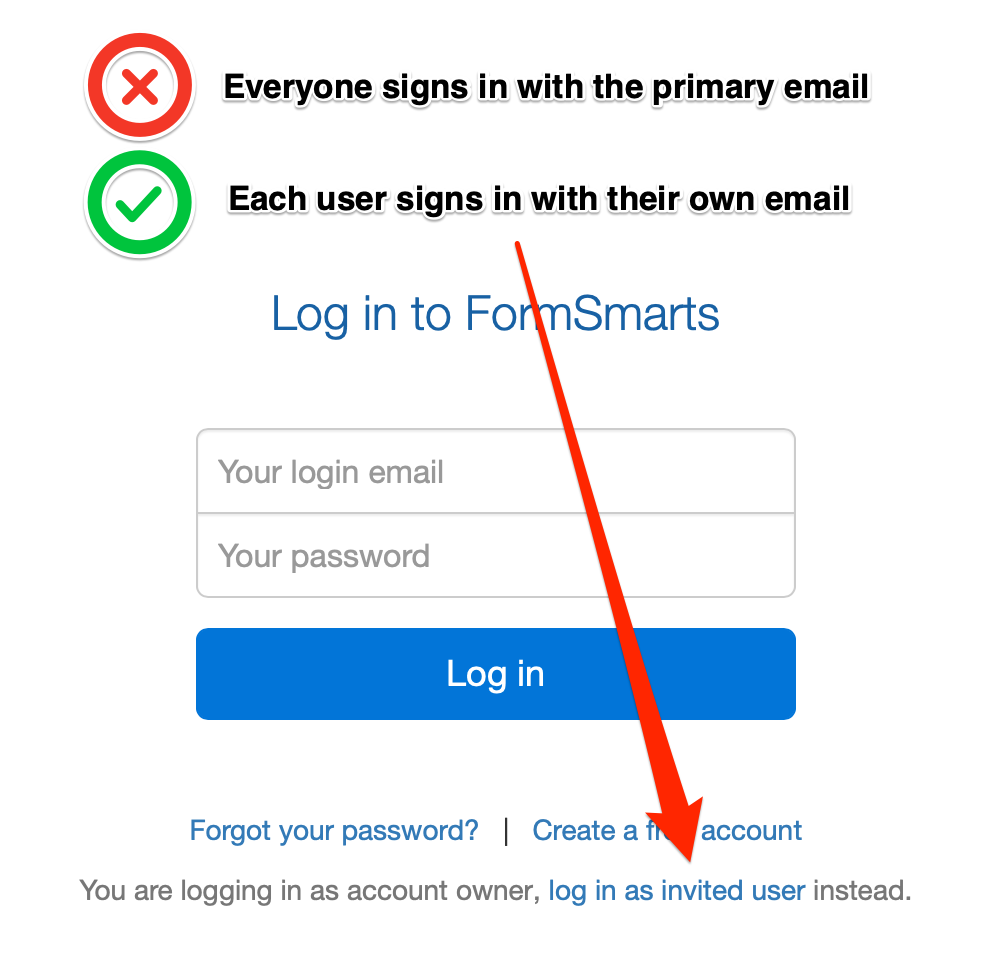
How Can Users Sign In?
To sign in to your account, a users must select Log in as Invited User on the log in page and enter your Account Alias in addition to their email and password.
Your Account Alias uniquely identifies your account on FormSmarts. You need to create an account alias to allow users to log in.
Posted on Mar 29th, 2021 in form builder.
Post a Comment
Tags: collaboration, form attachment, form recipient, team, user
Introducing the New Account Dashboard
A major refresh of the account section of the site introduces several new tools and capabilities:
- Easily create sub-users and share forms with them with the User Management dashboard
- Review activity in your account in the new Account Activity pane
- Invited users now have their own account dashboard
Contact Information
Many customers rely on FormSmarts to receive timely form notifications critical to their organization. Unfortunately, we’ve been in the past left without any ways to contact some members after all email addresses in their account bounced our emails.
The Contact Information panel of the account dashboard now allows you to set a secondary email address and mobile phone number we will use in situations were we are unable to contact you via the primary email address associated with your account (i.e. your login email).
To set a secondary email, select one of the verified email addresses in your account, or add a new email in the Settings Tab of the Form Builder, verify it, then go back to the account dashboard to set the new address as your secondary email.
If your organization gets its email service as part of a web hosting package, we recommend using your personal email (e.g. Gmail account) as a secondary email.
To set a phone number, enter your cell phone number including the international dialing code (e.g. +1, +44,…). FormSmarts will send you a text message with a code to verify your number. Enter the verification code in the space provided and tap Verify to verify your number, then Update Contact Info to save the new number.
User Management Dashboard
The User Management Dashboard illustrated above allows you to view and manage existing users in your account, create new ones, and change their permissions on individual forms.
Click the button showing a vertical ellipsis to access the Actions menu for the corresponding user.
You can:
- Edit a user’s permissions on your forms and share new forms with them
- Change the email address associated with a user
- Reset a user’s password
- Turn off a user’s two-factor authentication
- Suspend a user
- Permanently delete a user
Create a User
To create a new user, enter their name and select their email address in the list of verified emails in your account. If needed, click the button showing a plus sign to add and verify a new email address.
Click Create User button.
The newly created user doesn’t have any permissions on any of your forms but has implicit permissions. They can, for instance, submit Private Forms.
Share a Form with a User & Edit Form Permissions
Tap the Edit Permissions option in the Actions menu of a user to launch the User Permissions settings.
To allow a user to access submitted data for a form, first share the form with them: select (or search for) a form in the list and click Share.
FormSmarts will give the user the necessary permissions to view a single form entry online, download a copy in PDF, view uploaded documents (form attachments), and add notes and tags to a form entry.
You can adjust permissions to additionally authorize the user to edit a form submission and generate a spreadsheet with aggregated form responses.
Account Activity
The new Account Activity panel allows you to review and audit the session history of all users who have accessed your account in the last thirty days.
A separate table lists Administrator Sessions and User Sessions.
Sign a User Out
Should you suspect or become aware of an unauthorized access to your account while it is still taking place, you can immediately sign the user out and invalidate their session with the Log Out of Other Sessions and Log User Out buttons.
- Click Log Out of Other Sessions to immediately invalidate all administrator sessions other than the one you are currently using
- Select a user in the list of users with an active session and click Log User Out to immediately log them out
Invited User Dashboard
FormSmarts sub-users can also access the account dashboard to perform actions and view information relevant to them:
- View a list of forms you’ve shared with them and actions you’ve allowed them to perform
- Review their recent account activity to check no one else has accessed their account
- Change their password
- Set up two-factor authentication
Posted on Aug 3rd, 2020 in form builder.
Post a Comment
Tags: collaboration, file upload, form attachment, form builder, form to pdf, team, user
Introducing Multi-User Accounts
FormSmarts supports accounts with multiple users, allowing an account owner to give invited users access to selected online forms.

How to Enable Multiple User Accounts
- Set up an account alias
- Create users
- Manage user permissions
Set Up an Account Alias
Before allowing sub-users to sign in to FormSmarts, you first need to set up an alias for your account. The alias must be unique and easy for users to memorize. A good choice is probably your organization or department’s name. Users will need to enter the account alias on the log in screen.
To create an account alias, visit the Account Overview panel of your account.
Create a User
To create a user, head to the User Management Dashboard.
- Users sign in to FormSmarts with their email address, account alias and password
- Before creating a user, add their email address to your account in the Settings Tab of the Form Builder and verify it
- Users can change their password in the Security Settings panel of their account if they know their current password
- The account administrator can reset a user’s password in the User Management Dashboard.
Manage User Permissions
For each form, you can grant a user permissions to:
- access individual form entries online or download a PDF (e.g. from the link in email notifications)
- download form attachments (file uploads)
- generate Excel reports
- add tags and notes to a form entry
- edit or delete a form entry
You can also give a user account-level permissions to:
- renew your subscription or upgrade your account (billing permissions)
To set account-level permissions, please contact Support.
How to Sign In as an Invited User
We’ve updated the log in screen to allow all FormSmarts members to sign in on the same page. Account owners (aka account admins) can sign in in the usual way with their email address and password. Invited users also need to enter the account alias provided by their account admin as shown in this video.
Multiple users are available with our Business Plus package and above.
Posted on Jul 10th, 2014 in collaboration, form builder.
2 Comments
Tags: business, collaboration, form attachment, form results, form to excel, form to pdf, howto, team, user