Posts Tagged ‘business’
Introducing Multi-User Accounts
FormSmarts supports accounts with multiple users, allowing an account owner to give invited users access to selected online forms.

How to Enable Multiple User Accounts
- Set up an account alias
- Create users
- Manage user permissions
Set Up an Account Alias
Before allowing sub-users to sign in to FormSmarts, you first need to set up an alias for your account. The alias must be unique and easy for users to memorize. A good choice is probably your organization or department’s name. Users will need to enter the account alias on the log in screen.
To create an account alias, visit the Account Overview panel of your account.
Create a User
To create a user, head to the User Management Dashboard.
- Users sign in to FormSmarts with their email address, account alias and password
- Before creating a user, add their email address to your account in the Settings Tab of the Form Builder and verify it
- Users can change their password in the Security Settings panel of their account if they know their current password
- The account administrator can reset a user’s password in the User Management Dashboard.
Manage User Permissions
For each form, you can grant a user permissions to:
- access individual form entries online or download a PDF (e.g. from the link in email notifications)
- download form attachments (file uploads)
- generate Excel reports
- add tags and notes to a form entry
- edit or delete a form entry
You can also give a user account-level permissions to:
- renew your subscription or upgrade your account (billing permissions)
To set account-level permissions, please contact Support.
How to Sign In as an Invited User
We’ve updated the log in screen to allow all FormSmarts members to sign in on the same page. Account owners (aka account admins) can sign in in the usual way with their email address and password. Invited users also need to enter the account alias provided by their account admin as shown in this video.
Multiple users are available with our Business Plus package and above.
Posted on Jul 10th, 2014 in collaboration, form builder.
2 Comments
Tags: business, collaboration, form attachment, form results, form to excel, form to pdf, howto, team, user
How to Track the Source of Leads
If you use online forms for lead generation, you will want to know the source of form submissions: from which page of your site a form was submitted, which social network or site the visitor came from, or which marketing campaign led the prospect to you.

You can track the source of leads received via form submissions with the ctx context parameter, giving it a unique value for each source or campaign you wish to track. In this article, we show you how. If you need help setting this up, let us know.
Example 1: Form Accessed by Its FormSmarts URL
The simplest way to publish a form online is to allow your customers to directly access the form by its FormSmarts URL. To track the source of form responses, create a unique URL for each source or campaign:
- https://formsmarts.com/form/lqh
?ctx=Facebook-May-2013 - https://formsmarts.com/form/lqh?ctx=Newsletter-May-12-2013
- https://formsmarts.com/form/lqh?ctx=ABC+Conference+2013 (tip: create a QR code with this URL and print it on posters, flyers and stickers)
- https://f8s.co/lqh?
ctx=insta - https://f8s.co/
lqh-insta
As you would expect, context values are collected by FormSmarts and shown in notification emails, online & PDF reports, Excel reports, and can be retrieved in a form automation with a webhooks callback or the web API.
Example 2: Form Embedded onto Your Site
If you manually inserted the code snippet for the same form into multiple pages of you site, follow instructions in this section to track leads. If you added the form to your site template, skip to the next section (for WordPress sites) or the one after (for other template-based sites).
Edit each web page where you embedded the form and locate the code snippet in the HTML source. Add the context value after lay=1 (or lay=2), as in the code highlighted below:
<iframe width="540" height="481" src="https://formsmarts.com/form/lqh?mode=h5embed&lay=1&ctx=Summer+2013+Conference+Registration+Page" scrolling="auto" marginwidth="0" marginheight="0" vspace="0" hspace="0" allowtransparency="true" frameborder="0" style="overflow-x:hidden"><a href="https://formsmarts.com/form/lqh">Can't see the form? Click here</a>.</iframe>
Alternatively, grab a fresh copy of the code snippet from the form builder, edit the code as described, then add it to your site in the usual way.
Example 3: Tracking Leads on a WordPress Site
If you added a form to the template of your WordPress site, you can track the URL of the page a form was submitted from with PHP.
- In your WordPress template, replace the form’s HTML snippet by the PHP code below
- Paste the form’s code snipped given by the form builder between the single quotes as shown.
<?php
$snip = ''; // Paste form embedding code between single quotes
$url = get_permalink();
$re = "/[^\w\s,()\[\]*\/:\-.?]+/";
$ctx = urlencode(substr(preg_replace($re, "", $url), 0, 150));
print(str_replace("mode=h5embed", "mode=h5embed&ctx=".$ctx, $snip));
?>
Example 4: Tracking Leads on Any Site with JavaScript
You can do the same on any other sites with JavaScript:
<script>
var snip = ''; // Paste embed code here
var pth = document.location.pathname;
var re  = /[^\w\s,()\[\]*\/:\-.?]+/g;
var ctx = encodeURIComponent(pth.replace(re, '').substring(0, 150));
document.write(snip.replace("mode=h5embed", "mode=h5embed&ctx=" + ctx));
</script>
Notes
This feature is included with Business plans. Context data may not contains non-alphanumeric characters other than “()[]*/:-.? ” and may not exceed 150 characters.
Posted on May 27th, 2013 in form builder.
2 Comments
Tags: business, email notification, form to excel, form to pdf
How to Integrate with FormSmarts API
The Event Notification API allows you to have FormSmarts send a machine processable ‘push’ notification message to a script on your website (or for that matter to any URL) to process the information that has just been submitted through one of your online forms. You can use the Event API (a.k.a. Web Hooks) to integrate FormSmarts with your database, website or any online service or application.
How to Integrate
Whereas this feature is mainly targeted at developers, creating a script that does something useful with the data received from FormSmarts is actually not difficult. The API is fully documented with examples in PHP.
- You first need to create a program/script to process form data and upload it to your web server. Data is sent in JSON format, which is supported natively by all modern programming languages.
- Then register the script’s URL with FromSmarts
- Whenever a form is submitted, FormSmarts will send the data submitted through the form as well as other data pertaining to the form response (e.g. payment information if the form involves a payment) to the URL you have registered.
Have a Great Idea?
If you have a great idea about how you could use FormSmarts API, let us know: we have several Business Starter subscriptions to give away.
Posted on May 31st, 2012 in form builder.
2 Comments
Tags: API, automation, business, howto, payment integration
Attach a File to a Form in a Click: File Upload Made Easy
With the new file upload feature, you can now let form users attach a picture or document to a form like in this demo.

Adding a file upload widget to your forms is as easy as adding a simple text box: visit the Fields Tab of the form builder, and create a new field choosing the File Upload widget. That’s all there is to it. Once a file has been uploaded and the form confirmed, that file will be stored on FormSmarts and available to you.
Customizing File Upload Fields
Although a file upload field created as just described will be fully functional, you may want to restrict the type of content the form will allow users to upload, as well as set the maximum file size permitted. You can also specify how long FormSmarts should keep uploaded documents on the server. To change these options, visit the Field Details screen of the form builder.

Allowed Content Type
By default, a file upload field will accept all supported content types: documents (PDF, Word, Excel, RTF, OpenOffice ODF, and HTML documents) and images (JPEG, PNG, and GIF). You can restrict the type of content the form will allow users to upload to either documents or images. For example, if you’re building a job application form, you will want applicants to upload their CV and should restrict uploads to Documents to prevent mistakes.
Maximum File Size
When you add a file upload field to an online form, the maximum size of the files that can be uploaded is set to the maximum for your plan:
- 2 Mb for Business Starter
- 4 Mb for Business Plus
- 8 Mb for Business Max
- 10 Mb for Business Premier
- 15 Mb for Business 3 and above
Edit the file upload field and use the slider to adjust that value to whatever makes sense for the purpose of the form.
Storage Policy for Uploaded Content
You can define the period of time during which FormSmarts retains uploaded content. At this time, we support eight storage policies:
- 5 days
- 10 days
- 30 days
- 90 days
- 1 year (365 days)
- 2 years (731 days)
- 5 years (1,827 days)
- Forever (default)
The period of time FormSmarts keeps form attachments can be set for each individual file upload field. To change it, edit each file upload field and set the retention period as required for your application.
To prevent accidental data loss, FormSmarts keeps, by default, form attachments on the cloud for the lifetime of the account (“forever” option). While this ensures a high level of data availability and durability, members may then exceed the upload storage quota for their accounts — currently:
- 100 Mb for Business Starter
- 500 Mb for Business Plus
- 1.5 Gb for Business Max
- 10 Gb for Business Premier
- 30 Gb for Business 3
- 100 Gb for Business 4
You can view your current usage in the Resource Usage section of your account. We’ll send you an email if you’re getting close to or exceed the storage space for your plan.
Note: Form attachments for online forms integrating with PayPal using Advanced Integration are retained for at least 20 days, even if the storage policy is set to 5 or 10 days.
Secure File Upload
File upload works with FormSmarts secure form feature so that files attached to a secure form only transit via a secure connection (TLS/SSL), both when uploaded to FormSmarts and when downloaded by the form owner. Form attachments uploaded securely are also encrypted at rest.
Any Feedback?
As always, your feedback is important to us and is our primary inspiration for developing new features and improving existing ones.
Posted on Jan 4th, 2011 in file upload.
14 Comments
Tags: business, file upload, form attachment, form builder, secure form, SSL
Detailed Form Confirmation Page (Summary Page)
FormSmarts supports a number of options to complement the default confirmation page that is displayed when someone submits a form.
You can:
- Redirect form users to your site
- Allow form users to pay a registration fee via PayPal
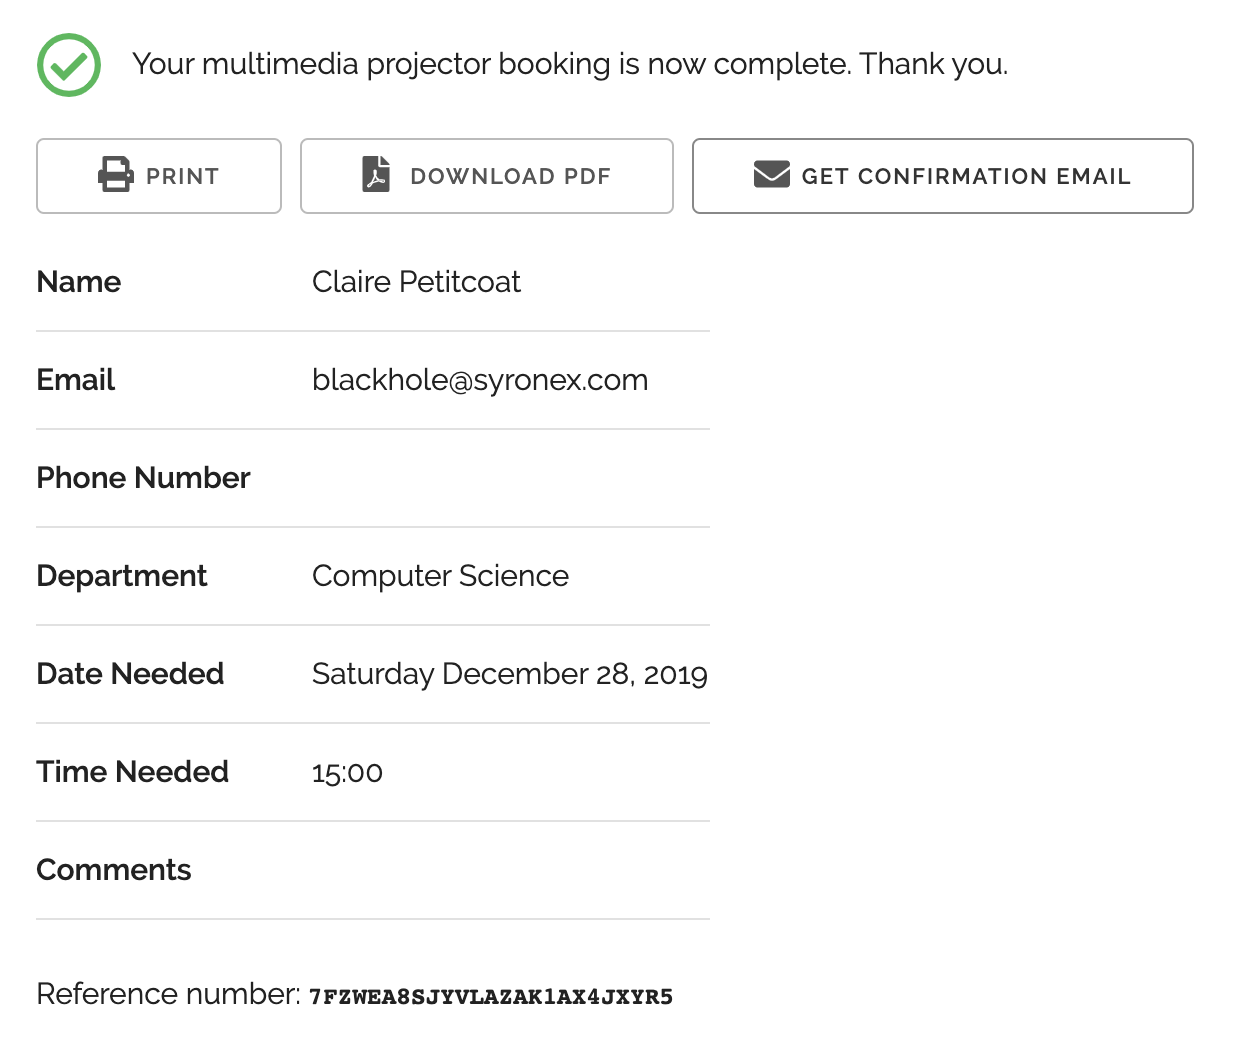
- Show a detailed confirmation page where users can choose to receive a confirmation email or download a PDF receipt
Detailed Form Confirmation Page
The detailed confirmation page, also called Summary Page, shows a summary of the data submitted and allows form users to:
- Have a confirmation email sent to them
- Download a PDF receipt
- Print a copy of the form data.
Feel free to try this demo.
Use the summary page whenever you want users to be able to keep a copy of the information they’ve submitted or a proof of their submission.
- You can change the text at the top of the confirmation message and in the PDF receipt (not supported with all account types)
- The confirmation email, PDF and printable receipts show a total of any fees/prices on the form (see FormSmarts payment integration syntax) to allow members to create invoices and allow cash payments on-site.
PDF receipts may not display correctly in non Western-European languages (Russian, Chinese,…) unless the language is set explicitly with the lang parameter.
Setup Instructions

Visit the Forms Tab of the form builder and click the icon showing a pen to edit the corresponding form. Towards the bottom of the Form Details screen (pictured above), change the On Submission action to ‘Show summary with print, email & PDF options’.
Posted on Oct 12th, 2010 in form builder.
13 Comments
Tags: business, confirmation email, form submission, form to pdf, paypal form, pdf receipt, pro