Posts Tagged ‘form design’
Changing the Color of Form Buttons
The latest version of the Form Builder now allows FormSmarts members to change the color of buttons on their online forms.
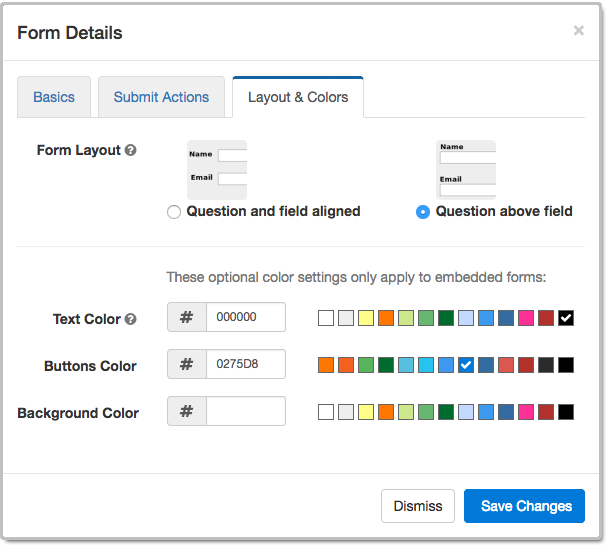
The Buttons Color setting only applies to forms embedded on customers websites. Standalone forms accessed via their FormSmarts.com or f8s.co URL use a standard color scheme.
The color of buttons can only be changed on the current version of our forms. If you’re still using the old one, you probably shouldn’t. The current version is more secure and offers a better user experience. Please update your site.
Like most customizations, this functionality requires at least a Starter account.
As part of this form builder update, we slightly reorganized how information is presented in the Form Details screen illustrated above. The form layout and color settings that were in the Basics tab in earlier versions have been moved to a new Layout & Colors tab.
Posted on Aug 24th, 2018 in online form.
Post a Comment
Tags: embed, form design
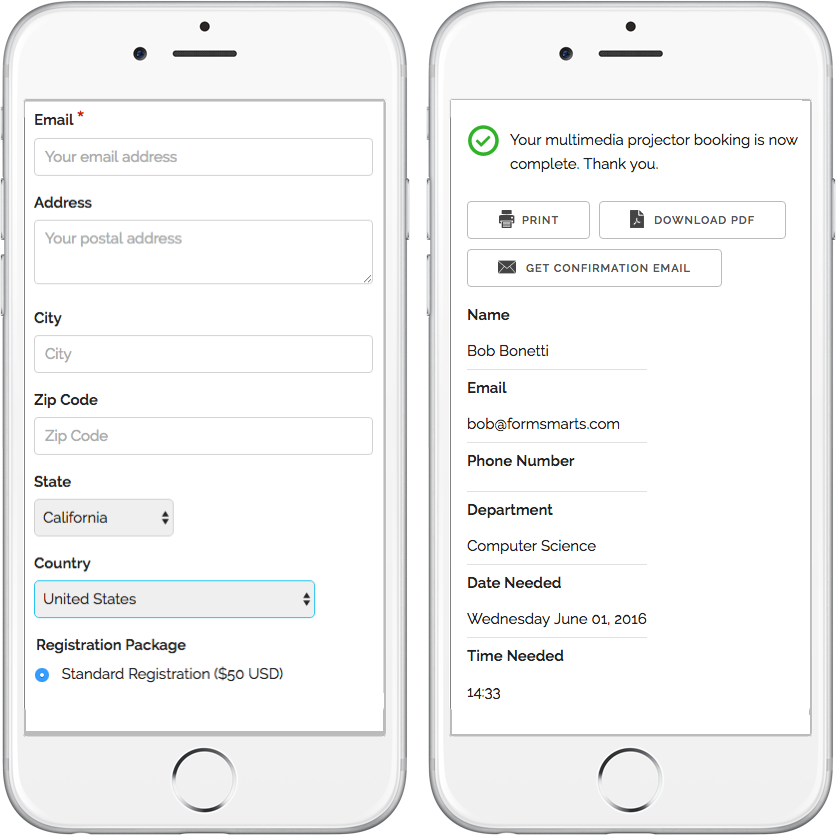
New Form Design
We’ve updated the design of our forms. The new forms provide a superior user experience on all devices; mobile, desktop and smart TV.
How Can I Start Using the New Form Version?
If you’ve joined FormSmarts since March 1, 2016, you are most likely already using the new version. Otherwise you need to migrate your forms to the new version:
- Visit the Settings Tab of the Form Builder and set Form Version to Current
- Copy the new embed code snippet and update your site
- If you’re using standalone forms, use the new FormSmarts.com URL provided.
What Do You Think About the New Form Design?
Please share your thoughts and feedback about the new form design. Write a comment to this blog post or let us know on Twitter @FormSmarts or Facebook.
Posted on Jun 7th, 2016 in online form.
2 Comments
Tags: embed, form builder, form design, mobile form, usability
How to Add a Waiver, Liability Release or Other Contractual Agreement to a Form
The Agreement form widget allows you to add a waiver, liability release, agreement, or any other contract (terms & conditions, privacy statement, policy) to a form.

The Agreement widget is intended to be combined with a required checkbox and an e-signature to capture a person’s consent on an online registration form or any other digital contract. Please try this demo.
- A user can read the agreement inline in a scrollable area
- The text can be popped out to a larger window and even launched full screen
- We provide print and download buttons in the pop-up window
- The text shown in agreement widget allows links and basic formatting: bold, italics, underlining, ordered and unordered lists. Here is a waiver example with formatted text.
- Agreements are currently limited to 20,000 characters, please contact us if you need more.
Agreements are only available with the new generation of FormSmarts forms. You can set your account to the new forms in the Settings tab of the Form Builder.
Posted on Jan 22nd, 2016 in form builder.
2 Comments
Tags: digital contract, form design, howto
How to Add Links and Basic Formatting on a Form & More…
Did you know FormSmarts allows you to include links on a form? You may also use bold, italic and underline for simple formatting.
- Both web links and email links are supported
- You may now add links and formatted text in form filling instructions, text blocks and form submission confirmation messages
- The wiki-like syntax is summarized here.

Posted on Nov 28th, 2013 in online form.
Post a Comment
Tags: form builder, form design
How to Customize the Look of Your Forms with CSS
The online form builder allows you to easily change the layout and colors of your forms when these are embedded into your website. This article discusses how to further customize the look of your online forms by providing your own CSS stylesheet. You can create one (or more) CSS stylesheet for each form.
Disclaimer
The feature discussed in this article is UNOFFICIAL. It is NOT PART OF ANY FORMSMARTS COMMERCIAL OFFERS and we do not provide direct support for it. Feel free to post questions at the bottom of this page. Changing the layout of a form may prevent it to display consistently across browsers.
Verify Your Site & Upload a Logo
To be able to use your own CSS stylesheet, your first need to verify your site and upload a site logo. Uploading a logo creates a website profile on FormSmarts and will allow you to provide your own CSS stylesheet. The logo will be shown on the standalone version of your forms and also on PayPal if you’re using Advanced Payment Integration.
Create a CSS Stylesheet
The CSS code in your stylesheet will be loaded after the default FormSmarts CSS, so any instructions specified in it will override the default. We give a few examples of customizations in the Example section below. More will follow.
Update the Embed Code on Your Site
In the HTML snippet given in the Form Publishing Info screen of the form creator, change the query string portion of the URL from mode=embed&lay=1 to mode=embed&lay=1&style=form.css, where form.css is the path to the CSS file relative to the root of your website. For example, if your website’s URL is http://www.example.com, the CSS file should be at http://www.example.com/form.css.
CSS Styling Examples
Changing the Font and Color of Headings
h2{
font-family:serif;
font-size:14px;
color:orange;
}
Changing the Layout of a Form to Multiple Columns
Logical sections defined by headings can be made into separate columns using the following CSS code and changing the iframe width accordingly.
#section_1{
width:350px;
float:left;
}
#section_2{
width:350px;
float:right;
}

Posted on Nov 21st, 2011 in form builder.
21 Comments
Tags: embed, form design, howto, usability, widget
A Tip to Increase Form Conversion: Use Required Fields Wisely
When creating a form, the form builder allows you to specify whether your want each input field to be required or optional. The meaning of required is obvious: form users will not be able to submit the form unless a value has been entered for each and every required fields. For radio buttons and drop-down lists, that means users will have to explicitly select an option between the ones provided. The decision to make a field required is not to be made lightly, because that could frustrate the user and affect the form’s conversion rate.

The meaning of optional is more subtle as it is different for text input fields (text boxes, multi-line text areas) on the one hand, and radio buttons and drop-down lists on the other hand. That’s because in the latter case users only have a limited set of options to choose from, and the first option in the list is always selected by default.
In the example illustrated below, we’re building a registration form for an event. The form should accommodate up to two delegates. The first delegate is required, but the second one is optional. It turns out that:
- The first set of radio buttons or drop-down list should be required.
- The second set of radio buttons or drop-down list should be optional, with None as the default option.

Because None is selected by default, the form user won’t have to do anything in the most likely scenario where he’s only registering one attendee. This will save him time and frustration, and will statistically increase the form conversion rate and reduce form abandonment.
Posted on Apr 12th, 2011 in form builder.
4 Comments
Tags: form conversion, form design, HTML form, input field
Introducing Form Layouts
We’re pleased to now support two form layouts.
Question (a.k.a. field name) and input field aligned horizontally (default):
|
Question and input field aligned vertically:
|
Which Layout Should You Use?
Most people find web forms designed with the first layout clearer and easier to read. That’s why we use it by default whenever you create a form.
The best layout to use depends on the length of the questions asked on the form.
- When a form is made of short questions like name or email address, prefer the first layout. This is what you should use, for example, for contact forms.
- When the form contains longer questions like Why do you want to work for us?, you should rather use the second layout. It turns out that you should use the second layout for most complex forms like web surveys and job application forms.
How to Change the Layout of a Form
You can change the layout of a form in the form details page. Note that if you’re using a form widget embedded into your site, you must update the HTML code on your site whenever you switch layout.
This is simply because the layout affects the size of the form. Forms accessed by their FormSmarts.com URL don’t have this restriction.
Any Feedback About Form Layouts?
We welcome your feedback about this feature.
Posted on Aug 14th, 2008 in HTML form.
9 Comments
Tags: form design, usability, widget
How to Lay Out Form Input Fields
Your goal as a web publisher is maximize the number of (legitimate) respondents to your forms. A first step towards this goal is to lay out your forms in a way that is intuitive to users, makes forms faster to fill in, and minimizes form validation errors.
It follows four points you should consider when designing a web form:
- choose the most appropriate input field widget for the situation
- group fields together within logical sections
- place multi-line text input fields (textarea in HTML) towards the bottom of the form
- group optional fields together at the bottom of the form
The first point is discussed in details in FormSmarts documentation.
The second point commends, for example, that when you ask people about their contact details, you group all relevant fields (first name, last name, email,…) together. We found that most form designers tend to do that right. The form builder will in the future allow users to define different logical (and visual) sections within web forms.
Multi-line text input fields obviously tend to take longer to fill in than other input fields. They require more effort, thinking and typing, so place them after other fields. Visitors will be less inclined to abandon the form altogether if they have already spent time completing the first part of the form.
The last point is about grouping optional fields together at the bottom of the form. This allows people to quickly review the remaining questions, and skip the fields they don’t want to fill in or don’t apply to them. This may of course conflict with grouping fields within logical sections. In that case, place optional fields at the end of each logical section.
We’ve now enabled comments, and we warmly welcome your thoughts and feedback about this post. if you’re reading this by email, just click on the title to post a reply.
Posted on Jun 29th, 2008 in HTML form.
4 Comments
Tags: form builder, form design, howto, input field, web forms
Ever Wished You Could Reorder Fields?
The set of form-making operations supported by FormSmarts form builder was up to now almost complete, allowing to:
- create a form
- delete a form
- edit form properties (name, title, return URL, form filling instructions, recipient email account)
- add a form input field
- delete a field
- edit field properties (name, description, field type, input widget, optional/required)
The last unsupported operation was to allow users to easily change the order in which fields appear on a form. This is often needed to:
- group fields logically
- group optional fields together at the bottom of a form
- insert a field in a existing form
- move fields around to increase the visual appeal of a form
Reordering fields manually is tedious, as it involves deleting and re-creating fields.
No more. Reordering fields is now a trivial drag & drop: in the fields tab, drag the field you want to move, and drop it in the position you want.
As usual, we welcome your comments and suggestions about this feature.
Posted on Jun 20th, 2008 in form builder.
5 Comments
Tags: form builder, form design, input field
How to Embed a Form Into Your Site
Linking or Embedding?
FormSmarts supports two ways to integrate a form into your website or blog: linking and embedding. Embedding lets you place the form on your site alongside other content. Linking gives your form its own separate web page. Both have advantages and disadvantages. Many users think embedding the form into their site gives them more control. That’s far from always being the best option.
Embed Short Contact & Feedback Forms Onto your Site
You can embed a contact form, customer inquiry form or short feedback form onto your site without affecting user experience.
Embed a Form When…
- The form is short — 10-15 input fields maximum
- It is self comprehensible and form filling instructions are not needed
There is unfortunately no way to embed a larger registration form or survey onto your site without having a negative effect on user experience. For those forms, simply link to the FormSmarts URL of the form and share that URL (or the form’s shortened URL) on social media.
If you decide to embed a form onto your site, always use the embed code snippet provided by the form builder. Do not embed a form using the FormSmarts URL of the standalone form, even if that appears to work with your browser. This conflicts with security restrictions we’re putting in place and those forms will soon be blocked by modern browsers.
Link to Registration Forms and Other Large Forms
A standalone form almost invariably gives a better, frictionless user experience. In order to protect the security and privacy of their users, browsers impose a growing number of restrictions on embedded content. These restrictions affect a form’s usability when it is embedded on your site.
Link To a Form When…
- The form is long or complex
- The form is accessed both by web visitors and via social media or a mailing list
- The form in intended for a large audience, that may be using a wide range of browsers and devices
- Your audience is likely to fill out the form on mobile device
- You expect a large number of form submissions
- Event registration forms and surveys perform better when accessed by URL on their own page
A word of wisdom: Resist the temptation to systematically embed web forms on your site for irrational reasons “because it gives you more (apparent) control”. Some web forms perform better on their own page.
- Standalone forms accessed by URL load faster and are more scalable
- They are more reliable
- They offer more flexibility
- There are no sizing or other user experience issues
Placing the Embedding Code On Your Site
To embed a form into your website, visit the Forms tab, and click Embed to see the form code.

Copy the HTML code, then paste it somewhere in the HTML source of the
host page on your website or blog. If you’re using an online service like Blogger, that’s
all you have to do. Otherwise, you need to publish the page to your web server.
A word of warning: do not try to save the form as an HTML page, and publish that page. This will not work. You must paste the code exactly as given. Do not attempt to alter, remove, or hide the mention “web form by FormSmarts”, or the link to our Privacy Policy. This would be a breach of our Terms of Use, and your account would risk to be terminated without notice.
Changing a Form, Once the Code Is on Your Site
Any changes you make to a form using the form builder will show up straight away on your website. You do not need to update the embedding code. However, as a result of adding more fields, or changing a text box to a larger text area, the frame containing the form may no longer be high enough to fit the form. You will then need to re-publish the embedding code to your site. See the section about Form Sizing below.
Customizing Your Form
You can customize several aspects of your forms in the Form Details screen of your account.
Web Form Sizing
Why Is There Extra Space at the Bottom of the Form?
Forms are contained within an HTML frame (“iframe” for geeks). The frame has a fixed size, which is computed for each form, based on several factors, like the number and type of fields used, and the form layout chosen.
It is necessary to leave room at the bottom of the form for error messages that may need to be displayed during a form submission. That’s the reason for the extra space at the bottom of a form.
Manually Changing the Height or Width of a Form
You can change the size of a web form widget by editing the value of the height and width attributes in the HTML snippet (a.k.a. form embed code) given by the form builder.
We do not recommend changing the height of forms. If you do, remember to allow extra space at the bottom of the form, as discussed in the previous section.
The width of embedded web forms can be resized down to 360px without side-effects, and should degrade well beyond that.
How Do I Get Rid of the Vertical Scrollbar
With time, you may need to add more fields to your forms, but forget to refresh the form HTML code on your site. Since the frame height is hard-coded into the code on your website, the form may no longer fit into the frame, and a vertical scrollbar will then appear. That is not desirable on a usability standpoint, so you are advised to update the code on your site whenever you add new fields, or change a text box to a text area.
Only One Form Per Page
It is against our terms of service to embed more than one form in a single web page.
Embed a Form to a Facebook Fan Page
The easiest way to add a form to a Facebook page is to use the FormSmarts URL that comes with each form. Click on the URL link in the Forms Tab of the form builder to show form URLs instead of embedding code. You may also embed the form into your Facebook page using an FBML Box. See instructions to embed a form to Facebook. Feel free to post your questions in the relevant thread of our forum on FormSmarts’ Facebook page if you need help.
Posted on May 21st, 2008 in HTML form.
40 Comments
Tags: embed, facebook, form builder, form design, howto, web forms, widget