Posts Tagged ‘form builder’
« Older Entries Newer Entries »
Form Owner Verification with Google Page Creator
To verify you own a website, we ask you to create a file with a specific name on your web host. If you use Google Page Creator, proceed as follows to verify your site:
- create a new page
- enter the verification file name (e.g. syronex8800…2523.html) as the page title
- publish the new page
Form ownership verification is optional but recommended to build trust with your visitors. It is required you intend to advertise a web form URL by email.
Recent Issues with Google Page Creator
Although hundreds of Google Page Creator users have successfully verified their site, we’ve had a few issues in the last few days. Google was redirecting some of the requests to googlepages.com to the same page on google.com, thus preventing us to check the verification file exists. We obviously have a limited scope for action, but we identified a likely cause and took technical measures that seem to have solved the problem. Leave a comment if you experience any more problems.
Posted on Jul 2nd, 2008 in form builder.
1 Comment
Tags: embed, form builder, google page creator, widget
How to Lay Out Form Input Fields
Your goal as a web publisher is maximize the number of (legitimate) respondents to your forms. A first step towards this goal is to lay out your forms in a way that is intuitive to users, makes forms faster to fill in, and minimizes form validation errors.
It follows four points you should consider when designing a web form:
- choose the most appropriate input field widget for the situation
- group fields together within logical sections
- place multi-line text input fields (textarea in HTML) towards the bottom of the form
- group optional fields together at the bottom of the form
The first point is discussed in details in FormSmarts documentation.
The second point commends, for example, that when you ask people about their contact details, you group all relevant fields (first name, last name, email,…) together. We found that most form designers tend to do that right. The form builder will in the future allow users to define different logical (and visual) sections within web forms.
Multi-line text input fields obviously tend to take longer to fill in than other input fields. They require more effort, thinking and typing, so place them after other fields. Visitors will be less inclined to abandon the form altogether if they have already spent time completing the first part of the form.
The last point is about grouping optional fields together at the bottom of the form. This allows people to quickly review the remaining questions, and skip the fields they don’t want to fill in or don’t apply to them. This may of course conflict with grouping fields within logical sections. In that case, place optional fields at the end of each logical section.
We’ve now enabled comments, and we warmly welcome your thoughts and feedback about this post. if you’re reading this by email, just click on the title to post a reply.
Posted on Jun 29th, 2008 in HTML form.
4 Comments
Tags: form builder, form design, howto, input field, web forms
Ever Wished You Could Reorder Fields?
The set of form-making operations supported by FormSmarts form builder was up to now almost complete, allowing to:
- create a form
- delete a form
- edit form properties (name, title, return URL, form filling instructions, recipient email account)
- add a form input field
- delete a field
- edit field properties (name, description, field type, input widget, optional/required)
The last unsupported operation was to allow users to easily change the order in which fields appear on a form. This is often needed to:
- group fields logically
- group optional fields together at the bottom of a form
- insert a field in a existing form
- move fields around to increase the visual appeal of a form
Reordering fields manually is tedious, as it involves deleting and re-creating fields.
No more. Reordering fields is now a trivial drag & drop: in the fields tab, drag the field you want to move, and drop it in the position you want.
As usual, we welcome your comments and suggestions about this feature.
Posted on Jun 20th, 2008 in form builder.
5 Comments
Tags: form builder, form design, input field
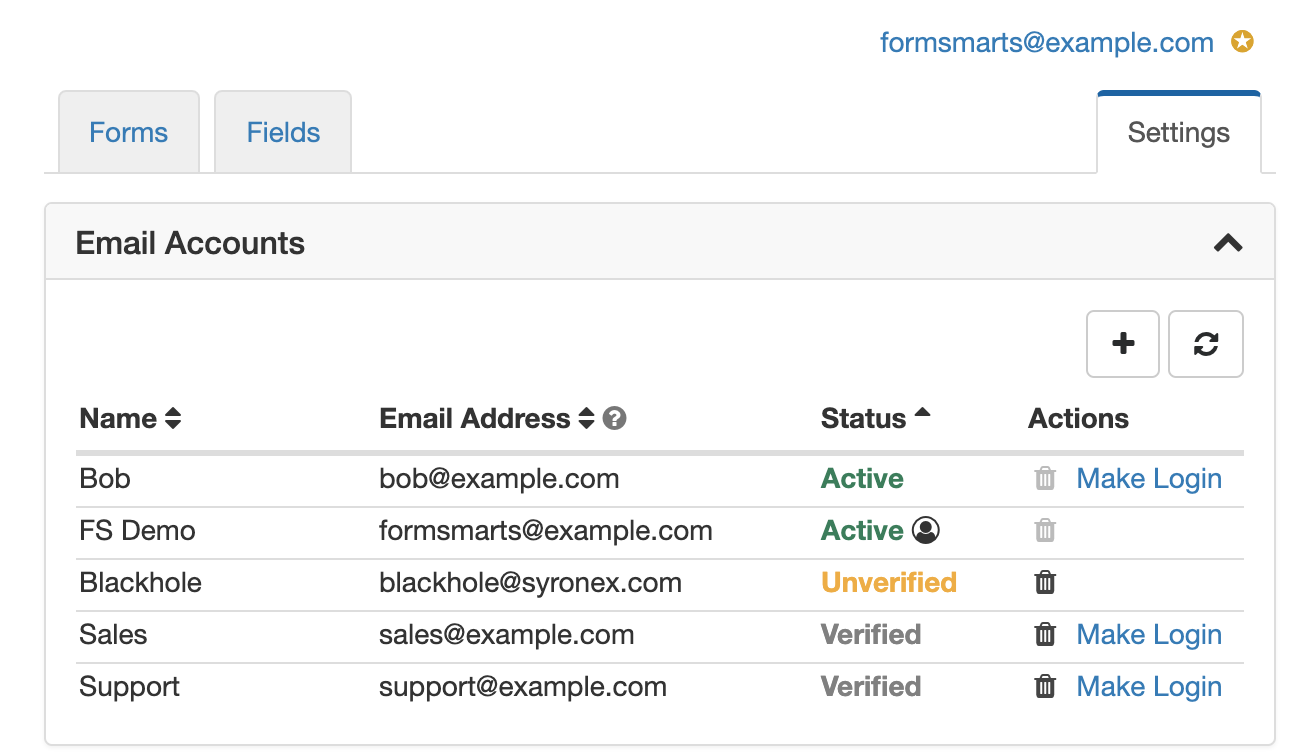
Managing Email Accounts & Form Recipients
You can manage the email addresses linked to your FormSmarts account in the Settings tab of the online form builder, under Email Accounts.
Adding an Email Account to FormSmarts
Before you can start using an email address as the destination email of a form, you must add it to your account and verify it.
To add a new email account to FormSmarts, visit the Settings tab of the form builder. Click the Email Accounts link and enter a name and email address under Add an Account.
FormSmarts verifies that the owner of an email account agrees to his email being used by sending a verification link. Once the email account owner has visited the verification link, the status of that email address will change to Verified. Use the Refresh button to check if a newly added email account has just been verified. You can start using an email address as a form subscriber or as your FormSmarts login as soon as it shows as Verified.
Changing the Destination Emails of a Form
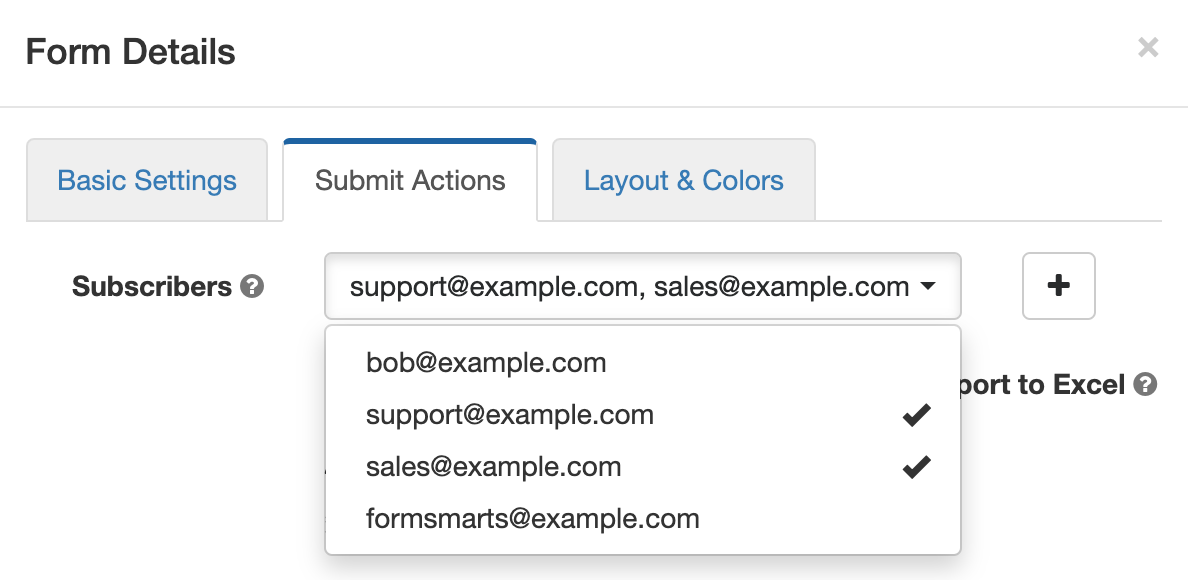
When you create a new form, responses are sent to your login email address by default. To have a form sent to another email account (or email accounts):
- Add a new email address to your account as described in the last section.
- Click on the icon showing a pen to edit the relevant form and check or uncheck email subscribers as required in the Submit Actions tab as illustrated on the screenshot above.
Note: An email address will only appear in the list after it has been verified (see previous section).
Changing Your Login Email
You can set any of the verified email addresses registered on your account as your FormSmarts login. Note however that you won’t be able to use an email address as you login if it’s already the login of another account.
A user icon is displayed next to your login email address.
Note: Any email addresses that you use as your login or form recipient has the Active status and cannot be removed (the corresponding trash can will be grayed out).
Removing an Email Address From Your Account
To remove an email address from your FormSmarts account, Visit the Email Accounts pane of the Settings tab and click on the trash can icon corresponding to the email address you want to remove.
Trash can icon grayed out? The trash can icon will be grayed out if the corresponding email address is still in use as a form recipient by at least one form or is the account’s login. To remove the email address, first edit each of the forms in the Forms tab and uncheck that email address under Form Subscribers (see screenshot above). Then go back to the Settings tab, refresh the list of email accounts, and click on the relevant trash can icon.
Give Feedback!
We welcome your feedback about this feature. This will help us improve it in the future.
Posted on Jun 16th, 2008 in form builder.
25 Comments
Tags: form builder, form recipient, form results
Changing a Form’s Recipient Email Address
We get many emails from users asking how they can modify the email address held on their FormSmarts account.
At this time, each FormSmarts account is bound to a single email address. The address is used both as the account username, and as the recipient of all the forms on the account.
We will soon be upgrading FormSmarts Form Builder to provide more flexible email address management.
Users will be able to:
- change the login email address
- specify a different recipient email address for each form
Posted on Jun 10th, 2008 in form builder.
2 Comments
Tags: email notification, form builder, form recipient, upcoming
How to Embed a Form Into Your Site
Linking or Embedding?
FormSmarts supports two ways to integrate a form into your website or blog: linking and embedding. Embedding lets you place the form on your site alongside other content. Linking gives your form its own separate web page. Both have advantages and disadvantages. Many users think embedding the form into their site gives them more control. That’s far from always being the best option.
Embed Short Contact & Feedback Forms Onto your Site
You can embed a contact form, customer inquiry form or short feedback form onto your site without affecting user experience.
Embed a Form When…
- The form is short — 10-15 input fields maximum
- It is self comprehensible and form filling instructions are not needed
There is unfortunately no way to embed a larger registration form or survey onto your site without having a negative effect on user experience. For those forms, simply link to the FormSmarts URL of the form and share that URL (or the form’s shortened URL) on social media.
If you decide to embed a form onto your site, always use the embed code snippet provided by the form builder. Do not embed a form using the FormSmarts URL of the standalone form, even if that appears to work with your browser. This conflicts with security restrictions we’re putting in place and those forms will soon be blocked by modern browsers.
Link to Registration Forms and Other Large Forms
A standalone form almost invariably gives a better, frictionless user experience. In order to protect the security and privacy of their users, browsers impose a growing number of restrictions on embedded content. These restrictions affect a form’s usability when it is embedded on your site.
Link To a Form When…
- The form is long or complex
- The form is accessed both by web visitors and via social media or a mailing list
- The form in intended for a large audience, that may be using a wide range of browsers and devices
- Your audience is likely to fill out the form on mobile device
- You expect a large number of form submissions
- Event registration forms and surveys perform better when accessed by URL on their own page
A word of wisdom: Resist the temptation to systematically embed web forms on your site for irrational reasons “because it gives you more (apparent) control”. Some web forms perform better on their own page.
- Standalone forms accessed by URL load faster and are more scalable
- They are more reliable
- They offer more flexibility
- There are no sizing or other user experience issues
Placing the Embedding Code On Your Site
To embed a form into your website, visit the Forms tab, and click Embed to see the form code.

Copy the HTML code, then paste it somewhere in the HTML source of the
host page on your website or blog. If you’re using an online service like Blogger, that’s
all you have to do. Otherwise, you need to publish the page to your web server.
A word of warning: do not try to save the form as an HTML page, and publish that page. This will not work. You must paste the code exactly as given. Do not attempt to alter, remove, or hide the mention “web form by FormSmarts”, or the link to our Privacy Policy. This would be a breach of our Terms of Use, and your account would risk to be terminated without notice.
Changing a Form, Once the Code Is on Your Site
Any changes you make to a form using the form builder will show up straight away on your website. You do not need to update the embedding code. However, as a result of adding more fields, or changing a text box to a larger text area, the frame containing the form may no longer be high enough to fit the form. You will then need to re-publish the embedding code to your site. See the section about Form Sizing below.
Customizing Your Form
You can customize several aspects of your forms in the Form Details screen of your account.
Web Form Sizing
Why Is There Extra Space at the Bottom of the Form?
Forms are contained within an HTML frame (“iframe” for geeks). The frame has a fixed size, which is computed for each form, based on several factors, like the number and type of fields used, and the form layout chosen.
It is necessary to leave room at the bottom of the form for error messages that may need to be displayed during a form submission. That’s the reason for the extra space at the bottom of a form.
Manually Changing the Height or Width of a Form
You can change the size of a web form widget by editing the value of the height and width attributes in the HTML snippet (a.k.a. form embed code) given by the form builder.
We do not recommend changing the height of forms. If you do, remember to allow extra space at the bottom of the form, as discussed in the previous section.
The width of embedded web forms can be resized down to 360px without side-effects, and should degrade well beyond that.
How Do I Get Rid of the Vertical Scrollbar
With time, you may need to add more fields to your forms, but forget to refresh the form HTML code on your site. Since the frame height is hard-coded into the code on your website, the form may no longer fit into the frame, and a vertical scrollbar will then appear. That is not desirable on a usability standpoint, so you are advised to update the code on your site whenever you add new fields, or change a text box to a text area.
Only One Form Per Page
It is against our terms of service to embed more than one form in a single web page.
Embed a Form to a Facebook Fan Page
The easiest way to add a form to a Facebook page is to use the FormSmarts URL that comes with each form. Click on the URL link in the Forms Tab of the form builder to show form URLs instead of embedding code. You may also embed the form into your Facebook page using an FBML Box. See instructions to embed a form to Facebook. Feel free to post your questions in the relevant thread of our forum on FormSmarts’ Facebook page if you need help.
Posted on May 21st, 2008 in HTML form.
40 Comments
Tags: embed, facebook, form builder, form design, howto, web forms, widget
Building Successful Web Forms
Web forms play a key role for visitor (and customer) interaction on many
sites. However, many web designers don’t realize that there may be huge
differences in form abandonment ratio, depending on how well the form is
designed. In this post and follow ups, we’ll give you some tips to help
you make your web forms an effective communication channel.
Always provide form filling instructions.
Don’t assume that all of your visitors will understand how to submit a form without further explanation. Short and clear form filling instructions can reduce form abandonment, and increase the quality of the information collected.
- include a call to action phrase like “Please fill out this form to
contact XYZ” - indicate the purpose of the form and the recipient of the information collected
- if applicable, confirm that you will reply, and give an indication of the time frame
Select the correct data type for each input field.
Because of necessary form validation, choosing and incorrect data type may prevent a form user from submitting valid information. When this happens, it is likely to lead to form abandonment.
For example, if you specify that a form field can only contain a Number, it may not work for a phone number. 1233456789 will work, but not 123-345-6789. So use
the Phone type instead. In many cases, the form builder will
pre-select a type for you, but not always. Read
more about selecting an input field data type in the form builder documentation.
Choose the most appropriate input field widget.
Don’t restrict yourself to text boxes and drop-down lists. Take advantage of the full range of HTML form fields with radio buttons and checkboxes. Learn when to use each one.
Using a drop-down list for a yes/no question will slow down the form user, and increase the chances (s)he gives up. Use radio buttons instead. Read tips about choosing the best input field widget in the form builder documentation.
Brand your forms for instant visual recognition.
Always brand your web forms with your own logo. This helps visitors
recognize at first sight who they are about to send information to.
Posted on May 6th, 2008 in HTML form.
Post a Comment
Tags: form builder, form design, howto, input field, web forms
Form & Input Fields Now Editable
The form builder now allows the modification of input fields and web form details. Click on the ![]() icon to edit a form or field.
icon to edit a form or field.
Posted on Apr 16th, 2008 in form builder.
Post a Comment
Tags: form builder, input field, upcoming, web forms
Form Builder and Form Spam Filter Updated
A major FormSmarts upgrade was rolled out today. Changes include:
- New features in the form generator, like the ability to delete a field in a form
- A simplified user interface for generated web forms
- A major upgrade of the form spam protection engine
Posted on Dec 28th, 2007 in form spam.
Post a Comment
Tags: form builder, upcoming, web forms
Why You Should Care About Web Form Usability
Many organizations don’t publish any email addresses on their website because of email spam. On those sites, a contact form is the only way for a visitor to reach the site owner. This should imply that website designers take a lot of care to ensure that web forms are usable by anyone, as email is.
Owing to comment spam and more generally web form abuse, many sites now protect forms with CAPTCHAs or other devices meant to prevent automated software from successfully submitting forms.
The accessibility issues associated with CAPTCHAs for visually impaired people are well known, so I’m not going to discuss this further. I’m going to talk here about people fortunate enough to have normal sight and hearing, but who may also have a hard time using web forms.
Visual CAPTCHAs
Many CAPTCHAs systems are difficult to read because they were designed to defeat automated attempts to read the image using OCR. As the designer of a CAPTCHA system, I’ve been trained more than the average web user to reading them. Still, I’m surprised by how often I miss the correct code on the first try. A high level of image obfuscation may be needed for very large websites like Google or Yahoo, for which it is realistic to believe some people would be ready to invest a lot of effort to break the system, given the potential payoff. But it’s very unlikely someone will try to break the CAPTCHA of the average website. So those should at least be easy-to-read and short, if CAPTCHA there has to be.
Not every web user downloads images. More and more people browse the web via cellphones, on which web usage is charged per megabyte. Users are then inclined not to load images to reduce costs. This is even the default setting on some low-end cellphones. Those users won’t see the CAPTCHA.
Audio CAPTCHAs
Audio CAPTCHAs are commonly accepted as a good complement to visual CAPTCHAs for the visually impaired. Besides the technical reasons for not being able to listen to an audio file on a computer (e.g. no sound support, no loudspeakers or earphones fitted), there are also social reasons. First, there are social environments where it may be rude or prohibited. For example in public libraries and open space offices. Second, the web is global and non-native English speakers may not be able to understand what is said in the audio CAPTCHA.
JavaScript
Some websites require JavaScript to be enabled for submitting a form. It may be because JavaScript is needed to (re)load the CAPTCHA, or because it is used for client-side validation and users not supporting it are redirected to an error page.
If very few people still use browsers without JavaScript support on desktop computers, that is not true for browsers on mobile platforms. More to the point, some people actively disable JavaScript. They do so for privacy reasons, or to get rid of ads. We’ve also seen corporate-wide policies to disable JavaScript for security reasons, i.e. to prevent cross-site scripting attacks and sneaky JavaScript redirects. There are surely compelling forces pushing towards JavaScript acceptance to take advantage of rich and interactive AJAX applications, but those users nonetheless exist and shouldn’t be ignored.
Flash Forms
Some web publishers see using Flash forms as a viable option, presumably in an attempt to reduce form spam. Adobe claims Flash reaches 99% of “Internet viewers” (Sept. 2007). What they mean is that 99% of desktop computers in mature markets have the oldest version of Flash (Flash 6) installed. The figure goes down to 93.3% for Flash 9, and only includes six countries. It goes down to 89.4% for users in emerging markets (97.7% for Flash 6). The figure would be more meaningful prorated to the share of web users in each market segment. Still, I find this figure very high given that for people who are not using video-sharing sites, Flash is mainly a technology for displaying obtrusive ads. I feel that Flash ubiquity could drop a lot if browsers had an option to disable it, as they do for Java or JavaScript.
Posted on Dec 11th, 2007 in HTML form.
1 Comment
Tags: accessibility, form builder, usability, web forms