Posts Tagged ‘input field’
A Tip to Increase Form Conversion: Use Required Fields Wisely
When creating a form, the form builder allows you to specify whether your want each input field to be required or optional. The meaning of required is obvious: form users will not be able to submit the form unless a value has been entered for each and every required fields. For radio buttons and drop-down lists, that means users will have to explicitly select an option between the ones provided. The decision to make a field required is not to be made lightly, because that could frustrate the user and affect the form’s conversion rate.

The meaning of optional is more subtle as it is different for text input fields (text boxes, multi-line text areas) on the one hand, and radio buttons and drop-down lists on the other hand. That’s because in the latter case users only have a limited set of options to choose from, and the first option in the list is always selected by default.
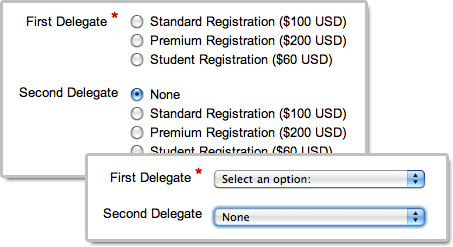
In the example illustrated below, we’re building a registration form for an event. The form should accommodate up to two delegates. The first delegate is required, but the second one is optional. It turns out that:
- The first set of radio buttons or drop-down list should be required.
- The second set of radio buttons or drop-down list should be optional, with None as the default option.

Because None is selected by default, the form user won’t have to do anything in the most likely scenario where he’s only registering one attendee. This will save him time and frustration, and will statistically increase the form conversion rate and reduce form abandonment.
Posted on Apr 12th, 2011 in form builder.
4 Comments
Tags: form conversion, form design, HTML form, input field
Web Form Builder Upgrade
This release of FormSmarts introduces over one hundred improvements, leading to our most powerful, reliable and generous offer yet.
Important Reminder
Please add FormSmarts sender email formsmarts-noreply@syronex.com to your contacts, whitelist, or list of allowed senders and instruct any other form recipients to do so too. This should ensure your web forms are (and continue to be) always correctly delivered to your Inbox.
Increased Input Fields Allowance
To allow all users to take advantage of the new Heading and Text Block widgets introduced with this release, we’ve increased the number of fields you can use on a form.
- FormSmarts Standard users can add up to 15 fields on each form using their referral points.
- FormSmarts Pro users can add up to 60 fields on each form.
Be a Good Web-Citizen
- Report bugs. However intense our testing efforts before releasing a new version of the form builder, bugs may remain due to the number of different browsers and versions in use. Please report any suspected bugs on the forum or by email.
- Show your support. Whether you are a Standard user getting the web form service for free or a FormSmarts Pro customer paying the price of a business lunch for a year of service, please show your support by pressing the “Like” button on our Facebook page and following us on Twitter.
Major Changes
If many of the changes are improvements to FormSmarts server-side software which are not directly visible to you, all affect the quality of the service we provide you.
- Form data storage and Excel reporting are coming out of Beta, and you can now activate those for each form in the Form Details screen of your account.
- We’ve improved several aspects of the form creator‘s interface.
- We now support headings and text blocks on forms; details in another post.
Posted on May 5th, 2010 in form builder.
4 Comments
Tags: form to excel, input field, news, paypal form
How to Add Headings & Text Blocks to a Form
Headings
Use headings to create logical sections within your forms. For example, you might want to split a job application form into a Contact Details and a Past Employment section.
To add a heading, select the Heading widget in the Fields tab of the form builder. Enter the text of the heading into the Text box and save.

Text Blocks
The Text Block widget that allows you to insert text anywhere on a form. Example uses include:
- Providing directions to guide respondents and help them fill out the form accurately
- Adding a short disclaimer or waiver at the bottom of a form
- Specifying an amount of money on a payment form
- Defining the terms of a digital contract e-signed by the user

Text blocks are limited to 2,000 characters (250 characters with Free/Basic accounts). To add a waiver, contract, or terms of service, use an Agreement widget instead.
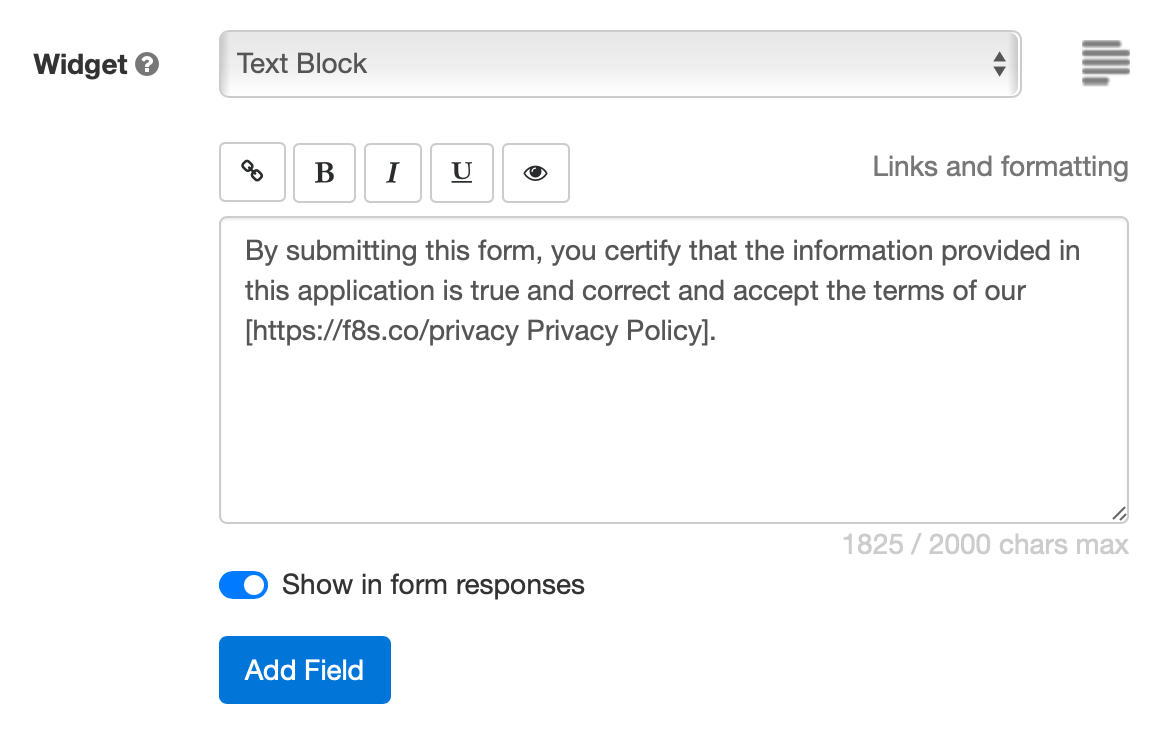
To add a text block to a form, select the Text Block widget in the Fields tab of the form builder, as illustrated below.

Links and Formatting
The form builder allows you to insert links, specify bold text, and italicize and underline text using either the formatting toolbar (screenshot above) or with the wiki-style formatting syntax below:
| Text with Commands | Formatted Text | |
|---|---|---|
| Web Link | This is a [http://FormSmarts.com link to FormSmarts]. | This is a link to FormSmarts. |
| Email Link | This is an [joe@example.com email link]. | This is an email link. |
| Bold | This text is *important*. | This text is important. |
| Italics | So is **this one**. | So is this one. |
| Underlining | Use underlining __sparingly__! | Use underlining sparingly! |
| Unordered List | * red * green * blue |
|
| Ordered List | 1. red 2. green 3. blue |
|
Links and formatting commands are supported in text blocks, agreements, form filling instructions, form submission confirmation messages, confirmation emails, auto-responder messages and checkbox labels. Check out this example.
Ordered & unordered lists are only supported in agreements/waivers at this time.
- Links open in a new window
- Email links are not supported in checkbox labels at this time
Should You Show Text Blocks in Form Responses?
If you use text blocks to create a digital contract between you and the form respondent, the terms of the contract may need to appear in the copy of the submitted data given to both parties.
Instructions for filling out a form are only needed on the form itself, so by default text blocks are not shown in form responses or confirmation emails/PDF receipts.
Toggle on Show in form responses (see screenshot above) to display text blocks in both form responses and the confirmation email or PDF receipt issued to the person who submitted the form.
This option is not available with all types of accounts.
Posted on May 5th, 2010 in form builder.
20 Comments
Tags: digital contract, input field
Date Type & Datepicker

Anyone using a standard text field for dates should upgrade to the new date type.
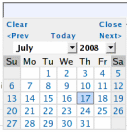
Fields with the date type show as a text box, with a datepicker poping up when the field is selected. A datepicker allows users to input dates in an intuitive and interactive way, therefore reducing the risk of errors.
Date Format
Another reason for using a datepicker is to alleviate the date format problem. Because of date formatting differences, 12/07/2008 means December 7th in the U.S., but July 12th in Europe. Although we initially thought of adopting the ISO/W3C date format “yyyy-mm-dd”, we eventually preferred the U.S. format “mm/dd/yyyy”. That is, until we release an internationalized version of FormSmarts.
Because users don’t interact directly with the text field (unless they want to), but rather with the datepicker, they don’t have to be aware of date formatting issues.
To avoid any misunderstandings, dates are displayed as Sunday July 20, 2008.
Any questions or comments? Leave a reply. We are in particular interested in feedback from non U.S. users.
Posted on Jul 20th, 2008 in form handler.
3 Comments
Tags: email notification, form handler, input field, international, web forms
Geolocalized Country Selection Field
We’re going to add over the week-end two new input field types: country, and date. You should upgrade any web forms currently using a standard text field for country or date to the new types.
When to Use the Country Type
Choose the country type whenever you want to show on a form a dropdown list with the 280 odd ISO country names.
Visitor Country Selected by Default
A country list field is typically used to ask the visitor about his/her country of residence. You’ve certainly already experienced the frustration of having to search for your country in a long list each time you fill out a form. At FormSmarts, we want to save time to everyone, so the visitor’s country is automatically selected by default.
That way, users only have to change the selection if the question asks them about a country different from their country of residence. For example, “Where did you travel last time you went abroad?”
Reducing the time needed to fill a form helps reduce form abandonment.
Any questions or comments? Leave a reply.
P.S. We’ll present the date type in another post.
Posted on Jul 17th, 2008 in form handler.
6 Comments
Tags: form handler, geolocalization, input field, web forms
How to Lay Out Form Input Fields
Your goal as a web publisher is maximize the number of (legitimate) respondents to your forms. A first step towards this goal is to lay out your forms in a way that is intuitive to users, makes forms faster to fill in, and minimizes form validation errors.
It follows four points you should consider when designing a web form:
- choose the most appropriate input field widget for the situation
- group fields together within logical sections
- place multi-line text input fields (textarea in HTML) towards the bottom of the form
- group optional fields together at the bottom of the form
The first point is discussed in details in FormSmarts documentation.
The second point commends, for example, that when you ask people about their contact details, you group all relevant fields (first name, last name, email,…) together. We found that most form designers tend to do that right. The form builder will in the future allow users to define different logical (and visual) sections within web forms.
Multi-line text input fields obviously tend to take longer to fill in than other input fields. They require more effort, thinking and typing, so place them after other fields. Visitors will be less inclined to abandon the form altogether if they have already spent time completing the first part of the form.
The last point is about grouping optional fields together at the bottom of the form. This allows people to quickly review the remaining questions, and skip the fields they don’t want to fill in or don’t apply to them. This may of course conflict with grouping fields within logical sections. In that case, place optional fields at the end of each logical section.
We’ve now enabled comments, and we warmly welcome your thoughts and feedback about this post. if you’re reading this by email, just click on the title to post a reply.
Posted on Jun 29th, 2008 in HTML form.
4 Comments
Tags: form builder, form design, howto, input field, web forms
Ever Wished You Could Reorder Fields?
The set of form-making operations supported by FormSmarts form builder was up to now almost complete, allowing to:
- create a form
- delete a form
- edit form properties (name, title, return URL, form filling instructions, recipient email account)
- add a form input field
- delete a field
- edit field properties (name, description, field type, input widget, optional/required)
The last unsupported operation was to allow users to easily change the order in which fields appear on a form. This is often needed to:
- group fields logically
- group optional fields together at the bottom of a form
- insert a field in a existing form
- move fields around to increase the visual appeal of a form
Reordering fields manually is tedious, as it involves deleting and re-creating fields.
No more. Reordering fields is now a trivial drag & drop: in the fields tab, drag the field you want to move, and drop it in the position you want.
As usual, we welcome your comments and suggestions about this feature.
Posted on Jun 20th, 2008 in form builder.
5 Comments
Tags: form builder, form design, input field
Building Successful Web Forms
Web forms play a key role for visitor (and customer) interaction on many
sites. However, many web designers don’t realize that there may be huge
differences in form abandonment ratio, depending on how well the form is
designed. In this post and follow ups, we’ll give you some tips to help
you make your web forms an effective communication channel.
Always provide form filling instructions.
Don’t assume that all of your visitors will understand how to submit a form without further explanation. Short and clear form filling instructions can reduce form abandonment, and increase the quality of the information collected.
- include a call to action phrase like “Please fill out this form to
contact XYZ” - indicate the purpose of the form and the recipient of the information collected
- if applicable, confirm that you will reply, and give an indication of the time frame
Select the correct data type for each input field.
Because of necessary form validation, choosing and incorrect data type may prevent a form user from submitting valid information. When this happens, it is likely to lead to form abandonment.
For example, if you specify that a form field can only contain a Number, it may not work for a phone number. 1233456789 will work, but not 123-345-6789. So use
the Phone type instead. In many cases, the form builder will
pre-select a type for you, but not always. Read
more about selecting an input field data type in the form builder documentation.
Choose the most appropriate input field widget.
Don’t restrict yourself to text boxes and drop-down lists. Take advantage of the full range of HTML form fields with radio buttons and checkboxes. Learn when to use each one.
Using a drop-down list for a yes/no question will slow down the form user, and increase the chances (s)he gives up. Use radio buttons instead. Read tips about choosing the best input field widget in the form builder documentation.
Brand your forms for instant visual recognition.
Always brand your web forms with your own logo. This helps visitors
recognize at first sight who they are about to send information to.
Posted on May 6th, 2008 in HTML form.
Post a Comment
Tags: form builder, form design, howto, input field, web forms
Form & Input Fields Now Editable
The form builder now allows the modification of input fields and web form details. Click on the ![]() icon to edit a form or field.
icon to edit a form or field.
Posted on Apr 16th, 2008 in form builder.
Post a Comment
Tags: form builder, input field, upcoming, web forms