Posts Tagged ‘form to excel’
Enhancing Your Reporting Experience: New Features in the Report Generator
We’re excited to announce two additions to our Report Generator, designed to empower our users to create custom Excel reports according to their unique needs.
Choose the Fields (Columns) Shown in Excel Reports

Our Excel reports now offer even more flexibility by allowing you to customize the displayed fields/columns. By default, reports include essential information like form fields, submission reference numbers, submission links, submission timestamps, payment details (for payment forms), and contextual information passed during submission.
However, we understand that your reporting needs may vary. That’s why we’ve introduced the ability to create tailored reports, that include only the specific fields relevant to your analysis. Simply navigate to the Fields section in the Settings and check/uncheck the desired fields and metadata items to include/exclude them in your report. It’s that simple!
Filter Form Responses by Tags

We’ve taken customization a step further by introducing the option to filter form responses based on tags. If you’ve assigned tags to form responses or if our system has automatically tagged submissions, you can now generate reports that exclusively include submissions matching specific tag criteria.
For instance, imagine creating a report highlighting all event attendees who not only registered but also checked in. This can be achieved by filtering submissions with the “checked-in” system tag, added when the event organizer scans QR codes from FormSmarts confirmation emails or PDF receipts.
These new features are designed to enhance your reporting experience, providing you with better control over the information presented in your Excel reports. We believe that by offering these customization options, we’re empowering you to extract precisely the insights you need.
We’d love to hear your thoughts—share your feedback with us!
Posted on Nov 15th, 2023 in event registration, form builder.
Post a Comment
Tags: excel, form results, form to excel, report generator
When Should You Export Forms to Native Excel (XLSX) instead of CSV?
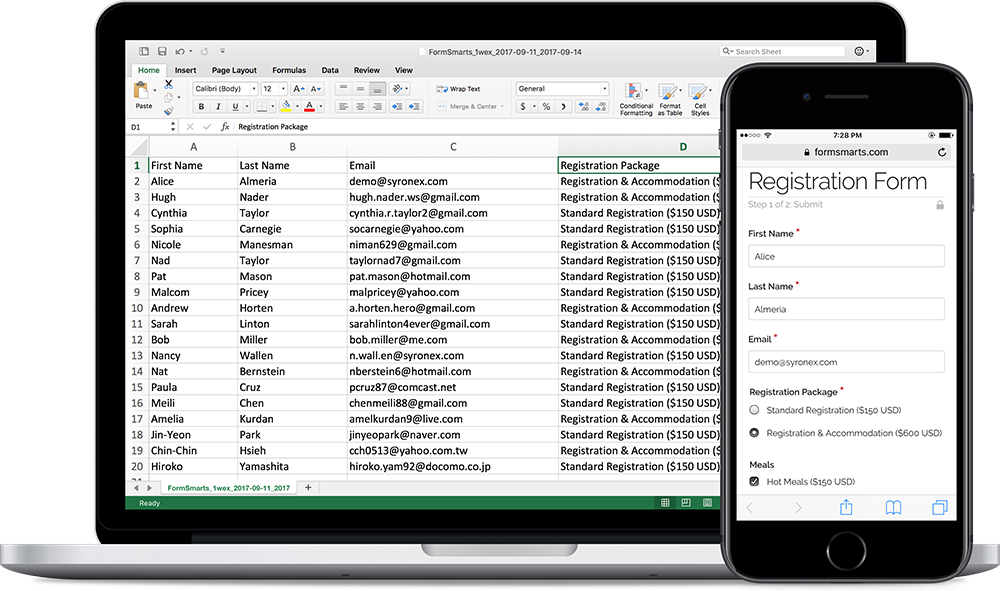
FormSmarts allows customers to collect online form submissions on the cloud and download aggregated entries in a format, CSV, which is supported by all spreadsheet applications (including Microsoft Excel, Apple Numbers and Apache OpenOffice) and many other data analysis tools. We’ve recently added the option to export form responses to native Excel format (.xlsx or .xls) instead of the default CSV for Excel.
The main reason we decided to support the new export format is to solve an issue with phone number fields that may not be displayed correctly when Excel opens a CSV file. The Excel XLSX format also has a few other benefits, but we expect most members to continue using the default CSV format in the foreseeable future. Please read on to find out if and when you would benefit from using the new format.
Benefits of the Excel .xlsx Format
Phone Number Fields
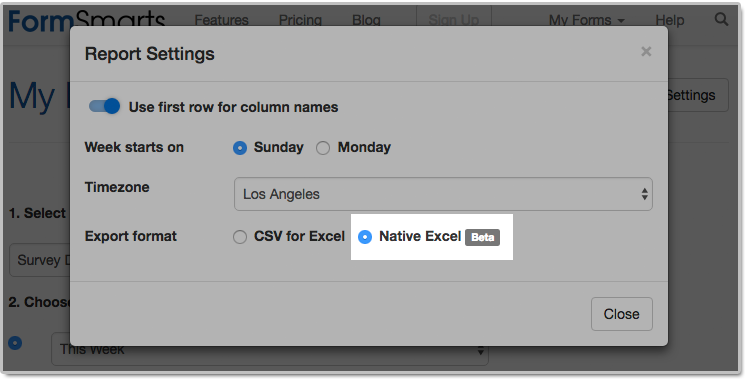
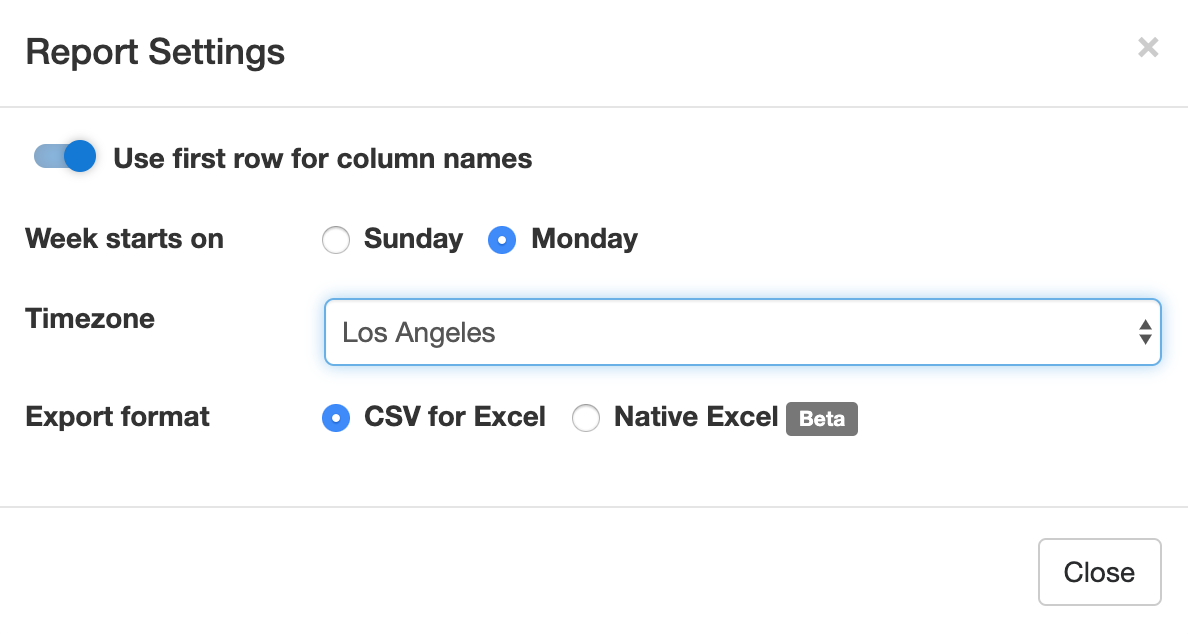
Provided you have set the Allowed Content (data type) of phone input fields to Phone Number, FormSmarts stores phone numbers as character strings rather than numbers to ensure any leading zero is not dropped from phone numbers. Unfortunately, Excel interprets character strings that only contain digits as numbers, thus removing leading zeros. Members who collect phone numbers on their forms, especially in locales where phone numbers may start with a zero (some US states and part of Asia & Europe), should set the Export Format to the Native Excel option in the Report Generator settings, as illustrated above.
If you find out when opening a CSV spreadsheet from FormSmarts that leading zeros were dropped from phone numbers, update the export format and create another report. Provided phone input fields were correctly created as phone number fields, the correct information, with any leading zeros, is stored on FormSmarts. No information was lost, any errors is due to the Excel import process and can be easily fixed by generating a new report after changing the export format.
All settings of the Report Generator but the timezone are kept in your browser, so as long as you use the same browser and allow FormSmarts to store information in your browser, your export preference will be saved from one session to the next.
Form Results with Data in a Non Western-European Language
When a spreadsheet contains data in a language other than English or another Western-European language, customers need to make sure when opening an Excel/CSV report from FormSmarts they select the UTF-8 (Unicode) encoding in Excel’s Import Wizard. The content of the spreadsheet may otherwise not be displayed properly. Alternatively, exporting form entries to a native Excel (.xlsx, .xls) spreadsheet removes the need to select the correct text encoding.
Note that FormSmarts stores data with a universal encoding (UTF-8) that supports all languages, so if you find out that a report appears corrupted when opening the spreadsheet, open the file again and select the UTF-8 encoding or switch the export format to Native Excel: no data was lost or corrupted.
Other Benefits
The native Excel format offers a few other benefits and we expect their number to grow in the future:
- The URLs of form attachments are clickable links
- The FormSmarts Reference Number (the penultimate column in the spreadsheet) links to the form response on FormSmarts. Use this link to add a note to a form submission, check where it was submitted from (IP address, approximate location), export it to PDF, print it, delete it and more. As we add more functionality to the page showing individual form responses (like the ability to tag and edit a form response), we expect more and more customers to rely on links in the spreadsheet as part of their workflow.
The native Excel format is supported with Business Plus accounts and above.
Posted on Jul 26th, 2018 in online form.
Post a Comment
Tags: excel, form results, form to excel
Introducing Multi-User Accounts
FormSmarts supports accounts with multiple users, allowing an account owner to give invited users access to selected online forms.

How to Enable Multiple User Accounts
- Set up an account alias
- Create users
- Manage user permissions
Set Up an Account Alias
Before allowing sub-users to sign in to FormSmarts, you first need to set up an alias for your account. The alias must be unique and easy for users to memorize. A good choice is probably your organization or department’s name. Users will need to enter the account alias on the log in screen.
To create an account alias, visit the Account Overview panel of your account.
Create a User
To create a user, head to the User Management Dashboard.
- Users sign in to FormSmarts with their email address, account alias and password
- Before creating a user, add their email address to your account in the Settings Tab of the Form Builder and verify it
- Users can change their password in the Security Settings panel of their account if they know their current password
- The account administrator can reset a user’s password in the User Management Dashboard.
Manage User Permissions
For each form, you can grant a user permissions to:
- access individual form entries online or download a PDF (e.g. from the link in email notifications)
- download form attachments (file uploads)
- generate Excel reports
- add tags and notes to a form entry
- edit or delete a form entry
You can also give a user account-level permissions to:
- renew your subscription or upgrade your account (billing permissions)
To set account-level permissions, please contact Support.
How to Sign In as an Invited User
We’ve updated the log in screen to allow all FormSmarts members to sign in on the same page. Account owners (aka account admins) can sign in in the usual way with their email address and password. Invited users also need to enter the account alias provided by their account admin as shown in this video.
Multiple users are available with our Business Plus package and above.
Posted on Jul 10th, 2014 in collaboration, form builder.
Post a Comment
Tags: business, collaboration, form attachment, form results, form to excel, form to pdf, howto, team, user
How to Track the Source of Leads
If you use online forms for lead generation, you will want to know the source of form submissions: from which page of your site a form was submitted, which social network or site the visitor came from, or which marketing campaign led the prospect to you.

You can track the source of leads received via form submissions with the fs_ctxval context parameter, giving it a unique value for each source or campaign you wish to track. In this article, we show you how. If you need help setting this up, let us know.
Example 1: Form Accessed by Its FormSmarts URL
The simplest way to publish a form online is to allow your customers to directly access the form by its FormSmarts URL. To track the source of form responses, create a unique URL for each source or campaign:
- https://formsmarts.com/form/lqh?fs_ctxval=Facebook-May-2013
- https://formsmarts.com/form/lqh?fs_ctxval=Newsletter-May-12-2013
- https://formsmarts.com/form/lqh?fs_ctxval=ABC+Conference+2013 (tip: create a QR code with this URL and print it on posters, flyers and stickers)
As you would expect, context values are collected by FormSmarts and shown in notification emails, online & PDF reports, exports to Excel and web API callbacks.
Example 2: Form Embedded into Your Site
If you manually inserted the code snippet for the same form into multiple pages of you site, follow instructions in this section to track leads. If you added the form to your site template, skip to the next section (for WordPress sites) or the one after (for other template-based sites).
Edit each web page where you embedded the form and locate the code snippet in the HTML source. Add the context value after lay=1 (or lay=2), as in the code highlighted below:
<iframe width="540" height="481" src="https://formsmarts.com/form/lqh?mode=embed&lay=1&fs_ctxval=Summer+2013+Conference+Registration+Page" scrolling="auto" marginwidth="0" marginheight="0" vspace="0" hspace="0" allowtransparency="true" frameborder="0" style="overflow-x:hidden"><a href="https://formsmarts.com/form/lqh">Can't see the form? Click here</a>.</iframe>
Alternatively, grab a fresh copy of the code snippet from the form builder, edit the code as described, then add it to your site in the usual way.
Example 3: Tracking Leads on a WordPress Site
If you added a form to the template of your WordPress site, you can track the URL of the page a form was submitted from with PHP.
- In your WordPress template, replace the form’s HTML snippet by the PHP code below
- Paste the form’s code snipped given by the form builder between the single quotes as shown.
<?php
$snip = ''; // Paste form embedding code between single quotes
$url = get_permalink();
$re = "/[^\w\s,()\[\]*\/:\-.?]+/";
$ctx = urlencode(substr(preg_replace($re, "", $url), 0, 150));
print(str_replace("mode=h5embed", "mode=h5embed&fs_ctxval=".$ctx, $snip));
?>
Example 4: Tracking Leads on Any Site with JavaScript
You can do the same on any other sites with JavaScript:
<script>
var snip = ''; // Paste embed code here
var pth = document.location.pathname;
var re  = /[^\w\s,()\[\]*\/:\-.?]+/g;
var ctx = encodeURIComponent(pth.replace(re, '').substring(0, 150));
document.write(snip.replace("mode=h5embed", "mode=h5embed&fs_ctxval=" + ctx));
</script>
Notes
This feature is included with all Business plans. Context data may not contains non-alphanumeric characters other than “()[]*/:-.? ” and may not exceed 150 characters.
Posted on May 27th, 2013 in form builder.
2 Comments
Tags: business, email notification, form to excel, form to pdf
Excel Report Generator Upgrade
If you’re using FormSmarts’ Export to Excel feature, you may have already noticed that we’ve updated the report generator. As well as several other minor changes, we’ve added a second way to specify the date range over which the report is generated (in addition to selecting a start and end date) by choosing a preset time period. This is meant to further simplify the task of generating a report. The preset periods available are Today, Yesterday, This Week, Last Week, Last Seven Days, This Month, Last Month, Last 30 Days.
For the time period options that depend on the first day of the week (This Week, Last Week), we use the default for your country, as set in your account. You can change this in the Report Generator under More Options.
Give Us Feedback
Do you find the new date range feature useful? Which one do you anticipate you will use most? Should we add more (e.g. quarter)? Please give us feedback by posting a comment, via Facebook or Twitter.
Posted on Sep 16th, 2011 in form builder.
4 Comments
Tags: excel, form to excel
Web Form Builder Upgrade
This release of FormSmarts introduces over one hundred improvements, leading to our most powerful, reliable and generous offer yet.
Important Reminder
Please add FormSmarts sender email formsmarts-noreply@syronex.com to your contacts, whitelist, or list of allowed senders and instruct any other form recipients to do so too. This should ensure your web forms are (and continue to be) always correctly delivered to your Inbox.
Increased Input Fields Allowance
To allow all users to take advantage of the new Heading and Text Block widgets introduced with this release, we’ve increased the number of fields you can use on a form.
- FormSmarts Standard users can add up to 15 fields on each form using their referral points.
- FormSmarts Pro users can add up to 60 fields on each form.
Be a Good Web-Citizen
- Report bugs. However intense our testing efforts before releasing a new version of the form builder, bugs may remain due to the number of different browsers and versions in use. Please report any suspected bugs on the forum or by email.
- Show your support. Whether you are a Standard user getting the web form service for free or a FormSmarts Pro customer paying the price of a business lunch for a year of service, please show your support by pressing the “Like” button on our Facebook page and following us on Twitter.
Major Changes
If many of the changes are improvements to FormSmarts server-side software which are not directly visible to you, all affect the quality of the service we provide you.
- Form data storage and Excel reporting are coming out of Beta, and you can now activate those for each form in the Form Details screen of your account.
- We’ve improved several aspects of the form creator‘s interface.
- We now support headings and text blocks on forms; details in another post.
Posted on May 5th, 2010 in form builder.
4 Comments
Tags: form to excel, input field, news, paypal form
How to Export an Online Form to Excel
FormSmarts allows customers to collect online form responses on the cloud and export them to Excel. We also support a number of options to create custom reports.
Enable Form Data Storage for Export to Excel
Export to Excel requires that you turn on data storage for each of the forms for which you would like to use this feature.
For privacy reasons, form submissions were not saved on the cloud by default in the past. For Business accounts created after March 20, 2017, storage is now enabled by default. This does not apply to Pro accounts, for which storage is turned off by default and must be enabled for each form if needed. Note that the storage space available with Pro accounts is limited.
To enable stored form results and allow Excel reporting, visit the Submit Actions tab of the Form Details screen of each of the forms for which you would like to access form responses online, as shown in the video below.

You will then be able to download Excel reports from stored form responses in a few clicks with the report generator. Business-level members may also view individual form responses online and download a PDF Report.
To enable storage of form entries by default when you create a new form, check Turn on cloud storage for all new forms in the Settings Tab of the form builder. This option is only available in Business accounts and is turned on by default for accounts created after March 20, 2017.
This video shows how to set up a form to store form responses on the cloud for online access and export to Excel. Although it features an old version of FormSmarts, the information provided can still be used with the current version.
Updating Form Results
To ensure you get consistent and up-to-date data when you export form results as an Excel spreadsheet:
- If you find out a form response has incorrect or out-of-date information, edit it and amend the data
- After you submit a test run, remember to remove it.
Excel Report Generator Settings
Show Field Names in the First Row
When toggled on, the first row of Excel spreadsheets shows the name of each field. This option is enabled by default.
Week Starts
The report generator allows you to specify the date range over which a report is generated by either picking a start & end date or choosing a preset period of time (This Week, Last Seven Days,…). For time periods that depend on the first day of the week (This Week, Last Week), we use the default first day of the week for your country (as set in your account). You can change the first day of the week with the Week Starts setting.
Select the Fields (Columns) Shown in the Spreadsheet
By default, Excel reports include:
- A column for each fields of a form
- Two columns for common metadata: the reference number of the form submission or a link to access it online, and the date and time the form was submitted
- Additional columns for payment details (payment forms only) and any context information passed to the form when it was submitted.
You can also create custom reports that only include the fields you need in the spreadsheet. To choose the fields/columns to include/exclude, check/uncheck the fields and metadata items listed in the Fields section of the Settings.
Time Zone
Preset time periods, date ranges and the form submission timestamp shown in Excel reports are now using your time zone (as defined in your computer settings). If you would like to generate a report using a different timezone, select the relevant city in the Timezone drop-down list. Note that the city selected by default may not be your city of residence, but it should be a city with the same UTC offset.
Filter Form Responses by Tags
If you have tagged form responses or a form has system tags set by FormSmarts when the form is submitted, you can create reports than only include form submission with the combination of tags and system tags you have specified.
You can for example create a report with all guests who registered and turned up at an event with the checked-in system tag. This tag is added when the event organizer checks-in attendees with the QR code in the confirmation email or PDF receipt.
Spreadsheet Format: CSV or XLSX
Choose a spreadsheet format from Comma-Separated Values (CSV) or native Excel (XLSX) format. We recommend you use the default CSV unless:
- Form submissions have data in a non-Western European language which doesn’t show correctly when you open the CSV spreadsheet
- Some of the characters like typographic curly quotes (‘, ’, “, ”) don’t display properly when you open the file with Microsoft Excel
If you experience one of these issues, download the report in Excel XLSX format. You can alternatively change the CSV text import settings in Excel as explained in the next section, or open the spreadsheet with another application like OpenOffice or Apple Numbers (on Mac OS X).
Importing an Excel Report When the Spreadsheet Contains Non-Western European Characters
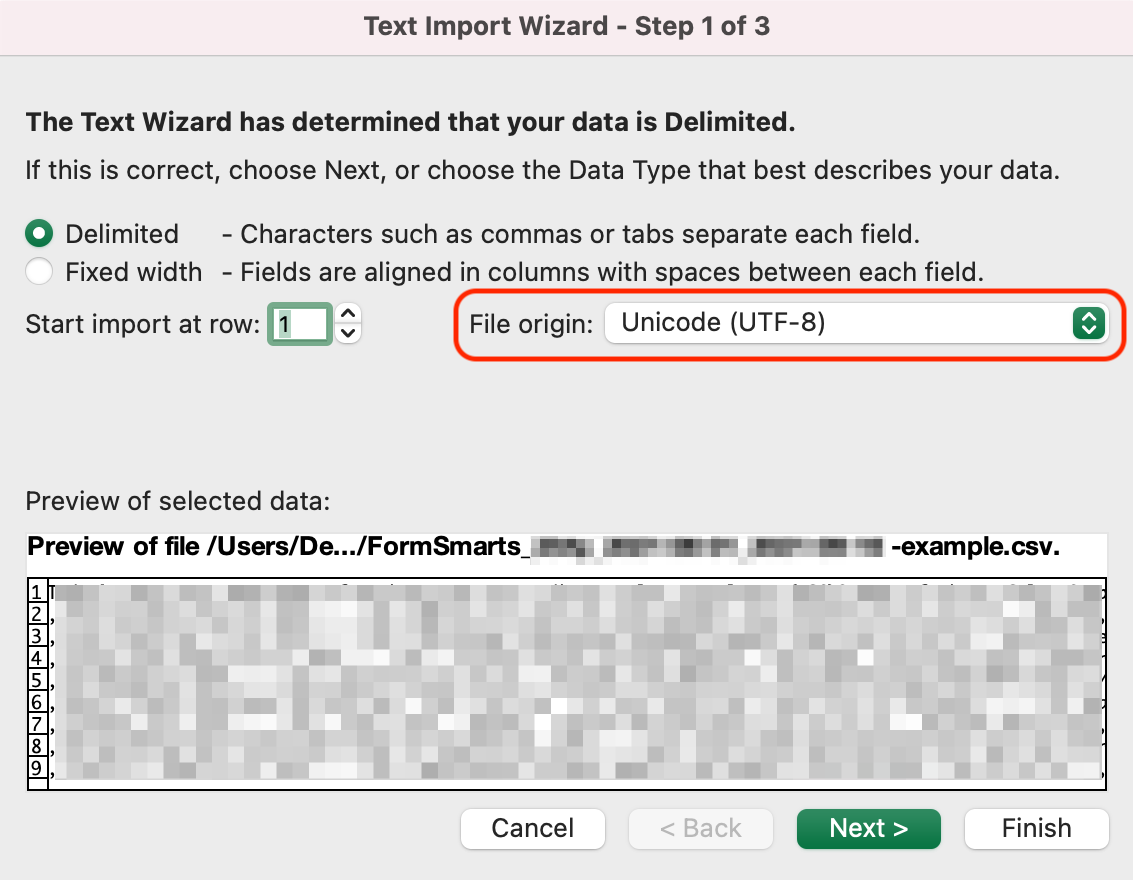
If an Excel (CSV) report contains text in a language other than English, you may need to change the character encoding to Unicode (UTF-8) in Excel’s Text Import Wizard, as illustrated below. The report may not display correctly for languages other than English unless the encoding is set to Unicode (UTF-8).
In the Data menu, click Get Data > From File > From Text/CSV
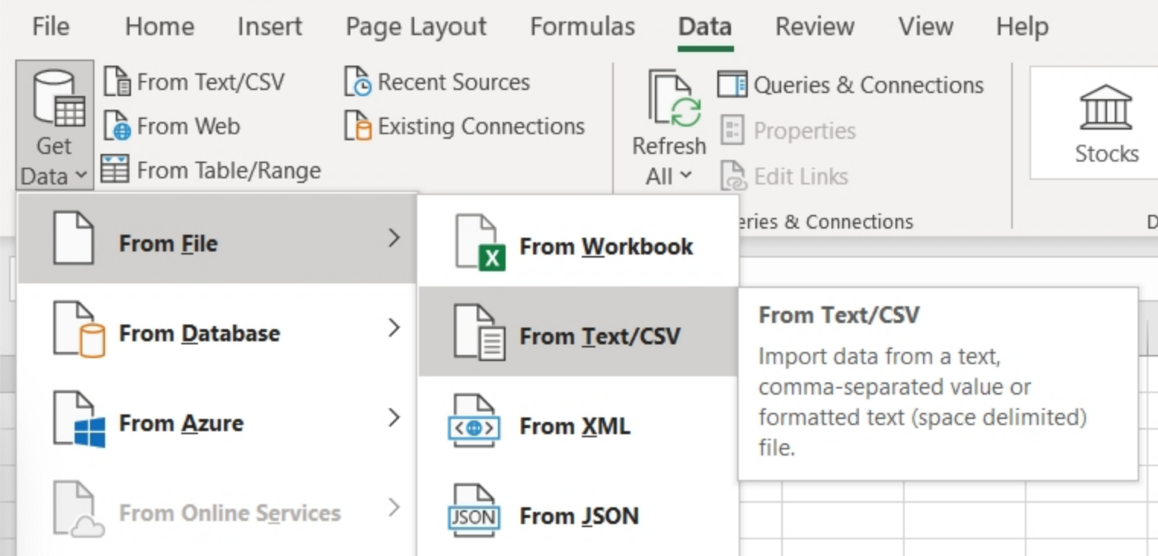
In Step 1 of the Text Import Wizard, set the file origin (character encoding) to Unicode (UTF-8):
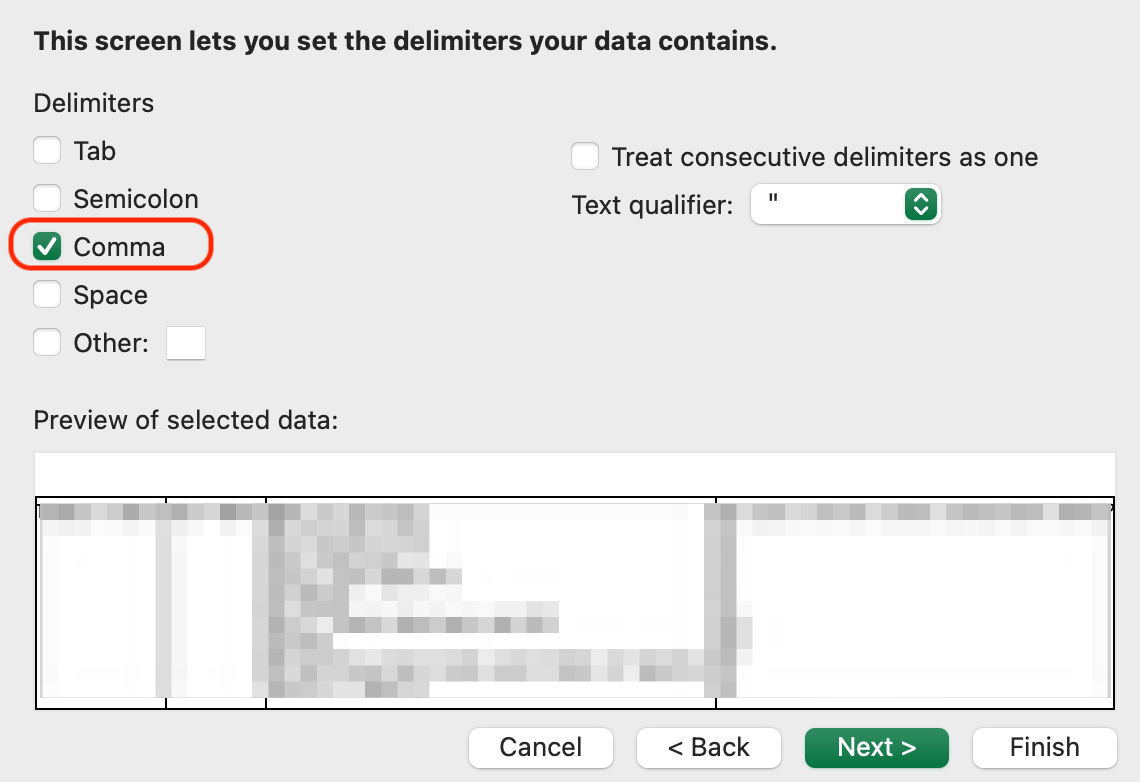
In Step 2 of the Text Import Wizard, set the delimiter to Comma:
Posted on Jul 8th, 2009 in form builder.
17 Comments
Tags: excel, form results, form to excel, form to pdf