Enable or Disable a Form at a Scheduled Date
The form builder allows you to configure a date and time in the future when a form will be enabled or disabled.
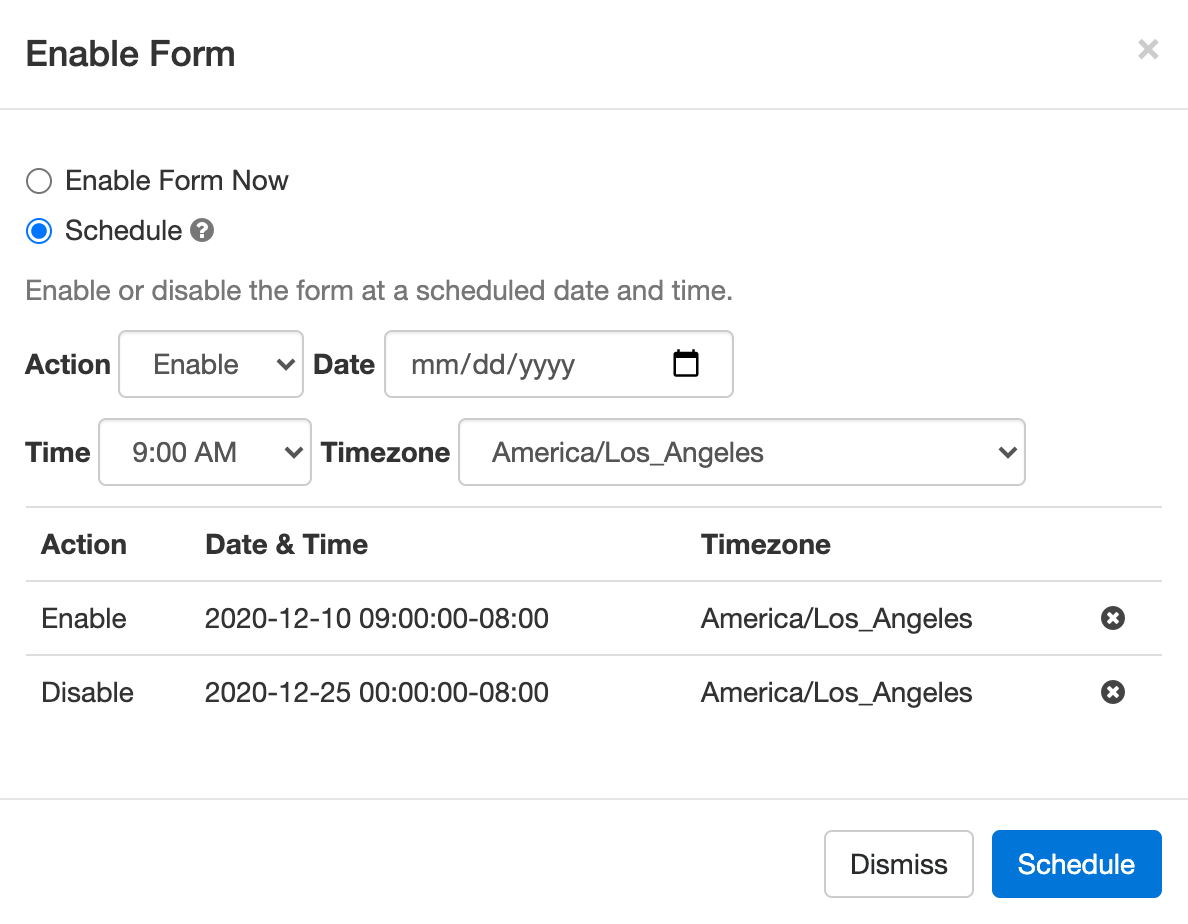
Click the ‘pause’ or ‘play’ icon corresponding to the form you would like to suspend/restore. Select the Schedule option:
- Choose whether you want to enable or disable the form
- Set the date and time when you want to the form to be enabled or disabled (form changes can only be scheduled at the top of the hour)
- Select a timezone if the date & time you’ve entered are in a timezone different from the timezone of you account. You can update your timezone in your account.
A few uses for this workflow:
- Configure a registration form to open and close registrations for an event at a preset date and time
- Specify an application period for an application form
- Set up a form so it is only available online at specific hours (e.g. weekdays 9am-10am) or days (e.g last day of the month) to support workflows, policies, and internal reporting requirements within your organization
The form builder interface currently only allows us to schedule events at a specific date and time, but FormSmarts also supports recurring scheduled actions. Consider a policy that expense claims must be submitted weekly every Friday from 12pm to 5pm. We can configure the expenses claim form to be enabled every Friday at noon and disabled at 5pm via the API Console. If you need help with this, please contact Support.
Posted on Dec 7th, 2020 in form builder.
Post a Comment
How to Capture a User’s State or Province on a Form
FormSmarts' Country Subdivision selector allows you to easily capture a visitor's state, province or other administrative country subdivision on a form.
- The person's state, province, county, etc. is automatically preselected from their approximate IP address location, so the form control requires no or minimal action from the user
- The Country Subdivision (CSD) selector works in all countries and territories worldwide
- The country subdivisions listed are those in use in each country: state in the US, India and Australia, province in Canada, prefecture in Japan, land in Germany, county or borough in the UK, …
- Please try this demo.
How to Select a Subdivision of Another Country
When we ask a user to provide their state or province on a form, we usually want to collect their state or province of residence, which is most likely (but not always) a subdivision of the same country they are submitting the form from.
For instance, if we need to get a visitor's country of birth or travel destination, this might not be the case, so we need to allow users to select an administrative subdivision in another country. We do this by adding a Country Selector before the Country Subdivision selector, as illustrated below.
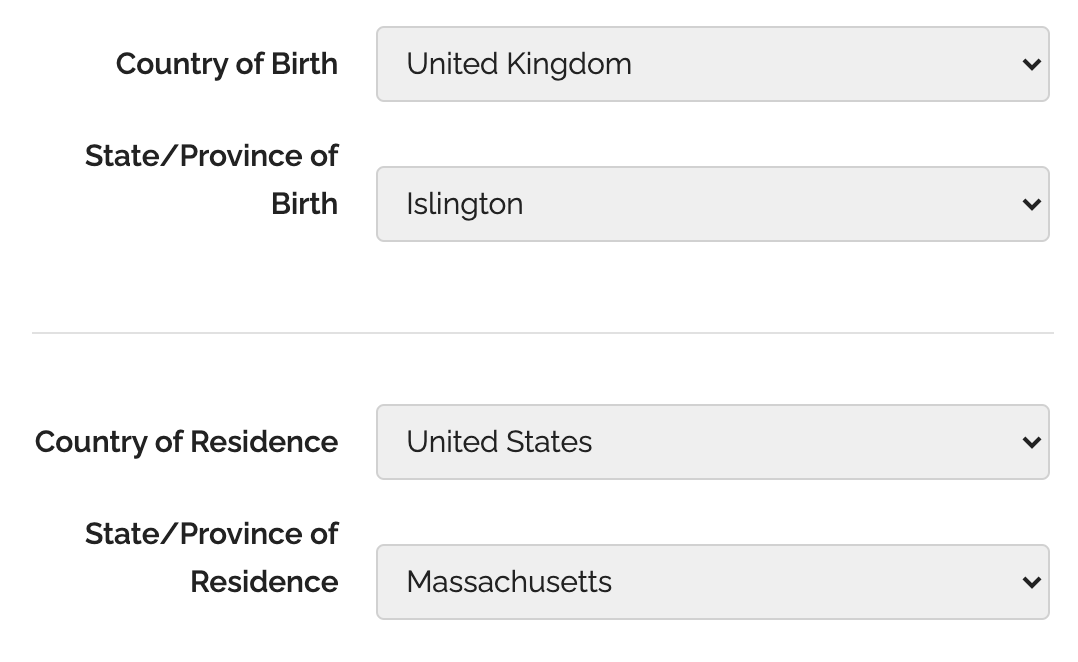
If a user changes the country selected, the list of subdivisions is updated accordingly. To allow more than one set of country & subdivision selectors on a form, a country selector is associated with the closest country subdivision selector it precedes.
For example, if a user changes their Country of Birth above, only the country subdivisions in the State/Province of Birth selector will be updated, those in the State/Province of Residence won't be affected.
To ensure a form works in all scenarios, we recommend you always add a Country Selector on a form whenever you include a Country Subdivision selector. Remember: because the country is automatically preselected, adding a Country Selector adds little if any friction/complexity to a form.
Posted on Sep 25th, 2020 in form builder.
Post a Comment
Introducing the New Account Dashboard
A major refresh of the account section of the site introduces several new tools and capabilities:
- Easily create sub-users and share forms with them with the User Management dashboard
- Review activity in your account in the new Account Activity pane
- Invited users now have their own account dashboard
Contact Information
Many customers rely on FormSmarts to receive timely form notifications critical to their organization. Unfortunately, we’ve been in the past left without any ways to contact some members after all email addresses in their account bounced our emails.
The Contact Information panel of the account dashboard now allows you to set a secondary email address and mobile phone number we will use in situations were we are unable to contact you via the primary email address associated with your account (i.e. your login email).
To set a secondary email, select one of the verified email addresses in your account, or add a new email in the Settings Tab of the Form Builder, verify it, then go back to the account dashboard to set the new address as your secondary email.
If your organization gets its email service as part of a web hosting package, we recommend using your personal email (e.g. Gmail account) as a secondary email.
To set a phone number, enter your cell phone number including the international dialing code (e.g. +1, +44,…). FormSmarts will send you a text message with a code to verify your number. Enter the verification code in the space provided and tap Verify to verify your number, then Update Contact Info to save the new number.
User Management Dashboard
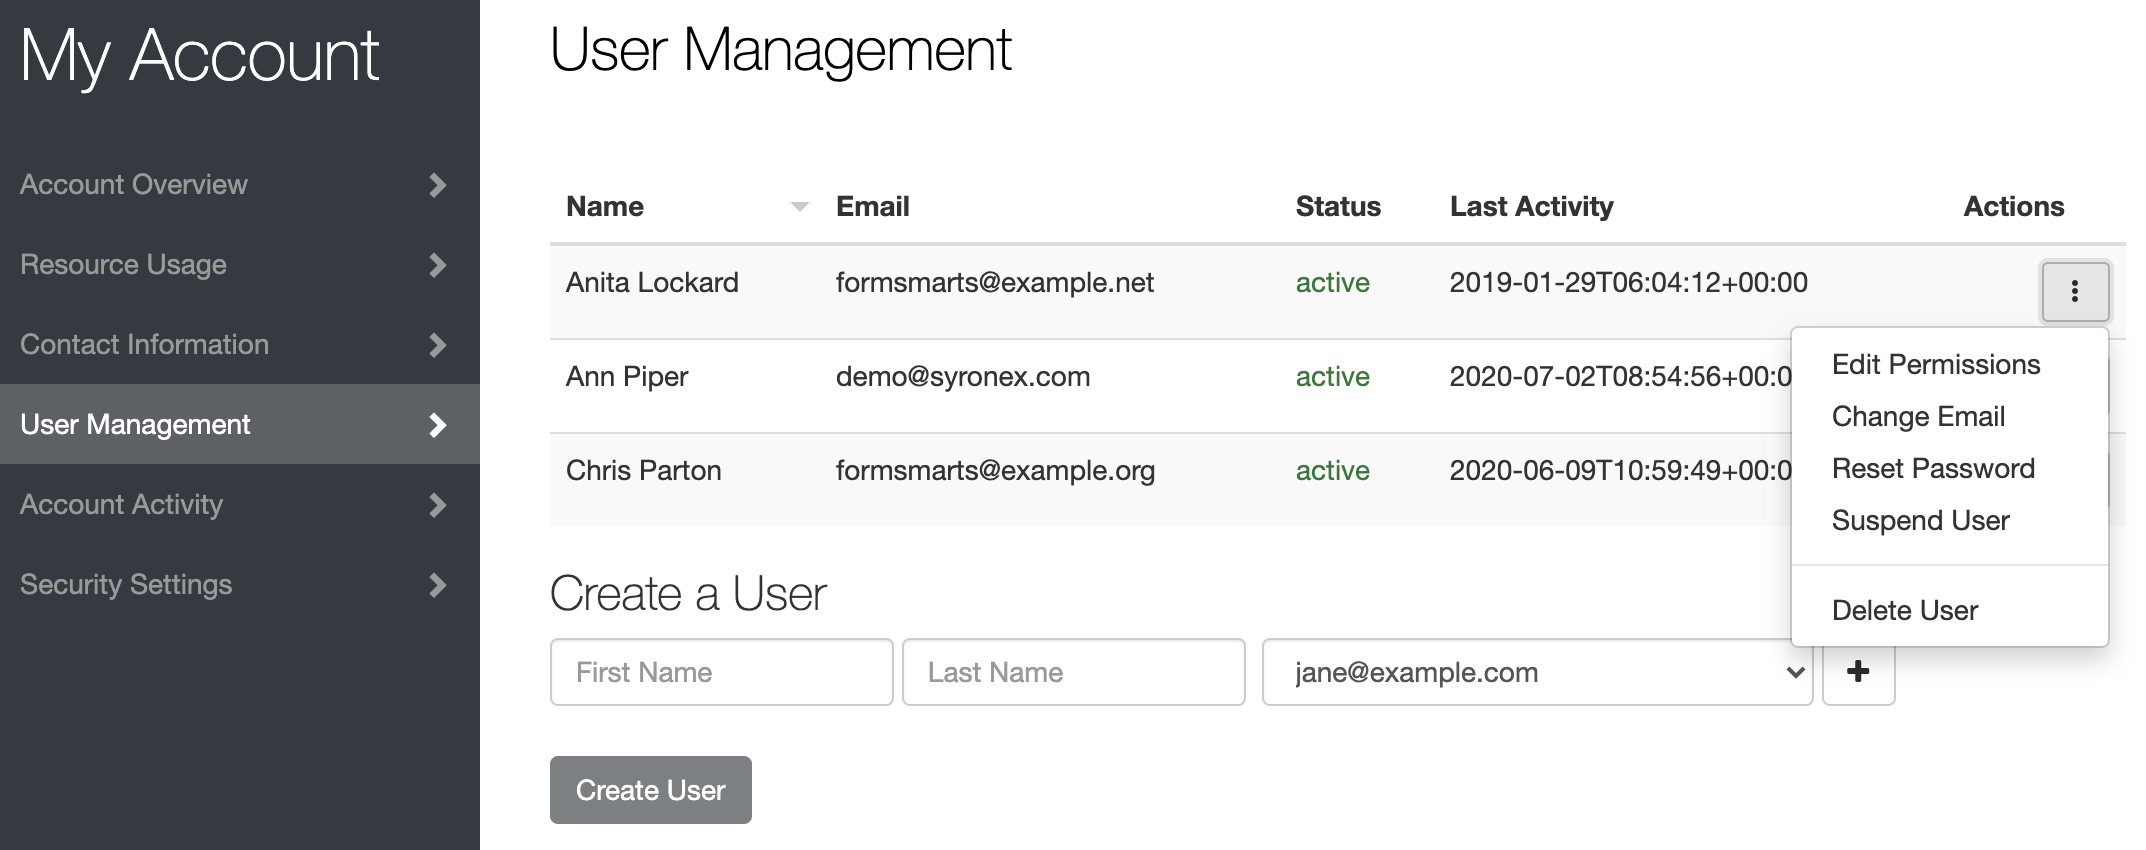
The User Management Dashboard illustrated above allows you to view and manage existing users in your account, create new ones, and change their permissions on individual forms.
Click the button showing a vertical ellipsis to access the Actions menu for the corresponding user.
You can:
- Edit a user’s permissions on your forms and share new forms with them
- Change the email address associated with a user
- Reset a user’s password
- Turn off a user’s two-factor authentication
- Suspend a user
- Permanently delete a user
Create a User
To create a new user, enter their name and select their email address in the list of verified emails in your account. If needed, click the button showing a plus sign to add and verify a new email address.
Click Create User button.
The newly created user doesn’t have any permissions on any of your forms but has implicit permissions. They can, for instance, submit Private Forms.
Share a Form with a User & Edit Form Permissions
Tap the Edit Permissions option in the Actions menu of a user to launch the User Permissions settings.
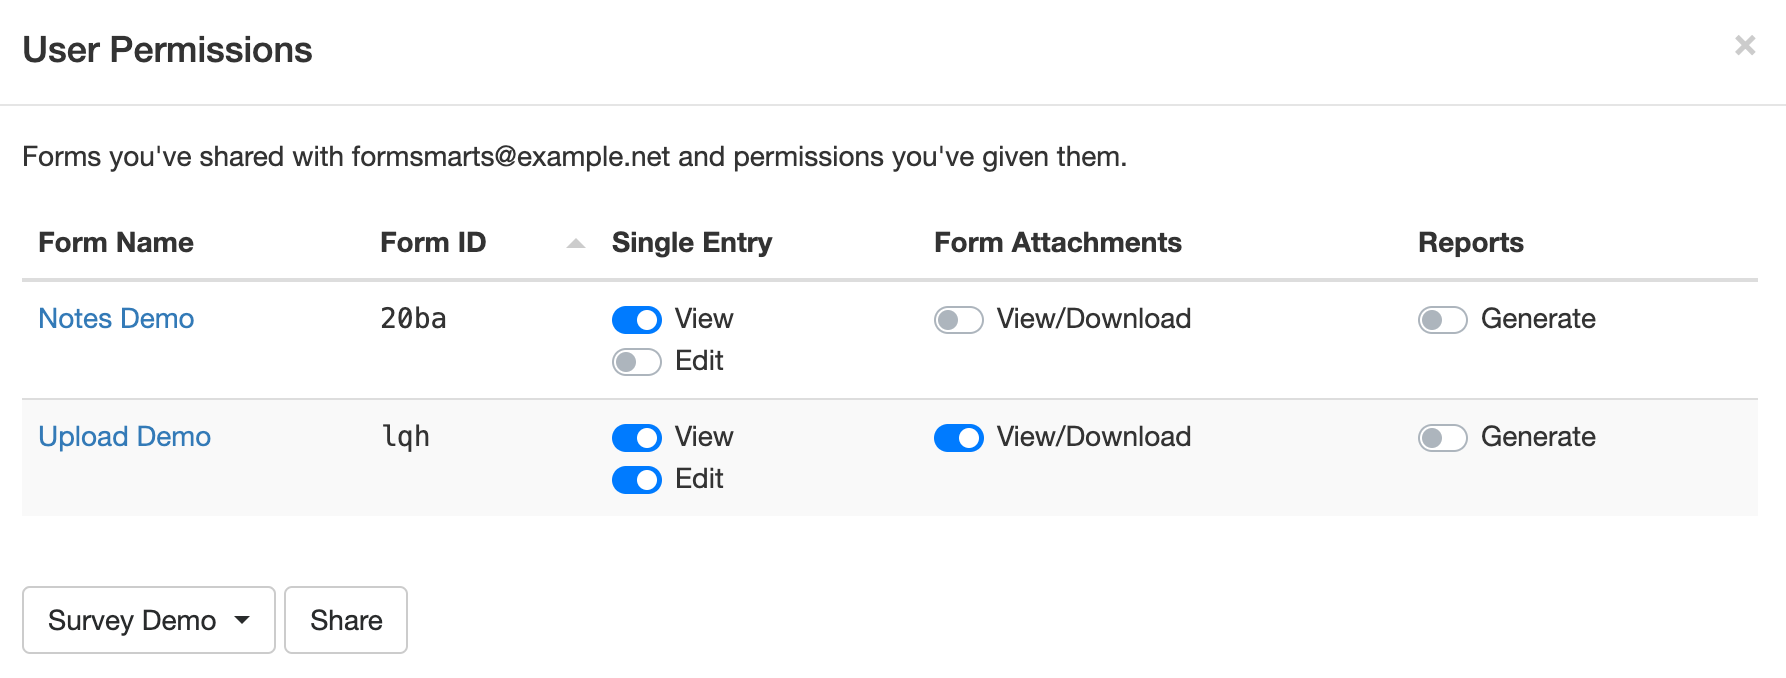
To allow a user to access submitted data for a form, first share the form with them: select (or search for) a form in the list and click Share.
FormSmarts will give the user the necessary permissions to view a single form entry online, download a copy in PDF, view uploaded documents (form attachments), and add notes and tags to a form entry.
You can adjust permissions to additionally authorize the user to edit a form submission and generate a spreadsheet with aggregated form responses.
Account Activity
The new Account Activity panel allows you to review and audit the session history of all users who have accessed your account in the last thirty days.
A separate table lists Administrator Sessions and User Sessions.
Sign a User Out
Should you suspect or become aware of an unauthorized access to your account while it is still taking place, you can immediately sign the user out and invalidate their session with the Log Out of Other Sessions and Log User Out buttons.
- Click Log Out of Other Sessions to immediately invalidate all administrator sessions other than the one you are currently using
- Select a user in the list of users with an active session and click Log User Out to immediately log them out
Invited User Dashboard
FormSmarts sub-users can also access the account dashboard to perform actions and view information relevant to them:
- View a list of forms you’ve shared with them and actions you’ve allowed them to perform
- Review their recent account activity to check no one else has accessed their account
- Change their password
- Set up two-factor authentication
Posted on Aug 3rd, 2020 in form builder.
Post a Comment
Tags: collaboration, file upload, form attachment, form builder, form to pdf, team, user
How to Set Up a Conditional Form Notification Email Based on a User’s Answer
Conditional Notifications allow a form owner to choose when to receive an email notification based on the value of a field or other conditions on the answer the user provides on a form.
Let’s see how we can benefit from this feature in practice with two examples.
First, consider a questionnaire where we ask customers to rate and give feedback about their experience with various aspects of a service. We’re going to send out invitations for customers to take part in the survey and collect their responses on the cloud. When the survey period is over, we’ll generate an Excel report with the aggregated answers of all participants for analysis. In this scenario, there is clearly no point in sending an email for each and every form submission.

But we wouldn’t want to miss an opportunity to talk to a customer promptly if they indicate on the form they have unfulfilled needs or concerns to address. This is where Conditional Notifications come handy: we want to send an email notification to the Customer Support team only when a customer indicates they need to speak to someone.
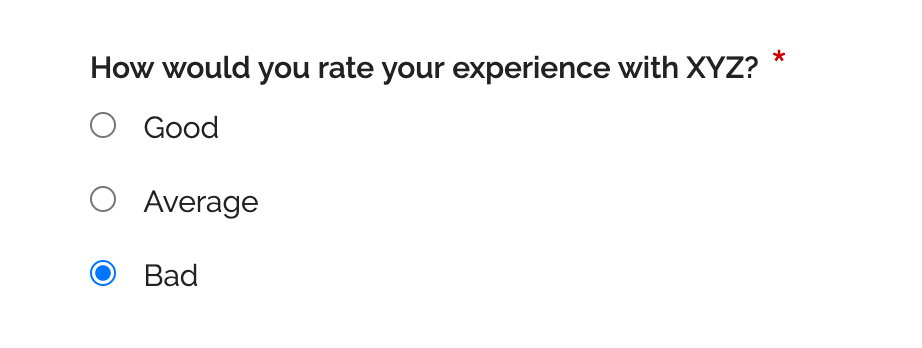
We can define the Conditional Notification rule to send an email if a specific checkbox is checked as illustrated above, or when at least one aspect of the service is rated ‘Bad’.
When Should You Use Conditional Notification?
Online forms typically support one of two workflows:
- Form responses are collected “unsupervised” then the aggregated data set is processed or analyzed: this workflow relies on FormSmarts’ Excel report feature to generate a spreadsheet, it doesn’t involve email notifications
- Someone needs to attend to each and every form response, which is time-sensitive, must be processed individually and for which a reply must be sent to the submitter.
Conditional Notification allows FormSmarts members to add an exception to the first workflow by specifying a set of situations where a notification is sent, providing a bridge to the second workflow.
Rules can apply to any properties of a form response: value of input fields, type of form control (e.g. ‘radio button’), field ID, etc and may include logic operators, conditions, boolean operations,… to support a wide range of use-cases.
Second Example: A Screening Questionnaire
In the context of the current COVID-19 pandemic, an employee screening questionnaire provides us with another practical example of a situation where we can use a Conditional Notification to help screen employees prior to returning to work.
The screening questionnaire lists a number of questions describing COVID-19 symptoms to which employees have to reply by ‘Yes’ or ‘No’. All employees have to submit a screen questionnaire, but the sponsor of the questionnaire should only by notified by email if an employee replies ‘Yes’ to any of the screening questions.
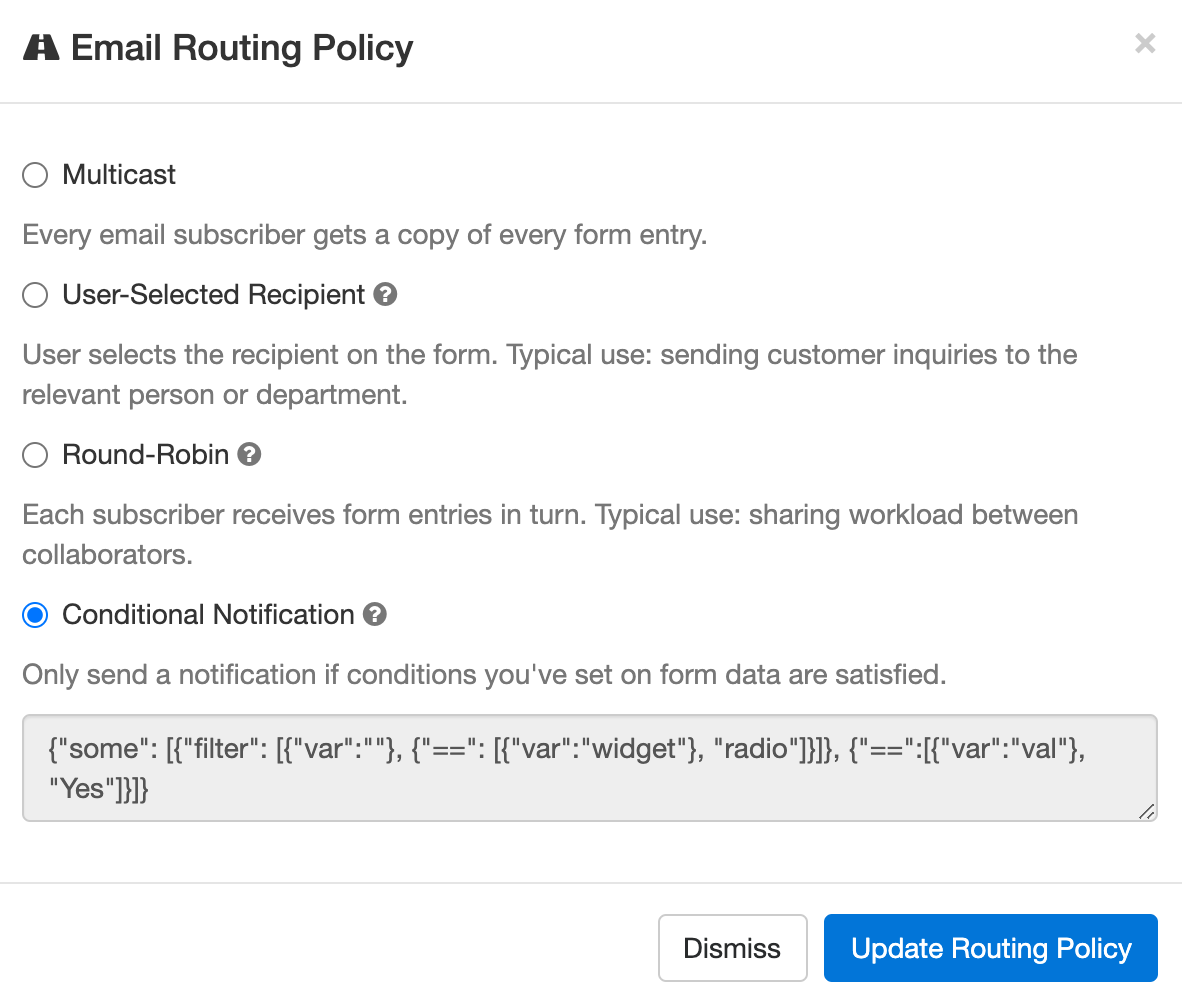
When an employee submits their screening questionnaire, the Conditional Notification rule checks the value of all radio buttons on the form and sends a notification if at least one has the value ‘Yes’.
How to Set Up a Conditional Notification
To set up a Conditional Notification:
- Define a Rule: Conditional Notification rules are defined with a formal language for which there is currently no visual rules builder. Until we provide such a tool, contact Support with details of the precise conditions under which you want to receive an email notification so we set up the conditional notification rule for you. Please remember to provide us with the URL of the form.
- Enable conditional notifications: Once we’ve set up the rule for you, edit the form and tap Update email routing policy in the Submit Actions tab of the form builder. Select the Conditional Notification routing policy and save.
Other Email Routing Policies
By default, all destination emails you’ve set up for a form get a copy of every form response. You can change this behavior by setting a different email Routing Policy.
FormSmarts currently has the following Routing Policies:
- Multicast: Every email subscriber gets a copy of every form entry (default).
- User-Selected Recipient: User selects the recipient on the form. Typical use: sending customer inquiries to the relevant person or department.
- Round-Robin: Each subscriber receives form entries in turn. Typical use: sharing workload between collaborators.
- Conditional Notification: Only send a notification if conditions you’ve set on form data are satisfied.
Posted on Jul 9th, 2020 in form builder.
Post a Comment
Tags: conditional logic, conditional notification, routing policy
How to Limit Who Can Submit a Form
Online forms are public and can be submitted by anyone by default, but FormSmarts offers a number of options to restrict and control who can submit them.
This article outlines different approaches to limit who can submit a form that are suitable for a number of situations, from restricting a form within a loosely defined group of users at large to sharing a form with team members within the confines of your FormSmarts account. We even show you how a user can share an individual form with someone else so they can complete it together.
Open a Form to Members of an Informal Group
In this first example, we exclusively open a form to staff within a company or a specific group within an organization, like students or staff at a university. User will have to provide their corporate or university-provided email address on the form.
Email Address Verification
To ensure individuals submit their own email address (and to verify their identity), we take advantage of a FormSmarts option that requires someone submitting a form to verify their email address or mobile phone number before they can proceed. FormSmarts verifies an email address or phone number by sending a one-time password (OTP) that the person then has to enter on the form.
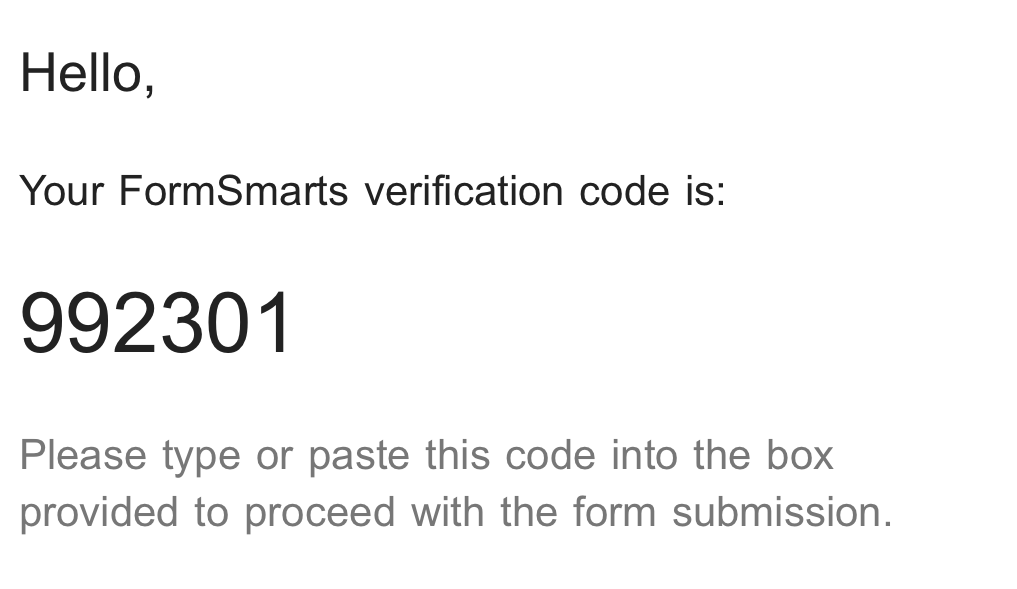
Please try this email verification demo.
This FormSmarts feature allows a FormSmarts account administrator to restrict verification emails to addresses on a specific domain or sub-domain, so we can for example selectively open a form to:
- Students at a university or college with an email address on the sub-domain students.example.edu
- Staff at a university with an email address on example.edu
- Staff with a corporate email address on example.com
For help settings this up, contact FormSmarts Support.
Email or Phone Verification on a Registration Form
Although not the subject of this article, FormSmarts members can also use email address or phone number verification to create a signup form for a site or online service.
By Invitation Only: Authorize Each Form Submission
FormSmarts lets you define how to authenticate a form user with their email address or phone number and who is allowed to submit a form.
FormSmarts members can also set the precise rules to authorize or reject users based on their email or mobile number. This is the most flexible option, but requires basic coding skills (we can help if needed).
- When someone submits a form, FormSmarts sends a request to a cloud function or script on your website (webhook)
- The request contains the person's email or phone number and a one-time password (OTP)
- The script or cloud function checks the email or phone number against a list of users authorized to submit the form and sends the OTP to the person so they may complete the form submission.
- It can alternatively automatically authorize the form submission to proceed with a call to FormSmarts API
Please try our this phone verification and custom authorization demos. The custom authorization demo only requires a phone number to be verified the first time it is used on a form.
For help settings this up, contact FormSmarts Support.
Private Form
Make a form private when you want to restrict who can submit it to your teammates.
Private Forms work best in teams and organizations that share a FormSmarts account and each team member has their own FormSmarts sub-user. Learn more about Private Forms.
- A Private Form can only be viewed and submitted by sub-users (invited users) within a FormSmarts account
- The user must be logged in to FormSmarts in order to submit a Private Form
- A Private Form response is associated with the user who submitted it
- The identity of the user who submitted a form entry is visible in email notifications and in reports
Please try this demo with the account alias, username and password given here.
Sharing a Form Submission
Finally, FormSmarts allows an individual submitting a form to share it with someone else — so the second person can, for example, review the information entered and co-sign it.
This is typically useful in application forms.
Posted on Jun 5th, 2020 in online form.
Post a Comment
Tags: collaboration, sharing, team
How to Edit Submissions Made on Your Forms
There are occasionally situations when you need to amend the information submitted on a form:
- A customer reaches out after submitting a form, realizing they had entered incorrect information
- Some time after they registered for an event via one of your forms, an individual contacts you saying they had moved or changed phone numbers

Instead of asking the customer to submit the form again, find the reference number of the form submission and view it online, then use the Edit and Revision History buttons illustrated above to update the relevant data fields.
If you’re viewing the form entry on a mobile device, the Edit and Revision History buttons may be hidden to avoid cluttering the page. Tap Show Editing in the main menu to show the buttons.
Editing & Revision History
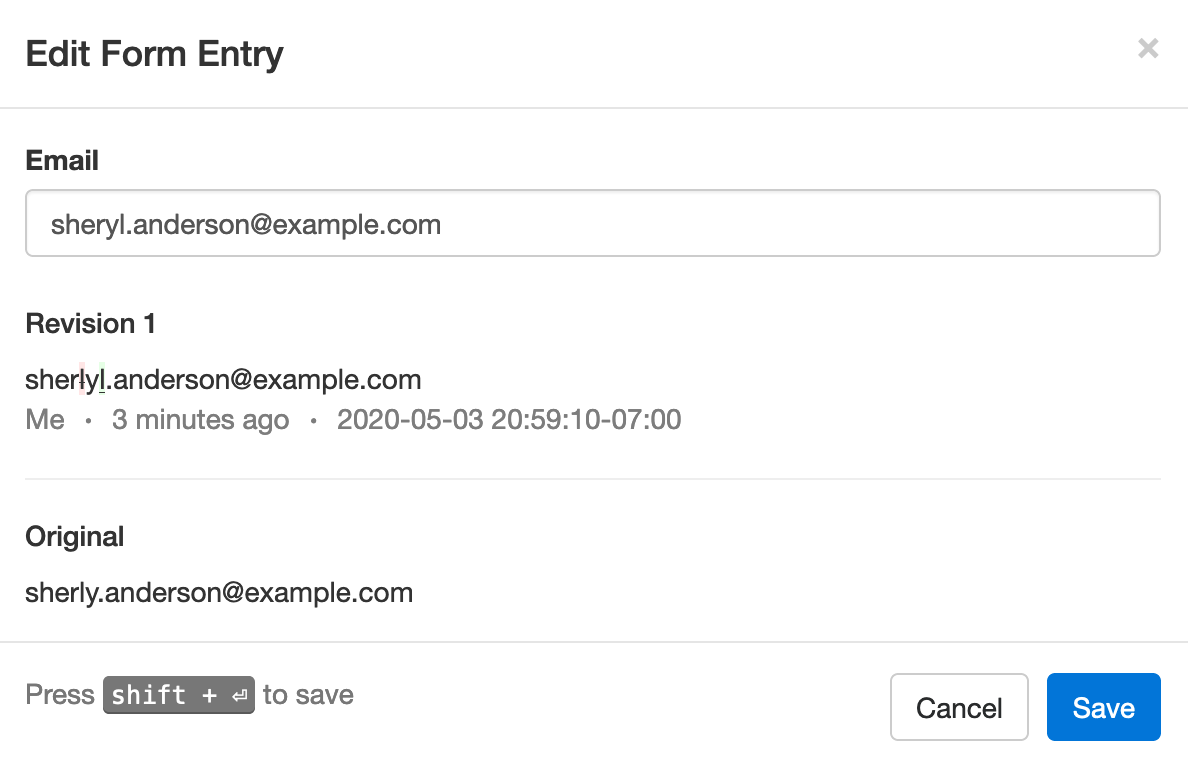
When you update a data field, the new value will show online, in PDF documents and in Excel reports. But it's important to understand that the original value submitted and all changes are kept on FormSmarts and can be viewed in the Revision History.
In the example below, we've changed the email address associated with a form entry where Sheryl was mistyped as Sherly, making the address invalid. The characters removed (crossed out with red background) and added (underlined with green background) are clearly visible.
Built for Teams
Each modification made to a form entry is associated with the FormSmarts user (account admin or invited user) who made it, allowing all users to know who made each change. In the example above, the amendment was made by the user viewing the changes, noted as Me. Other users would see that person’s name.
Regulatory & Compliance Considerations
Auditing and Compliance
When an individual submits an online form, they may be under contractual obligation to provide accurate information — or need to certify that the information submitted is true and accurate to the best of their knowledge.
Although FormSmarts allow members to alter the information originally submitted on a form, changes are made in such a way that we preserve the original value submitted and all changes made.
- Changes are append-only, they cannot be undone or retracted
- The precise change is preserved
- Each revision is associated with the user who made it
- A timestamp is kept for auditing
GDPR
If you are processing information about individuals in the European Union, use this feature to allow users to exercise their legal right to rectification (right to have inaccurate personal data rectified) under the GDPR regulation.
Posted on May 4th, 2020 in collaboration.
Post a Comment
Tags: form response, form results, form submission
How to Make a Booking Form
A booking form allows FormSmarts members to offer a fixed number of tickets for booking on a form, like on this demo.

To make a booking form, first create an event on FormSmarts with a preset number of slots (i.e. tickets, seats), then make a standard form with the form builder and add a booking field to it.

Create an Event
To create an event, sign in to the API console and submit a POST request to the URL https://formsmarts.com/api/v1/events specifying:
- An event label like Online Security Class
- The number of slots available for booking
- The date & time of the event and its timezone
We can for example create an Online Security Class event with 100 seats that takes place on June 12, 2020, 1pm Eastern time with the following Request Data:
label = Online Security Class
slots = 100
date = 2020-06-12 13:00:00
timezone = America/New_York
Add a Booking Field
Add a text box to the form, setting its Allowed Content property to Booking.
Guests should now be able to book tickets through a booking widget shown when they tap, click or move the form’s focus to the booking field.
A booking field only allows booking one ticket by default. You can configure the number of slots that can be booked and other settings with the Booking API.
Find Out More…
Read about how the booking system works and how to manage events, view the status of bookings or cancel a booking.
If you would like to create a booking form but your current FormSmarts package doesn’t support this feature, please ask us for a free trial.
We welcome your comments, questions and feedback.
Posted on Jan 7th, 2020 in booking.
Post a Comment
Tags: booking, howto, payment
How to Create a Bill
FormSmarts offers a really simple way to create bills that customers can pay online: just create a billing form like the one below, then use a tool on FormSmarts.com each time you want to generate a bill for a specific client and amount.

Make a Billing Form
We only need to create the billing form once, we’ll then reuse it each time we need to create an invoice.
Here our example has two main input fields: an email field to uniquely identify the customer and a text box for the amount we want to bill them for. You can view and test the billing form. We’ve also made a slightly more elaborate example that allows a client to add a gratuity with a second amount box.
Note how both the Email and Amount Due fields are fixed: the values preset in the pre-filled URL can’t be changed by the client. We’ll cover how to do this in the next section, for now I need to explain how to set up the Amount Due input field so FormSmarts recognizes it as a fee to be paid by the bill recipient.
Add an Amount Box
- Add a Text Box form control (widget)
- Name the input field Amount Due ($ USD). The ‘Amount Due’ label can be whatever you prefer, but you must stick to the same format and specify the currency as shown.
- Set its Allowed Content value to Positive Number
- If you’ve already configured PayPal integration, you’re all set. Otherwise your need to associate your PayPal account with FormSmarts.
Create a Pre-Filled Bill
When you need to create a new bill, sign in to FormSmarts’ API Console to generate a new Pre-Filled URL with a fixed email and amount. Send the URL to the client in an email or text as a bill.
- Set the Method to
POST (Create) - Set the API Endpoint to
https://formsmarts.com/api/v1/forms/Form_ID/prefilled_url, replacing Form_ID with the ID of your form. - Enter the Request Data as illustrated below and described in the documentation, then submit.
https://formsmarts.com/form/2301?mode=h5, its Form ID is 2301.
Preset Values & Make Fields Read-Only
We enter the preset value of the email and amount fields under Request Data, and make sure those can’t be modified by the user:
- Pre-fill the first input field on the form (
pf_f1) with the value blackhole@syronex.com - Preset the second input field (
pf_f2) to 187.59 - Prevent the user from modifying either fields by making them read-only (
pf_ro1=1,pf_ro2=2)
pf_f1=blackhole@syronex.com
pf_f2=187.59
pf_ro1=1
pf_ro2=2
Find out more about how to pre-fill your forms and how to automatically generate pre-filled URLs if you need to create too many bills to do it manually.
Posted on Nov 18th, 2019 in payment form.
Post a Comment
Tags: bill, invoice, payment, paypal, pre-filled url
How Notes Can Help You Manage Form Entries
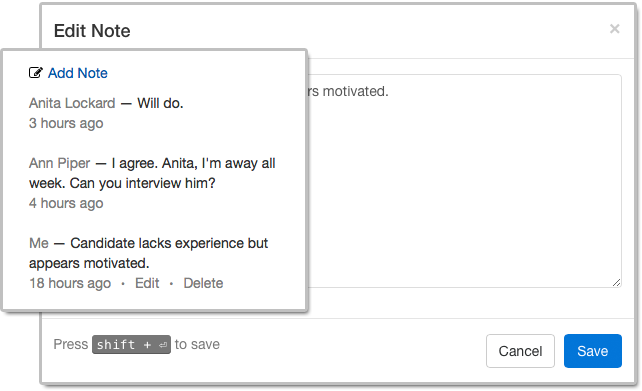
Notes help you keep track of what you need to do about a form entry. When you access an entry on FormSmarts, notes are listed alongside the information submitted.
Notes are especially useful for accounts with multiple users. A note is associated with the person who posted it and all users can see all notes, so notes allow a conversation between users centered around the form entry.
Who Can Benefit from Notes?
Customers who needs to process or review form responses one by one (e.g. application forms, order forms) can benefit from using notes to:
- Record a decision that was made about an entry and keep track of how a decision was reached
- Highlight elements that require further consideration
- Record the status of an application (“Pending Ann’s agreement.”) or registration (“Paid check, deposited today.”)
- Support a discussion between users about a form entry.
Even when form responses usually don’t need to be reviewed individually like with registration forms, notes can help document exceptions and incidents like “Chargeback after credit card was stolen. Paid by bank transfer.” or “Attendee changed to Jeanette Bowman”.
How to View Notes & Annotate a Form Entry
There are several ways to access a form entry online:
- Click the View online & add notes link in the email notification FormSmarts sends you when a form is submitted
- Use the links in the right-most column of Excel reports
- Scan the QR code from a confirmation email or PDF receipt provided by a customer.
Who Can Add Notes?
All users, both the account owner and invited users in the same account can add notes. If a forms was set up to send submissions to more than one person, a separate user should be created for each receiver so they can log in to FormSmarts and post comments.
- The account owner can create notes, edit their own notes, and delete anyone’s notes
- Invited users who were given access to individual entries pertaining to a given form can add notes and edit their own notes (and delete them provided they have write permission).
Closing Notes…
- Notes have keyboard shortcuts: Create a note with Alt + C, save it in the editor with Shift + Enter.
- If an entry is deleted, all notes associated with it are also removed.
Posted on Nov 1st, 2018 in collaboration.
Post a Comment
Tags: collaboration, email notification, form submission, team
Changing the Color of Form Buttons
The latest version of the Form Builder now allows FormSmarts members to change the color of buttons on their online forms.
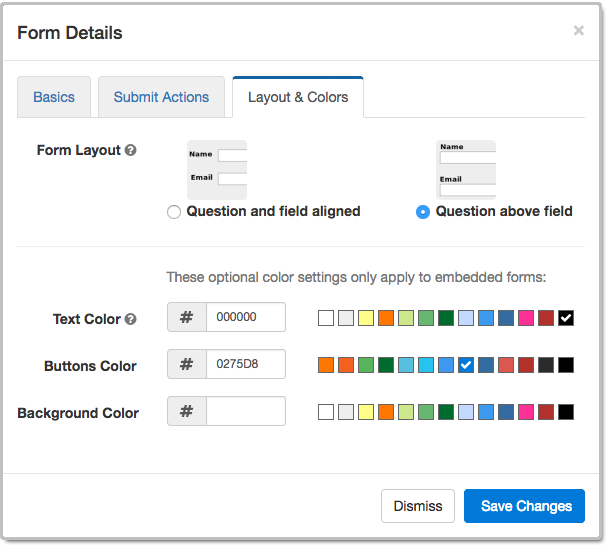
The Buttons Color setting only applies to forms embedded on customers websites. Standalone forms accessed via their FormSmarts.com or f8s.co URL use a standard color scheme.
The color of buttons can only be changed on the current version of our forms. If you’re still using the old one, you probably shouldn’t. The current version is more secure and offers a better user experience. Please update your site.
Like most customizations, this functionality requires at least a Starter account.
As part of this form builder update, we slightly reorganized how information is presented in the Form Details screen illustrated above. The form layout and color settings that were in the Basics tab in earlier versions have been moved to a new Layout & Colors tab.
Posted on Aug 24th, 2018 in online form.
Post a Comment
Tags: embed, form design
About the Form Builder Blog
Categories
- booking (1)
- collaboration (6)
- event registration (3)
- file upload (2)
- form builder (52)
- form handler (9)
- form spam (5)
- HTML form (11)
- mobile form (1)
- online form (10)
- payment form (16)