When Should You Export Forms to Native Excel (XLSX) instead of CSV?
FormSmarts allows customers to collect online form submissions on the cloud and download aggregated entries in a format, CSV, which is supported by all spreadsheet applications (including Microsoft Excel, Apple Numbers and Apache OpenOffice) and many other data analysis tools. We’ve recently added the option to export form responses to native Excel format (.xlsx or .xls) instead of the default CSV for Excel.
The main reason we decided to support the new export format is to solve an issue with phone number fields that may not be displayed correctly when Excel opens a CSV file. The Excel XLSX format also has a few other benefits, but we expect most members to continue using the default CSV format in the foreseeable future. Please read on to find out if and when you would benefit from using the new format.
Benefits of the Excel .xlsx Format
Phone Number Fields
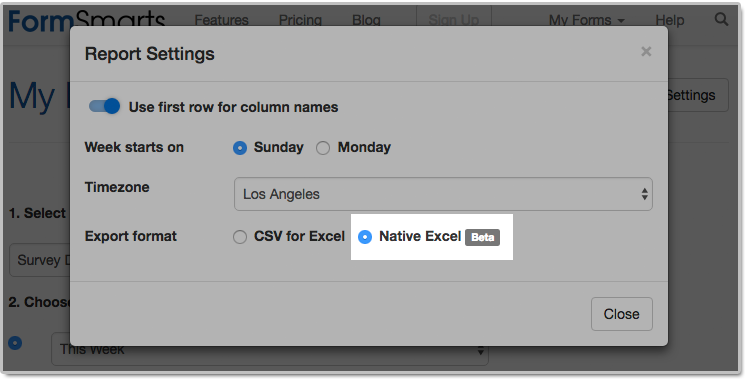
Provided you have set the Allowed Content (data type) of phone input fields to Phone Number, FormSmarts stores phone numbers as character strings rather than numbers to ensure any leading zero is not dropped from phone numbers. Unfortunately, Excel interprets character strings that only contain digits as numbers, thus removing leading zeros. Members who collect phone numbers on their forms, especially in locales where phone numbers may start with a zero (some US states and part of Asia & Europe), should set the Export Format to the Native Excel option in the Report Generator settings, as illustrated above.
If you find out when opening a CSV spreadsheet from FormSmarts that leading zeros were dropped from phone numbers, update the export format and create another report. Provided phone input fields were correctly created as phone number fields, the correct information, with any leading zeros, is stored on FormSmarts. No information was lost, any errors is due to the Excel import process and can be easily fixed by generating a new report after changing the export format.
All settings of the Report Generator but the timezone are kept in your browser, so as long as you use the same browser and allow FormSmarts to store information in your browser, your export preference will be saved from one session to the next.
Form Results with Data in a Non Western-European Language
When a spreadsheet contains data in a language other than English or another Western-European language, customers need to make sure when opening an Excel/CSV report from FormSmarts they select the UTF-8 (Unicode) encoding in Excel’s Import Wizard. The content of the spreadsheet may otherwise not be displayed properly. Alternatively, exporting form entries to a native Excel (.xlsx, .xls) spreadsheet removes the need to select the correct text encoding.
Note that FormSmarts stores data with a universal encoding (UTF-8) that supports all languages, so if you find out that a report appears corrupted when opening the spreadsheet, open the file again and select the UTF-8 encoding or switch the export format to Native Excel: no data was lost or corrupted.
Other Benefits
The native Excel format offers a few other benefits and we expect their number to grow in the future:
- The URLs of form attachments are clickable links
- The FormSmarts Reference Number (the penultimate column in the spreadsheet) links to the form response on FormSmarts. Use this link to add a note to a form submission, check where it was submitted from (IP address, approximate location), export it to PDF, print it, delete it and more. As we add more functionality to the page showing individual form responses (like the ability to tag and edit a form response), we expect more and more customers to rely on links in the spreadsheet as part of their workflow.
The native Excel format is supported with Business Plus accounts and above.
Posted on Jul 26th, 2018 in online form.
Post a Comment
Tags: excel, form results, form to excel
Personalize the Payment Confirmation Email
FormSmarts now allows customers1 to change the text part of the confirmation email we send to form users once their payment has been confirmed, as highlighted below.
If you use FormSmarts for online event registration forms, edit the confirmation message to remind attendees of the date and time of the event, provide information about the venue location, and ask them to print a copy of the message or have it ready for inspection on their phone on the date of the event.
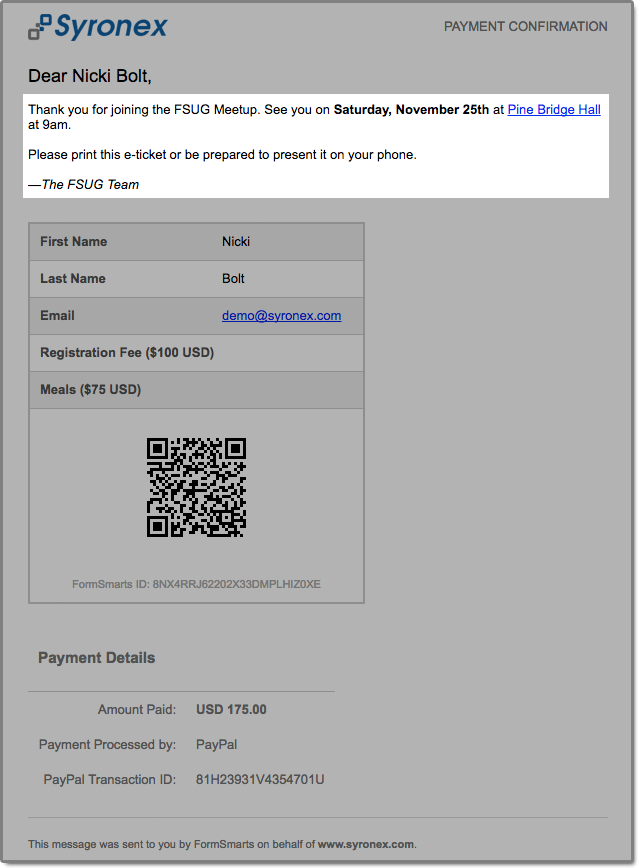
To edit the confirmation message, log in to the form builder and click/tap the pen icon corresponding to the form you would like to edit, then visit the Submit Actions tab.
You can emphasize a section of the text with bold or italics and you may include links and bullet points. The text can be formatted using the buttons provided or with the same Wiki-like syntax you can use elsewhere on your forms.
Use the Preview button to visualize the formatted output of the message.
As always, we value your feedback about this feature.
Note: If you have verified your site and uploaded the logo of your organization to FormSmarts, it will appear at the top of the message.
1 The confirmation email can only be customized with a Business Plus account or above.
Posted on Sep 22nd, 2017 in payment form.
4 Comments
Tags: confirmation email, e-ticket
How to Issue an Invoice or Support Check & Cash Payments
Your can allow form users to get an invoice by specifying prices, fees and quantities directly on a form. When FormSmarts detects an amount of money on a form, we compute the total amount and show it on the confirmation page, the PDF receipt, and in the confirmation email.
FormSmarts helps you generate invoices and manage check and cash payments by showing the total amount due on the printable Summary Page of a form and in the confirmation email and PDF receipt that users can get on that page.
- Use this to generate an invoice when someone submits an order form
- If you’re using our popular payment form feature to collect online payments on your membership and registration forms, chances are that some of your customers will want to pay by check, cash on site or by any other offline payment methods. Use this feature to offer an offline payment option for your online payment forms.
When a form is set up to show a Summary Page when submitted, users may:
- Request a confirmation email
- Download a PDF receipt
- Print a copy of the information submitted with the form

Fees and priced items must be formatted with the FormSmarts payment integration syntax.
As illustrated above, the printout, PDF receipt and confirmation message all include a QR code to help you process payments more reliably and effectively.
Check Payments
- Ask users to enclose a printout of the Summary Page with their check
- Scan the QR code with any phone or tablet to access the corresponding form entry on FormSmarts
- Update the form entry’s payment status with a tag and add a note to record the check number
Cash Payments on Site
The Summary Page can also help you manage cash payments by allowing guests to show their confirmation email or PDF receipt (a.k.a. e-ticket) on their phone (or their printed receipt), that staff can scan to update the registration on FormSmarts. Since the amount due also appears in form response notification emails and PDFs, check-in staff can also reconcile e-tickets with the list of notification emails or registration PDFs even if there is no network connectivity.
How to Make an Offline Payment Form
- Create an online payment form with fees formatted as documented
- When you’re satisfied with the result, make a copy of the form with the Duplicate Form button ( icon) in the Forms Tab of the form builder
- Rename the form and set On Submission to “Show summary with print, email & PDF options” in the Submit Actions tab of the Form Details screen.
The Summary Page supports the same payment-related features as payment forms (except those for recurring payments), including discounts and discount codes.
Can I Accept Online & Offline Payments on the Same Form?
One of the benefits of FormSmarts payment integration is that we won’t notify you until the person has paid so you don’t have to check this yourself each time. If you have a form allowing both online and offline payments, you won’t know which customers have paid online, so you’ll have to review each and every form response.
For this reason, we recommend that you create a copy of the form specifically for check payments and use the Summary Page setup described in the previous section, especially if there are several charges and fees on the form. You’ll then only have to track payments for entries pertaining to that form. You can make a copy of a form in a click with the Duplicate Form button in the upper right-hand corner of the form builder.
Offering a Check Payment Option on an Online Payment Form
If you are making a simple payment form that has a single payment option, you can alternatively include a check payment option on the form using radio buttons or a dropdown list with two options:
Registration Fee ($30 USD)
Registration Fee (pay by check)
If the user doesn’t select the online payment option, FormSmarts will skip the payment step and send you the form entry immediately.
Note that people paying by check won’t receive any confirmation email.
Posted on Aug 21st, 2017 in payment form.
2 Comments
Tags: e-ticket, payment, pdf receipt, summary page
How to Make a Membership Form
Did you know you can offer paid memberships through a simple online form?
If you thought offering online memberships was challenging because it involved a recurring payment each year (or month), you’d be wrong. Making a membership or subscription form with FormSmarts is (almost) as easy as making a one-time payment form.
Creating a Recurring Membership Form with FormSmarts
What Is a Recurring Membership?
Before discussing how to make a membership form, let’s first define what a membership is: A member of an organization or membership site may take part in the activities or otherwise claim the benefits exclusively offered by the organization or site to its members during the period of time covered by the membership (one year or month or any other period of time) by paying a membership fee. To remain an active member after the initial period of time, a member needs to pay again. Because most members want renew their membership, membership fees tend to be recurring payments.
When someone signs up for a recurring payment, also called subscription, they agree to be charged a fee at the time they subscribe and again after each period of time specified — until they cancel their membership.
How Can I Make a Subscription or Recurring Membership Form?
The short answer is: simply by writing “Recurring Membership ($100 USD/year)” on a form. FormSmarts will understand that the person filling out the form should be charged US$100 each year for a membership called “Recurring Membership”.
Like with other types of payment forms, you may add a recurring fee to a form in a radio button option, check box, drop-down list option or text block.
FormSmarts supports the following recurring periods and (optional) number of installments:
Recurring Period
- Recurring Monthly Subscription ($15 USD/month)
- Recurring 6-Month Membership ($60 USD/6 months)
- Recurring Yearly Membership ($100 USD/year)
- options: day(s), week(s), month(s), year(s)
Recurring Times/Number of Installments
- Quarterly Subscription (4 x $20 USD/3 months)
- Optional, if Recurring Times is not specified, the recurring payment runs until it is canceled
- Think of Recurring Times (4 in this case) as a number of installments
Multiple Recurring Fees
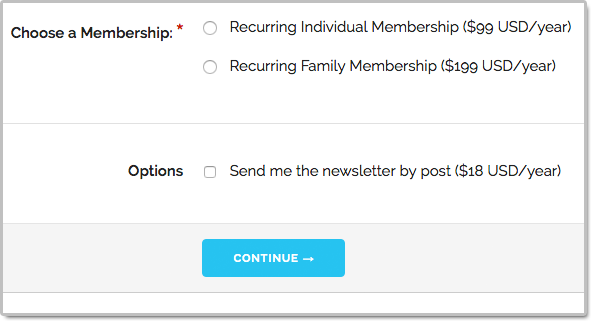
You may allow users to select more than one recurring fee on a form like on the membership form shown on the screenshot above (feel free to try the demo), but all fees must then have the same Recurring Period and Recurring Times.
When someone selects multiple fees, FormSmarts will charge them each time for the total amount.
Offering a Trial Period
Many membership sites offer new members a trial period allowing them to access the site at a low or no cost before having to pay the full membership fee. A fee with terms (i.e. Recurring Period and Recurring Times) different from the first recurring fee listed on a form is interpreted by FormSmarts as a trial period. Our membership form demo has a trial period.
Integration with Other FormSmarts Features
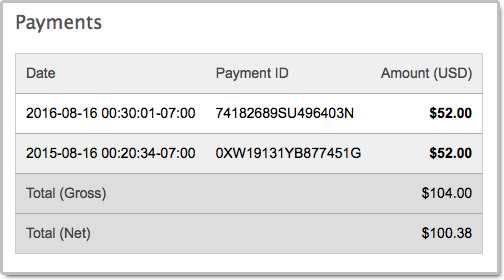
- If cloud storage is enabled, the details of a membership and all associated payments are listed on FormSmarts on the page corresponding to the initial form entry. A link is provided in every email notification.
- FormSmarts sends a confirmation email to the subscriber after each successful payment
- FormSmarts notifies the account owner when a recurring payment is received
Posted on Oct 20th, 2016 in payment form.
2 Comments
Tags: payment integration, paypal
How to Create a Recurring Donation Form
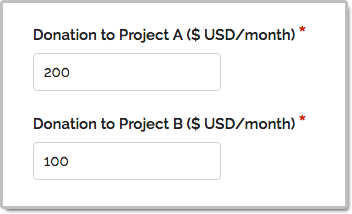
FormSmarts has long supported one-time donations as part of a dedicated donation form, together with other fees on a registration form, or even on a form using our SuperCart shopping cart.
We are pleased to announce that FormSmarts now also supports recurring donations. A recurring donation allows a contributor to sign up for a donation plan to give the same amount at regular intervals, typically every month or year.
Creating a Recurring Donation Form
- Add a text box with the field name formatted as My Donation ($ USD/month)
- Set the field’s Allowed Content (aka. data type) to Number
- In the Form Details screen of the form builder, set the On Submission option to Integrate with PayPal using advanced integration.
FormSmarts supports the following variations:
Recurring Period
- Cause Description ($ USD/month)
- Cause Description ($ USD/2 weeks)
- options: day(s), week(s), month(s), year(s)
Recurring Times
- Cause Description (12 x $ USD/month)
- Think of Recurring Times (12 in this case) as a number of installments
- If Recurring Times is not specified, the recurring donation runs until it is canceled
Contribution to Multiple Causes
As illustrated on the screenshot above and in this demo, you may add multiple donation boxes to a form to give contributors the opportunity to choose the causes they wish to donate to and allow them to contribute to several causes in a single donation. In the example above, the donor is signing up to give a total of $300 each month; with $200 to support Project A and $100 going towards Projects B.
Posted on Oct 13th, 2016 in payment form.
Post a Comment
Tags: payment integration, paypal
Introducing the New SuperCart Shopping Cart
We’ve completely redesigned the user interface of our SuperCart shopping cart to provide a more refined and intuitive user experience.
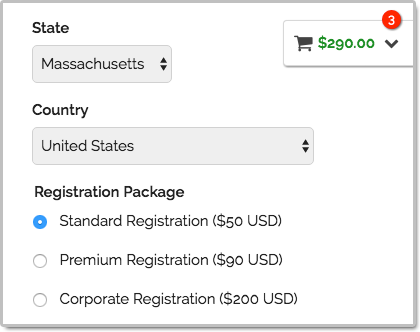
What Is SuperCart?
SuperCart is FormSmarts’ shopping cart.
SuperCart allows a user to submit multiple payment forms — each with one or more priced items on it — and pay for all of them at the end.
A typical use case for SuperCart is to allow a customer to register an open-ended number of guests for an event:
- The customer first enters the information of the first participant and chooses the relevant registration options.
- Once the customer has submitted the form, all fees and priced options are listed in the shopping cart. In the example below, the registration options for the first guest include two fees: Standard Registration and Lunch & Dinner.
- The customer is presented with two choices on the confirmation page: Continue Shopping or Proceed to Payment
- He can submit the form again as many time as needed to register more participants
- Once done, he can pay for all registrations
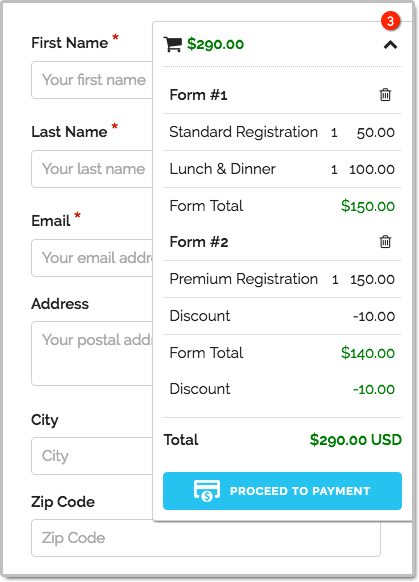
Building a SuperCart form is easy:
- Create a form with fees formatted like on any FormSmarts payment form.
- Set the Return URL of the form to the FormSmarts.com URL given by the form builder. If you prefer to embed the form onto your site (which we don’t recommend with SuperCart), use instead the URL of the page where the form is embedded.
- In the Form Details screen of the form builder, set the On Submission option to Integrate with PayPal using SuperCart.
If you haven’t already done so, remember to set up your PayPal account for payment integration.
Advanced Use Cases
Multiple Forms
Most users set up SuperCart to allow their customers to submit one specific form (e.g. registration form for event A) multiple times to register multiple participants, as presented in the scenario above.
SuperCart however allows different forms within the same cart. This would allow, for example, members of an organization to:
- Buy or renew their membership
- then register for a first event
- then register for a second event
- then pay for the total amount.
And of course, what works for one member works for several…
Donations
SuperCart also supports donations.
Discounts
Flat discounts and discount codes are supported, but percentage discounts are not.
Notes
The new shopping cart is only available with the latest generation of FormSmarts forms. If you’re still using an older version, please update your site now.
Give Feedback
Please share your thoughts and feedback about the shopping cart. Post a comment or let us know on Twitter @FormSmarts or Facebook.
Posted on Sep 26th, 2016 in payment form.
Post a Comment
Tags: payment, paypal, shopping cart, supercart
New Form Design
We’ve updated the design of our forms. The new forms provide a superior user experience on all devices; mobile, desktop and smart TV.
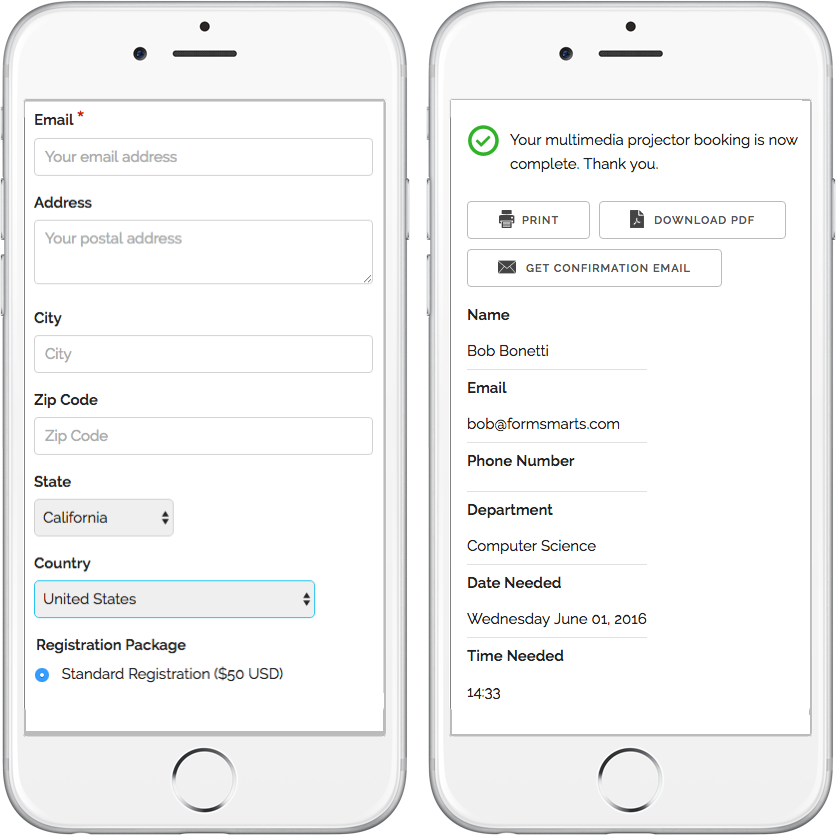
How Can I Start Using the New Form Version?
If you’ve joined FormSmarts since March 1, 2016, you are most likely already using the new version. Otherwise you need to migrate your forms to the new version:
- Visit the Settings Tab of the Form Builder and set Form Version to Current
- Copy the new embed code snippet and update your site
- If you’re using standalone forms, use the new FormSmarts.com URL provided.
What Do You Think About the New Form Design?
Please share your thoughts and feedback about the new form design. Write a comment to this blog post or let us know on Twitter @FormSmarts or Facebook.
Posted on Jun 7th, 2016 in online form.
2 Comments
Tags: embed, form builder, form design, mobile form, usability
Introducing Private Forms
Many FormSmarts members use our online forms within their organization, team or with external collaborators. With Private Forms, customers can now restrict who can submit a form to authorized users and identify the person who submitted each form entry.
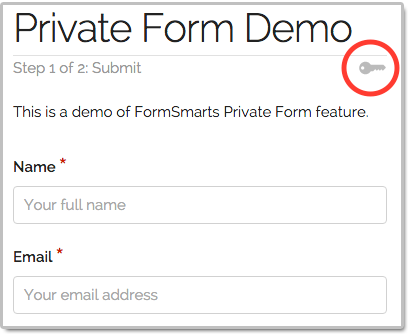
Unlike other FormSmarts forms, a Private Form:
- can only be accessed and submitted by a user attached to the form owner’s account (find out how to add users to your FormSmarts account)
- each form entry is associated with the user who submitted it, who’s username is displayed in the email notification, PDF, online and Excel report.
Use a private form in any situations where you need to temporarily or permanently limit who can submit a form:
- To support internal processes within your organization
- To associate each form response with the identity of the person who submitted it
- To allow onsite or private registrations for a registration form once public registrations for an event are closed.
Please try out this demo with the following login info:
- Account Alias: formsmarts_demo
- Email: demo@syronex.com
- Password: <5RUh02K
To make a form Private, sign in to the API Console and submit a request to the Form API.
Posted on Feb 18th, 2016 in collaboration.
2 Comments
Tags: collaboration, secure form, team
How to Add a Waiver, Liability Release or Other Contractual Agreement to a Form
The Agreement form widget allows you to add a waiver, liability release, agreement, or any other contract (terms & conditions, privacy statement, policy) to a form.
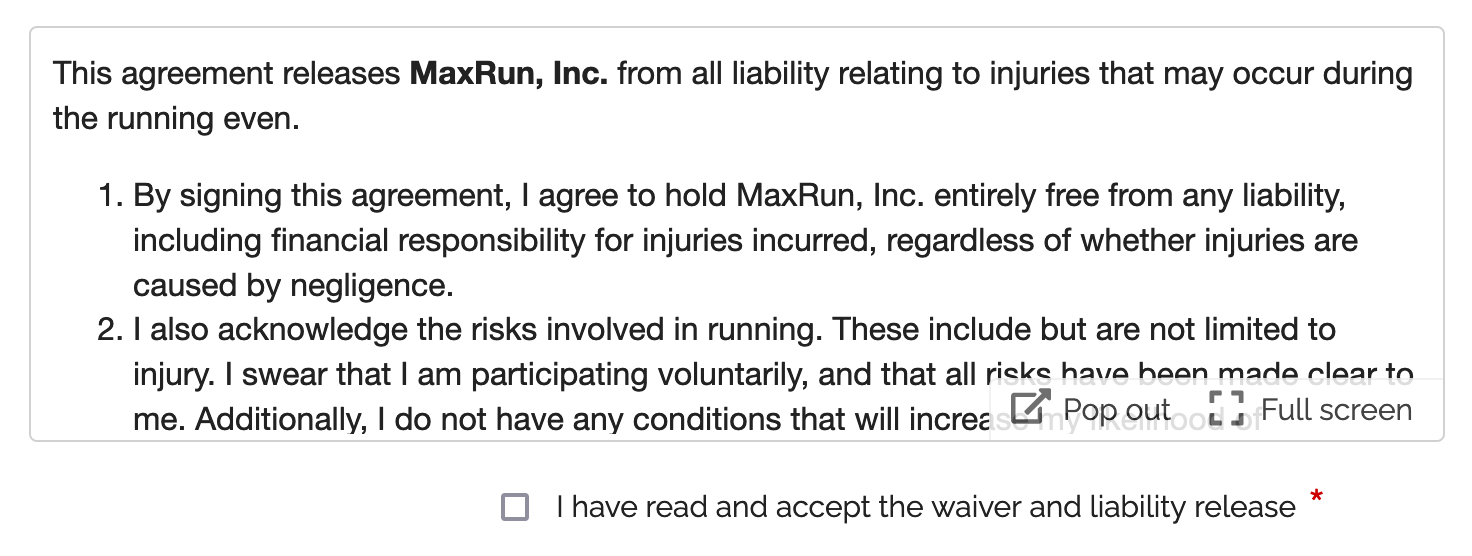
The Agreement widget is intended to be combined with a required checkbox and an e-signature to capture a person’s consent on an online registration form or any other digital contract. Please try this demo.
- A user can read the agreement inline in a scrollable area
- The text can be popped out to a larger window and even launched full screen
- We provide print and download buttons in the pop-up window
- The text shown in agreement widget allows links and basic formatting: bold, italics, underlining, ordered and unordered lists. Here is a waiver example with formatted text.
- Agreements are currently limited to 20,000 characters, please contact us if you need more.
Agreements are only available with the new generation of FormSmarts forms. You can set your account to the new forms in the Settings tab of the Form Builder.
Posted on Jan 22nd, 2016 in form builder.
2 Comments
Tags: digital contract, form design, howto
Introducing Form Routing Policies
As part of FormSmarts collaboration features, we’re introducing Routing Policies. Routing policies (or routing rules) allow you to change the destination email address of a form each time it is submitted, depending on certain criteria.
Until recently the only option was for each email subscriber to receive a copy of the notification message when a form is submitted. FormSmarts now also supports alternative behaviors.
User-Selected Recipient
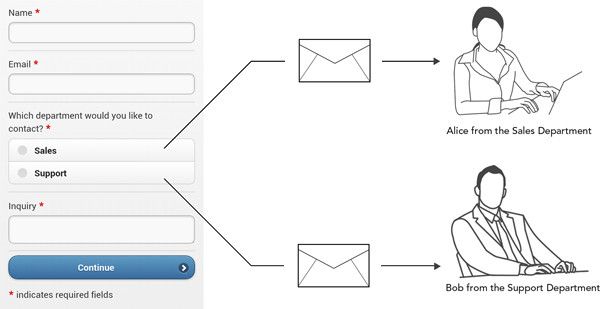
With User-Selected Recipient, users select to whom the form response is sent from a list on the form.
For example, a company might want to allow its customers to submit both sales and customer support inquires online. Customers should be able to choose on the form whether their inquiry is sent to the sales or customer support department.
Round-Robin
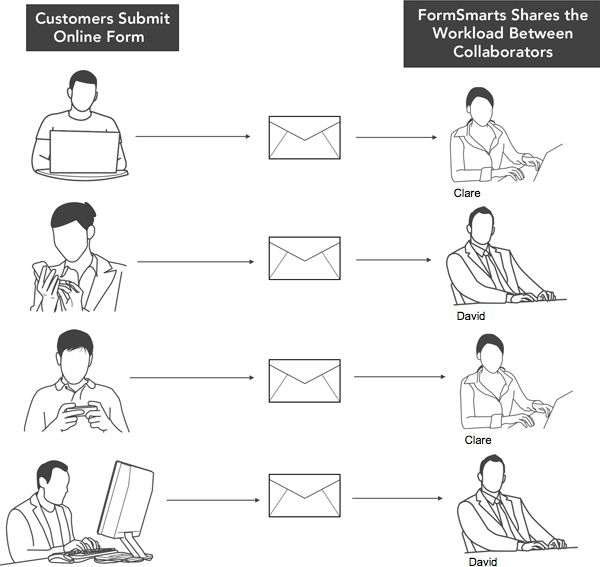
With Round-Robin, form entries are sent to email subscribers in turn, thus automatically sharing the workload between collaborators in a team.
In the example below, four customers are submitting the same online form. The form was set up for round-robin routing between two colleagues, Clare and David. The first time the form is submitted it’s sent to Clare, the second time it’s sent to David, then to Clare again, then to David again, and so on.
Conditional Notification
A Conditional Notification rule allows you to choose whether to send an email notification based on the value of input fields or other conditions on the answer the user provides on a form.
This lets you filter form responses, sending only those that meet the conditions you've specified to someone in your team, while all responses (even those that were filtered out) are still available online and in Excel spreadsheets.
An example use of Conditional Notification during the COVID-19 pandemic is to make an employee screening questionnaire.
Setting Up a Form’s Routing Policy
This short video shows how to set up a routing policy.
To set up a routing rule:
- Visit the Forms Tab of the form builder and click on the icon showing a pen corresponding to the form you would like to edit
- In the drop-down list under Form Subscribers, check all email addresses that you would like to take part in the routing policy (participants)
- Save changes
- Click Change email routing policy and select the relevant policy
- Save changes
Posted on May 6th, 2015 in collaboration.
2 Comments
Tags: collaboration, team
About the Form Builder Blog
Categories
- booking (1)
- collaboration (6)
- event registration (3)
- file upload (2)
- form builder (52)
- form handler (9)
- form spam (5)
- HTML form (11)
- mobile form (1)
- online form (10)
- payment form (16)