How to Track the Source of Leads
If you use online forms for lead generation, you will want to know the source of form submissions: from which page of your site a form was submitted, which social network or site the visitor came from, or which marketing campaign led the prospect to you.

You can track the source of leads received via form submissions with the ctx context parameter, giving it a unique value for each source or campaign you wish to track. In this article, we show you how. If you need help setting this up, let us know.
Example 1: Form Accessed by Its FormSmarts URL
The simplest way to publish a form online is to allow your customers to directly access the form by its FormSmarts URL. To track the source of form responses, create a unique URL for each source or campaign:
- https://formsmarts.com/form/lqh
?ctx=Facebook-May-2013 - https://formsmarts.com/form/lqh?ctx=Newsletter-May-12-2013
- https://formsmarts.com/form/lqh?ctx=ABC+Conference+2013 (tip: create a QR code with this URL and print it on posters, flyers and stickers)
- https://f8s.co/lqh?
ctx=insta - https://f8s.co/
lqh-insta
As you would expect, context values are collected by FormSmarts and shown in notification emails, online & PDF reports, Excel reports, and can be retrieved in a form automation with a webhooks callback or the web API.
Example 2: Form Embedded onto Your Site
If you manually inserted the code snippet for the same form into multiple pages of you site, follow instructions in this section to track leads. If you added the form to your site template, skip to the next section (for WordPress sites) or the one after (for other template-based sites).
Edit each web page where you embedded the form and locate the code snippet in the HTML source. Add the context value after lay=1 (or lay=2), as in the code highlighted below:
<iframe width="540" height="481" src="https://formsmarts.com/form/lqh?mode=h5embed&lay=1&ctx=Summer+2013+Conference+Registration+Page" scrolling="auto" marginwidth="0" marginheight="0" vspace="0" hspace="0" allowtransparency="true" frameborder="0" style="overflow-x:hidden"><a href="https://formsmarts.com/form/lqh">Can't see the form? Click here</a>.</iframe>
Alternatively, grab a fresh copy of the code snippet from the form builder, edit the code as described, then add it to your site in the usual way.
Example 3: Tracking Leads on a WordPress Site
If you added a form to the template of your WordPress site, you can track the URL of the page a form was submitted from with PHP.
- In your WordPress template, replace the form’s HTML snippet by the PHP code below
- Paste the form’s code snipped given by the form builder between the single quotes as shown.
<?php
$snip = ''; // Paste form embedding code between single quotes
$url = get_permalink();
$re = "/[^\w\s,()\[\]*\/:\-.?]+/";
$ctx = urlencode(substr(preg_replace($re, "", $url), 0, 150));
print(str_replace("mode=h5embed", "mode=h5embed&ctx=".$ctx, $snip));
?>
Example 4: Tracking Leads on Any Site with JavaScript
You can do the same on any other sites with JavaScript:
<script>
var snip = ''; // Paste embed code here
var pth = document.location.pathname;
var re  = /[^\w\s,()\[\]*\/:\-.?]+/g;
var ctx = encodeURIComponent(pth.replace(re, '').substring(0, 150));
document.write(snip.replace("mode=h5embed", "mode=h5embed&ctx=" + ctx));
</script>
Notes
This feature is included with Business plans. Context data may not contains non-alphanumeric characters other than “()[]*/:-.? ” and may not exceed 150 characters.
Posted on May 27th, 2013 in form builder.
2 Comments
Tags: business, email notification, form to excel, form to pdf
Offering Discounts with PayPal Integration & Discount Codes
FormSmarts allows you to offer three types of discounts to your customers on your PayPal forms: discounts for a fixed amount, percentage discounts and discount codes.
Fixed Amount Discount
- Syntax: My Discount (-$5 USD)
- Example form with a fixed amount discount
- You may offer more than one discount, but not more than there are paid items selected.
Percentage Discount
- Syntax: Discount Percentage (-25%)
- Example form featuring a discount rate
- You may only add one discount rate to a form
- Percentage discounts are not supported on SuperCart forms
- If you’re offering a fixed discount on the same form, both may not be selected at the same time
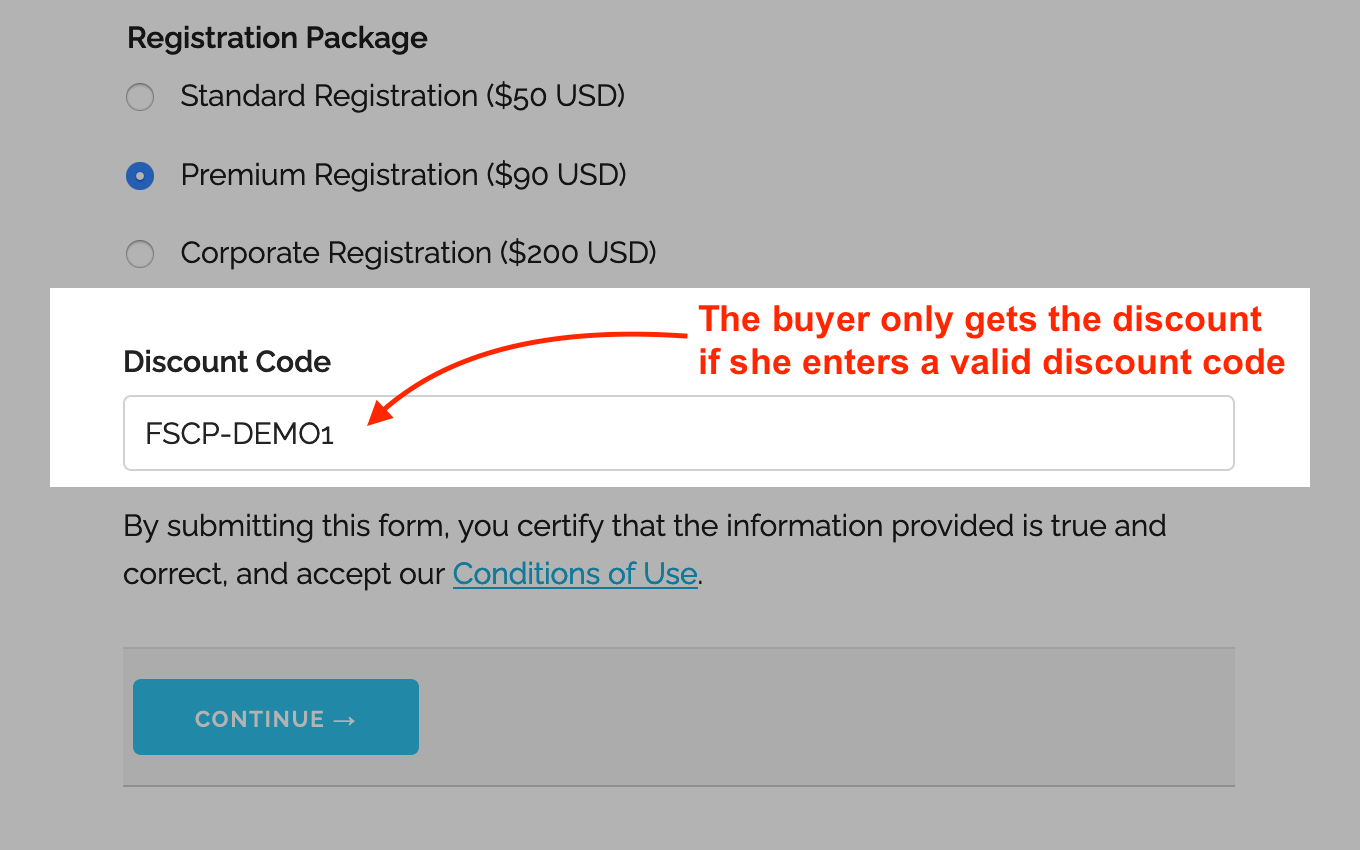
Discount Codes
Last but not least, FormSmarts supports discount codes. With discount codes, the buyer only get the discount if they enter a valid coupon code on the form.
- A discount code offers either a percentage discount or fixed amount discount
- Try this example with the discount code FSCP-DEMO1
- You may set up a discount code with a validity period by providing a start and end date (not supported with Starter accounts)
Early Bird Discounts
To offer an early bird discount on a registration form, create a discount code with a start and end date. The discount will only be applied if the form is submitted between those dates.
How to Offer Discount Codes on a Form
To create a discount code and associate it with a form:
- Add a text box to the form selecting the data type Letters + Numbers
- Create the discount code on FormSmarts with the API Console as documented and shown in this video.
- Promo codes must start with FSCP- and may only contain alphanumeric characters and dash.
Posted on Feb 1st, 2013 in payment form.
8 Comments
Tags: payment integration, paypal, paypal form
How to Have Users Pay Once for Multiple Registrations or Orders
A little known feature of FormSmarts’ Advanced PayPal Integration is SuperCart. This feature allows a user to submit multiple online forms that include a payment and pay once for the total amount at the end, thereby providing the buyer with a better ‘shopping’ experience and reducing the seller’s PayPal fees. Let’s review two typical uses of SuperCart.
Note: This article discusses an early version of SuperCart. Although it content has been updated and is still relevant, please also read our introduction to the SuperCart Shopping Cart.

Use Case 1: Event Registration Form
The first typical use for SuperCart is to create an online form to register attendees for an event. For illustration purposes, I’ve made a registration form for a conference. We want each attendee to be able to choose a different registration package, pick the seminars they would like to attend and optionally add an accommodation package. With SuperCart, a user can register multiple delegates by submitting the registration form for each one, then pay for all of them at once. In the illustration above, we submit the form once to register Pat selecting the standard registration option, then again for Jim, opting this time for a premium registration and adding accommodation. We then proceed to PayPal to pay for both registrations. This short video shows how this works in practice.
Use Case 2: Order Form
Another common use of this feature is to create an order form allowing a buyer to purchase several products or services while being able to customize options for each one. I’ve built an order form demo to allow customers to configure and order goods (greetings cards in this example). Each product can be customized based on the options selected on the order form. With SuperCart, the buyer will be able to order as many products as they like by submitting an order form for each one, then pay for all of them at once.
How to Create a SuperCart Form
While understanding the concepts behind SuperCart may not appear straightforward, building a SuperCart form is easy:
- Set the Return URL of the form to the URL of the page the form is embedded into. If you’re using the standalone form, enter the FormSmarts.com URL given by the form builder instead.
- In the Form Details screen, set the On Submission option to Integrate with PayPal using SuperCart.
If you haven’t already done so, remember to set up your PayPal account for Advanced PayPal Integration.
When You Should and Shouldn’t Use SuperCart
Set up your PayPal forms with SuperCart whenever you would like to allow a buyer to pay once for multiple form submissions and providing a single form would affect the form’s usability because each registration/order has too many options or you expect someone will submit more two or three registrations/orders. If it’s unlikely buyers will submit more than one form you should use a regular payment with Advanced PayPal Integration instead.
Posted on Jan 4th, 2013 in payment form.
4 Comments
Tags: order form, payment integration, paypal, paypal form, registration form, shopping cart, supercart, video tutorial
Introducing the New Mobile Form Platform
We’ve just released our new mobile form platform and we encourage you to try it out now from your smartphone or tablet.
- Form navigation is optimized for touch screen devices with a virtual keyboard
- If supported by the device (browser), a different virtual keyboard should be provided depending on the type of data to input. For example, when a phone number field is selected, the device will show a phone dial with large numbers. When moving to an email field, the keyboard will show the ‘@’ and ‘.’ keys at prominent positions.
- Form adapts to the size of the screen and form layout changes when switching from portrait to landscape mode (or conversely)

To access the mobile version of a form, use the URL http://m.f8s.co/your-form-id or add ?mobile=yes to the FormSmarts.com URL of the form.
e.g. If the URL of a form is https://formsmarts.com/form/lqh, you can access its mobile version at https://f8s.co/lqh or https://formsmarts.com/form/lqh?mobile=yes
Once the platform goes out of beta (i.e. public testing phase), FormSmarts will automatically serve the desktop or mobile version of a form depending on the client device.
Besides the iPhone and iPad, we’ve tested mobile forms with a wide range of Android smartphones and tablets, as well as BlackBerry devices. Please share with us your experience using mobile forms with your own device.
Posted on Sep 28th, 2012 in mobile form.
6 Comments
Tags: mobile, mobile form
How to Lead People to Online Forms from Printed Material
Here are two easy tips to increase online form conversion from paper material: bridge the offline-online gap by allowing people to register for your next event, pay their membership fee, or sign up for your newsletter on the spot from any poster, brochure or printed document.
You are probably aware that you can easily share a form with your user base by email or on social networks using the FormSmarts.com URL that comes with each and every web form. What you may not know is that FormSmarts has two features that allow you to share online forms on printed material.
Using QR Codes & Short Form URLs
You can and should take advantage of the dramatic increase of the number of smartphones and tablets in the last few years to give people a convenient way to access your forms on the spot with their smartphone (or tablet) by either scanning a QR code that will lead them straight to your form or by typing a short URL (for those users that don’t yet have a QR code scanner app on their device).
You’ll find the QR code and short URL (e.g. f8s.co/lqh) of each of your forms in the Form Publishing Options screen of the online form builder.
Printed material where you should consider printing the QR code and short URL of your forms include: posters, invitations, printed newsletters, ads, brochures, job specifications, tags,… and even t-shirts.
Send us a picture of printed media where you use a FormSmarts QR code or short URL and you could win yourself a free Pro subscription! The best three entrants will be chosen on Jul 31, 2012 and will get a 1 year Pro subscription and their picture published on FormSmarts.
Posted on Jun 25th, 2012 in form builder.
Post a Comment
Tags: accessibility, howto, mobile form, usability
How to Integrate with FormSmarts API
The Event Notification API allows you to have FormSmarts send a machine processable ‘push’ notification message to a script on your website (or for that matter to any URL) to process the information that has just been submitted through one of your online forms. You can use the Event API (a.k.a. Web Hooks) to integrate FormSmarts with your database, website or any online service or application.
How to Integrate
Whereas this feature is mainly targeted at developers, creating a script that does something useful with the data received from FormSmarts is actually not difficult. The API is fully documented with examples in PHP.
- You first need to create a program/script to process form data and upload it to your web server. Data is sent in JSON format, which is supported natively by all modern programming languages.
- Then register the script’s URL with FromSmarts
- Whenever a form is submitted, FormSmarts will send the data submitted through the form as well as other data pertaining to the form response (e.g. payment information if the form involves a payment) to the URL you have registered.
Have a Great Idea?
If you have a great idea about how you could use FormSmarts API, let us know: we have several Business Starter subscriptions to give away.
Posted on May 31st, 2012 in form builder.
2 Comments
Tags: API, automation, business, howto, payment integration
Engage Users via Twitter & Facebook to Increase Form Conversion
FormSmarts allows you to better engage with your user community by adding a social component to your online forms. The assumption with social networks is that a user is more likely to perform an online action such as filling out a form, registering for an event or sign up for a class if she knows that her friend or colleague has already done so.
Online Forms Get Social
For each form, FormSmarts allows you to set up a message template that will be used to post an update to social networks when the form is submitted. The message can incorporate any information entered on the form.
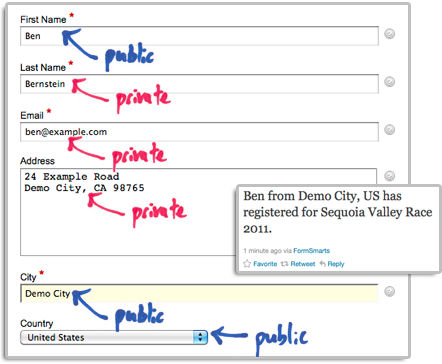
The user’s expectation when filling out online forms is that the information submitted will only be disclosed to the form owner, and you clearly need to ensure you don’t leak personal information (more about this in the last section). We define two types of input fields on a form. Those which will be populated by information which—taken out context—is so general that it can be safely disclosed, and those which should be kept private. In the example below, we deem First Name, City and Country as public, while all other fields are deemed private.
How to Set Up FormSmarts to Post Twitter Updates
First connect your Twitter account with FormSmarts to allow FormSmarts to post tweets on your behalf. You will be taken to Twitter for authentication and asked to authorize FormSmarts to post updates using your account. You will only need to do this once. Note that FormSmarts will not have access to your Twitter password. Once this is done, Twitter will send you back to FormSmarts.
Next click on Twitter Feed Setup in the Form Details screen of the form builder. Enter a short text using placeholders $1, $2, $3,… where you want the value of the corresponding input field to be inserted. Use $1 for the value of the first input field, $2 for the second, etc., in the order fields appear on the form.

Posting Updates to Your Facebook Wall
When someone submits a form, FormSmarts can post an update to your Facebook wall via the Twitter App for Facebook. First set up FormSmarts to post updates to Twitter as described in the previous section, then add the Twitter App to your Facebook page or profile. We will add native support for Facebook if there is demand—please let us know here. (Note: if you ended up here while looking for information on integrating an online form to Facebook, read this).
Respecting the Privacy of User Information
Protecting the information of your users is of paramount importance. When someone submits his information via an online form, he does it with the implicit understanding that his personal information will not be disclosed.
- Add a privacy note on the form (like on this demo) to ensure people understand that some none-personal information will be posted to social networks. Say what information will be published.
- Make sure you’re using the correct placeholder (e.g. $1, $2,…) in the message template. Remember that $1 will be replaced by the value of the first input field in the order they appear on the form, $2 will be replaced by the value of the second input field, etc.
- If you change the order of fields on the form, don’t forget to update the message template with the correct placeholder name.
- Always test the form after setting up a Twitter feed or changing field order.
To further prevent the leak of confidential information, FormSmarts will not publish Twitter updates for SSL secure online forms, even if this has been set up through the online form builder.
How to Disable a Twitter Feed
If you no longer want FormSmarts to post a Twitter update when a form is submitted, simply erase the message template in the Twitter Feed Setup screen (pictured above) and save changes.
Posted on Dec 13th, 2011 in form builder.
1 Comment
Tags: facebook, form builder, form recipient, form results, form submission, pro, twitter
How to Customize the Look of Your Forms with CSS
The online form builder allows you to easily change the layout and colors of your forms when these are embedded into your website. This article discusses how to further customize the look of your online forms by providing your own CSS stylesheet. You can create one (or more) CSS stylesheet for each form.
Disclaimer
The feature discussed in this article is UNOFFICIAL. It is NOT PART OF ANY FORMSMARTS COMMERCIAL OFFERS and we do not provide direct support for it. Feel free to post questions at the bottom of this page. Changing the layout of a form may prevent it to display consistently across browsers.
Verify Your Site & Upload a Logo
To be able to use your own CSS stylesheet, your first need to verify your site and upload a site logo. Uploading a logo creates a website profile on FormSmarts and will allow you to provide your own CSS stylesheet. The logo will be shown on the standalone version of your forms and also on PayPal if you’re using Advanced Payment Integration.
Create a CSS Stylesheet
The CSS code in your stylesheet will be loaded after the default FormSmarts CSS, so any instructions specified in it will override the default. We give a few examples of customizations in the Example section below. More will follow.
Update the Embed Code on Your Site
In the HTML snippet given in the Form Publishing Info screen of the form creator, change the query string portion of the URL from mode=embed&lay=1 to mode=embed&lay=1&style=form.css, where form.css is the path to the CSS file relative to the root of your website. For example, if your website’s URL is http://www.example.com, the CSS file should be at http://www.example.com/form.css.
CSS Styling Examples
Changing the Font and Color of Headings
h2{
font-family:serif;
font-size:14px;
color:orange;
}
Changing the Layout of a Form to Multiple Columns
Logical sections defined by headings can be made into separate columns using the following CSS code and changing the iframe width accordingly.
#section_1{
width:350px;
float:left;
}
#section_2{
width:350px;
float:right;
}

Posted on Nov 21st, 2011 in form builder.
21 Comments
Tags: embed, form design, howto, usability, widget
How to Use QR Codes to Deliver Online Forms to Mobile Users
As more users are accessing online forms through a mobile device, we’ve added two ways to share a form with mobile users. Each form now comes with it own QR code and short URL, to be found in the Form Publishing Options screen of the form creator. We’ve also made it easier to embed a form on Facebook.
Why Mobile Users Are Important
- Users are increasingly accessing online forms on the go through their iPhone, smartphone, iPad or other tablet. Recent figures from market research firm IDC suggest that by 2015 more US users will access the Internet through mobile devices than through traditional PCs.
- Online form publishers can and should take advantage of the QR code scanning functionality available on mobile devices to bridge the gap between offline and online content. A QR code is a type of two-dimensional (2D) barcode popular in the mobile industry and for which free scanning apps are readily available for (if not built in) most mobile platforms. By printing the QR code provided by the form builder on ads, posters, fliers, and any paper form or document (mobile tagging), you’re allowing mobile users to access an online form without typing, simply by scanning its QR code with their phone. Avoiding typing is a convenience for users, and it also eliminates the risk of errors when entering the URL.

QR Code vs. Short URL
For those cases where distributing a QR code is not practicable and for mobile users who haven’t yet installed a QR code scanner on their phone or don’t know how to use it, we’ve also made all online forms accessible via a short URL such as https://f8s.co/7kb. If this doesn’t fully eliminate typing, it at least makes typing a form URL a less frustrating experience and shows mobile users you do care. And again, it reduces the risk of making an error when typing the URL.
Posted on Oct 3rd, 2011 in form builder.
1 Comment
Tags: embed, facebook, mobile form, qrcode
Excel Report Generator Upgrade
If you’re using FormSmarts’ Export to Excel feature, you may have already noticed that we’ve updated the report generator. As well as several other minor changes, we’ve added a second way to specify the date range over which the report is generated (in addition to selecting a start and end date) by choosing a preset time period. This is meant to further simplify the task of generating a report. The preset periods available are Today, Yesterday, This Week, Last Week, Last Seven Days, This Month, Last Month, Last 30 Days.
For the time period options that depend on the first day of the week (This Week, Last Week), we use the default for your country, as set in your account. You can change this in the Report Generator under More Options.
Give Us Feedback
Do you find the new date range feature useful? Which one do you anticipate you will use most? Should we add more (e.g. quarter)? Please give us feedback by posting a comment, via Facebook or Twitter.
Posted on Sep 16th, 2011 in form builder.
4 Comments
Tags: excel, form to excel
About the Form Builder Blog
Categories
- booking (1)
- collaboration (7)
- event registration (4)
- file upload (2)
- form builder (54)
- form handler (9)
- form spam (5)
- HTML form (11)
- mobile form (1)
- online form (11)
- payment form (16)