PayPal Integration in Two Steps
FormSmarts PayPal integration is as easy to use as our popular PayPal form feature, but it provides several additional benefits, mainly:
- FormSmarts only notifies you of a new registration (or more generally, payment form submission) after the payment is confirmed and verified (no need for manual verification)
- Your customer receives an automated email receipt with a copy of the data submitted and a payment confirmation. For registration forms, this can work as an e-ticket.
- PayPal Integration works seamlessly with other FormSmarts features (export to Excel, PDF reports, API).
What Are the Benefits of PayPal Integration?
FormSmarts’ old PayPal integration was easy to use and set up as it required no change to your PayPal account. A downside to this was that FormSmarts had no way to know if the payment went through or not, and you — the seller — had to manually reconcile payments and the corresponding form responses using the FormSmarts Reference Number. That was usually not an issue for small sales volumes, but could quickly become so as sales increased. We’ve now fully automated payment processing and integrated it with the form processing platform. Here are the benefits:
- No need to manually reconcile form responses with payment notifications from PayPal
- The seller is only notified of a registration/order when the payment has gone through
- The transaction won’t appear in Excel exports until the buyer has paid
- FormSmarts verifies that the payment details match data submitted on the form (e.g. amounts, quantities)
- Excel exports combine data submitted through the form and details of the corresponding payments.
- FormSmarts sends a confirmation email to the buyer with both the order details and a payment confirmation. If you have verified your website and uploaded a logo, your site URL and logo will appear in the email.
- Payment processing is fully automated and if you’re using online/PDF reporting or export to Excel, your registration forms are on autopilot.
- You can further automate processing or integrate FormSmarts with your website or another web service using the FormSmarts API.
Setting Up PayPal Integration
This video shows how to set up your form and set up your PayPal account for PayPal Integration.
Add Fees to the Form & Set It Up to Integrate with PayPal
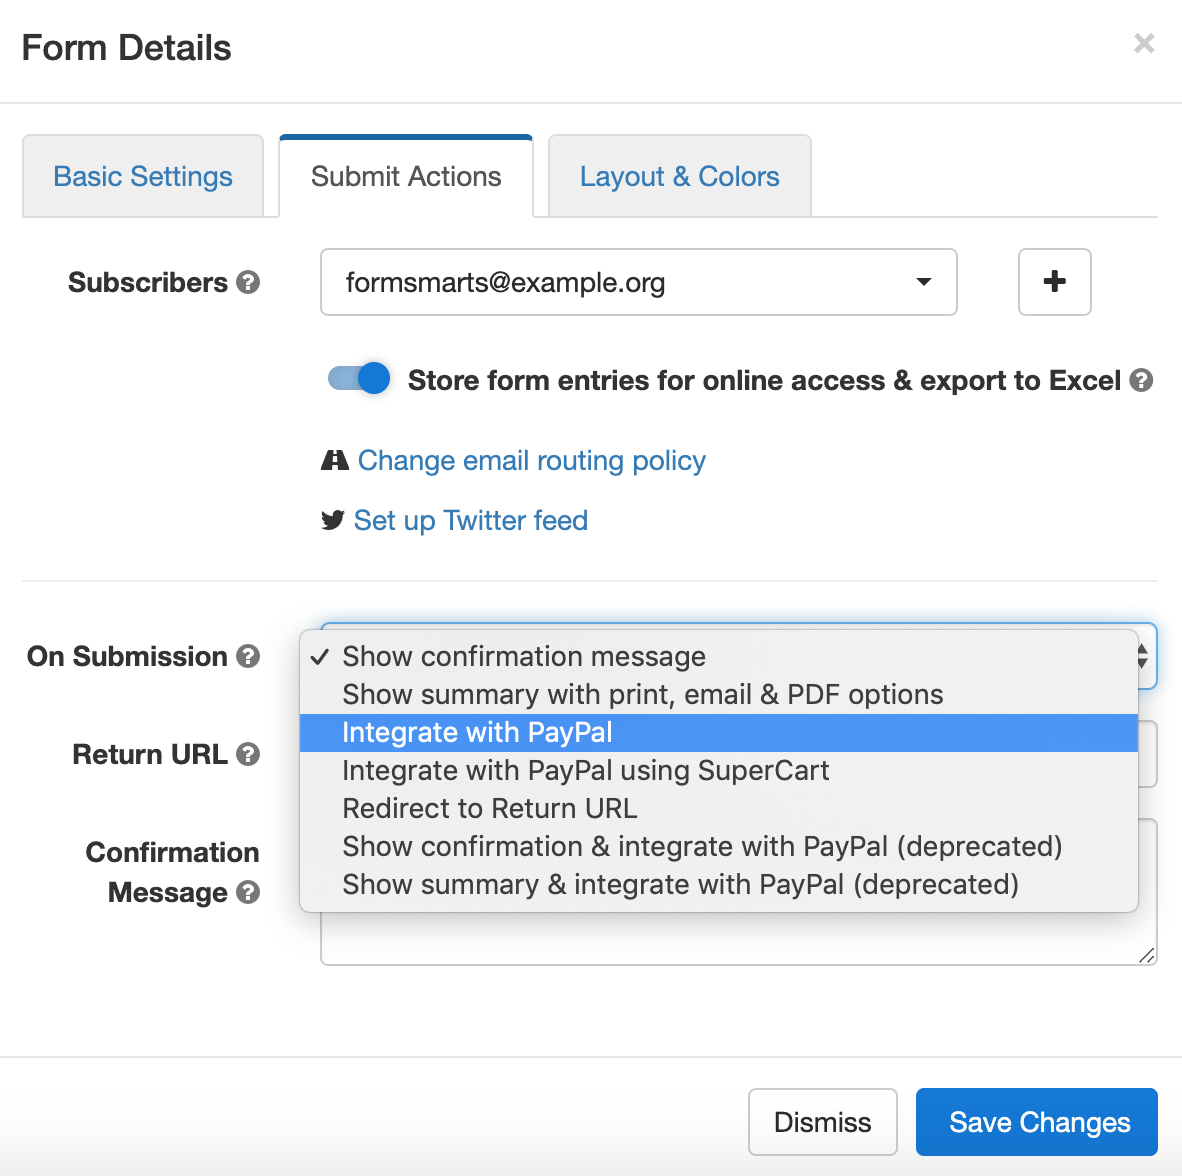
To set up PayPal integration, first create a payment form with prices formatted as shown in the PayPal integration page of the site. Then visit the Forms tab of the form builder and select Integrate with PayPal in the Submit Actions tab of the Form Details screen, as illustrated below.
Add Your FormSmarts Notification URL to PayPal
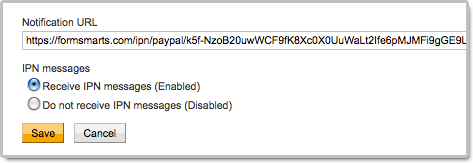
It’s now time to log in to your PayPal account to add your Notification URL. PayPal will use this URL to communicate with FormSmarts. You’ll find your notification URL in the Security Settings section of your FormSmarts account. The URL contains your private security key, so don’t share it with anyone.
Use this link to access the Instant Payment Notification (IPN) page of your PayPal account, then tap Edit Settings and paste your Notification URL in the box as shown on the screenshot below. Make sure Receive IPN messages is enabled before saving.
You can alternatively navigate to the IPN Settings screen from the homepage of your PayPal account.
Payment integration will not work until you have added your FormSmarts Notification URL to your PayPal account.
Did You Link Multiple Emails to PayPal?
If you’ve associated more than one email address to your PayPal account, the email you’ve selected as your Primary PayPal email must be the same as your FormSmarts login email.
You can either change your FormSmarts login or update your Primary PayPal email so both email addresses are the same.
FormSmarts will reject payments associated with an email address other than your FormSmarts login email for security reasons.
If PayPal shows an error on the checkout page when testing your first form, you may need to update your PayPal account settings.
Posted on Apr 28th, 2011 in payment form.
29 Comments
Tags: form builder, payment integration, paypal, paypal form
A Tip to Increase Form Conversion: Use Required Fields Wisely
When creating a form, the form builder allows you to specify whether your want each input field to be required or optional. The meaning of required is obvious: form users will not be able to submit the form unless a value has been entered for each and every required fields. For radio buttons and drop-down lists, that means users will have to explicitly select an option between the ones provided. The decision to make a field required is not to be made lightly, because that could frustrate the user and affect the form’s conversion rate.

The meaning of optional is more subtle as it is different for text input fields (text boxes, multi-line text areas) on the one hand, and radio buttons and drop-down lists on the other hand. That’s because in the latter case users only have a limited set of options to choose from, and the first option in the list is always selected by default.
In the example illustrated below, we’re building a registration form for an event. The form should accommodate up to two delegates. The first delegate is required, but the second one is optional. It turns out that:
- The first set of radio buttons or drop-down list should be required.
- The second set of radio buttons or drop-down list should be optional, with None as the default option.

Because None is selected by default, the form user won’t have to do anything in the most likely scenario where he’s only registering one attendee. This will save him time and frustration, and will statistically increase the form conversion rate and reduce form abandonment.
Posted on Apr 12th, 2011 in form builder.
4 Comments
Tags: form conversion, form design, HTML form, input field
How to Build a PayPal Subscription Form
Many websites allow visitors to access online content and services for a monthly subscription fee. Creating a subscription form is somewhat different from creating a regular payment form, because it involves setting up a recurring payment, so that the buyer is automatically billed a fixed amount of money at a fixed interval until the subscription is canceled. The online form builder’s payment integration feature now supports PayPal Subscriptions.

Creating a Subscription Form
Creating a subscription form is quick and easy:
- If you haven’t got a FormSmarts account yet, sign up for a FormSmarts Business account, then create a form with the form generator
- In the Form Details screen of the form generator, set the On Submission option to Integrate with PayPal
- Add radio buttons, a drop-down list or a checkbox, and enter the description, price and duration of subscription options formatted as My Subscription ($19.99 USD/month), as shown on the screenshot above and in this demo.
Duration of a Subscription
The time before another payment is due can be specified in days, weeks, months, or years. The form builder understands the following formatting variations:
- Monthly Subscription ($9.99 USD/Month)
- 30-Day Subscription ($9.99 USD/30 days)
Trial Subscription
Like in the example presented in the first section, you may specify a trial period for the subscription. This is typically used to give a free trial subscription to the buyer before he is charged for the first billing cycle. The buyer will not have to pay anything if he cancels the subscription before the end of the trial period.
- The trial period doesn’t need to be free
- You may specify up to two trial periods
- Any trial periods must be placed on the form after the main subscription specification.
Payment in Installments
A payment in installments is a recurring payment where the number of payments is fixed.
FormSmarts supports installments with the following syntax:
- Payment in 12 Installments (12x$9.99 USD/month)
- Try this demo
Any Feedback?
As always, your feedback is important to us and is our primary source of inspiration for developing new features. You can also post your questions and comments on Facebook and Twitter (@FormSmarts).
Posted on Jan 17th, 2011 in payment form.
1 Comment
Tags: form builder, payment integration, paypal, paypal form
Attach a File to a Form in a Click: File Upload Made Easy
With the new file upload feature, you can now let form users attach a picture or document to a form like in this demo.

Adding a file upload widget to your forms is as easy as adding a simple text box: visit the Fields Tab of the form builder, and create a new field choosing the File Upload widget. That’s all there is to it. Once a file has been uploaded and the form confirmed, that file will be stored on FormSmarts and available to you.
Customizing File Upload Fields
Although a file upload field created as just described will be fully functional, you may want to restrict the type of content the form will allow users to upload, as well as set the maximum file size permitted. You can also specify how long FormSmarts should keep uploaded documents on the server. To change these options, visit the Field Details screen of the form builder.

Allowed Content Type
By default, a file upload field will accept all supported content types: documents (PDF, Word, Excel, RTF, OpenOffice ODF, and HTML documents) and images (JPEG, PNG, and GIF). You can restrict the type of content the form will allow users to upload to either documents or images. For example, if you’re building a job application form, you will want applicants to upload their CV and should restrict uploads to Documents to prevent mistakes.
Maximum File Size
When you add a file upload field to an online form, the maximum size of the files that can be uploaded is set to the maximum for your plan:
- 2 Mb for Business Starter
- 4 Mb for Business Plus
- 8 Mb for Business Max
- 10 Mb for Business Premier
- 15 Mb for Business 3 and above
Edit the file upload field and use the slider to adjust that value to whatever makes sense for the purpose of the form.
Storage Policy for Uploaded Content
You can define the period of time during which FormSmarts retains uploaded content. At this time, we support eight storage policies:
- 5 days
- 10 days
- 30 days
- 90 days
- 1 year (365 days)
- 2 years (731 days)
- 5 years (1,827 days)
- Forever (default)
The period of time FormSmarts keeps form attachments can be set for each individual file upload field. To change it, edit each file upload field and set the retention period as required for your application.
To prevent accidental data loss, FormSmarts keeps, by default, form attachments on the cloud for the lifetime of the account (“forever” option). While this ensures a high level of data availability and durability, members may then exceed the upload storage quota for their accounts — currently:
- 100 Mb for Business Starter
- 500 Mb for Business Plus
- 1.5 Gb for Business Max
- 10 Gb for Business Premier
- 30 Gb for Business 3
- 100 Gb for Business 4
You can view your current usage in the Resource Usage section of your account. We’ll send you an email if you’re getting close to or exceed the storage space for your plan.
Note: Form attachments for online forms integrating with PayPal using Advanced Integration are retained for at least 20 days, even if the storage policy is set to 5 or 10 days.
Secure File Upload
File upload works with FormSmarts secure form feature so that files attached to a secure form only transit via a secure connection (TLS/SSL), both when uploaded to FormSmarts and when downloaded by the form owner. Form attachments uploaded securely are also encrypted at rest.
Any Feedback?
As always, your feedback is important to us and is our primary inspiration for developing new features and improving existing ones.
Posted on Jan 4th, 2011 in file upload.
14 Comments
Tags: business, file upload, form attachment, form builder, secure form, SSL
Detailed Form Confirmation Page (Summary Page)
FormSmarts supports a number of options to complement the default confirmation page that is displayed when someone submits a form.
You can:
- Redirect form users to your site
- Allow form users to pay a registration fee via PayPal
- Show a detailed confirmation page where users can choose to receive a confirmation email or download a PDF receipt
Detailed Form Confirmation Page
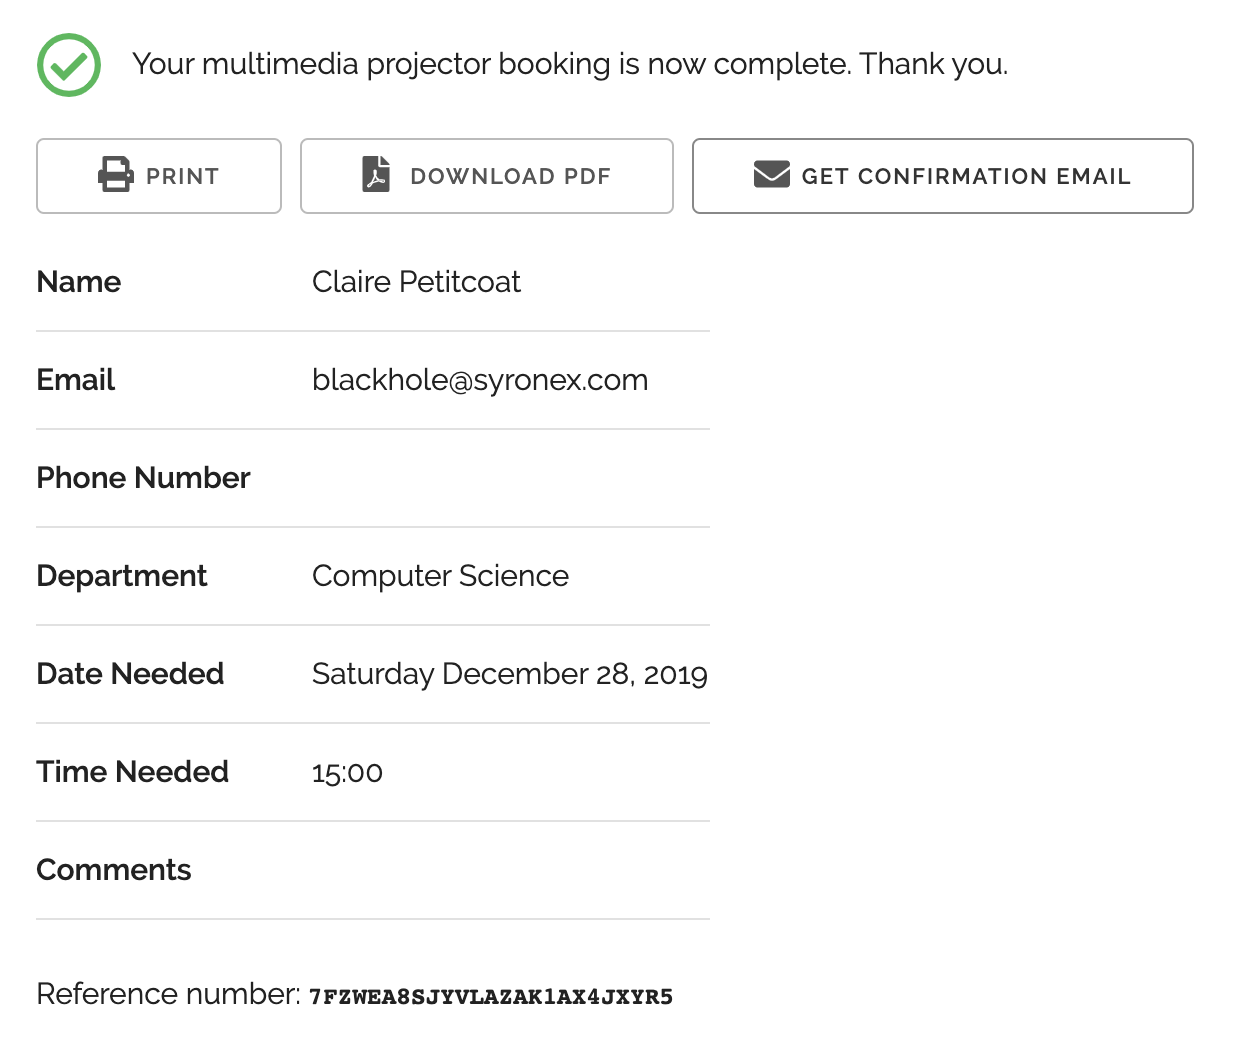
The detailed confirmation page, also called Summary Page, shows a summary of the data submitted and allows form users to:
- Have a confirmation email sent to them
- Download a PDF receipt
- Print a copy of the form data.
Feel free to try this demo.
Use the summary page whenever you want users to be able to keep a copy of the information they’ve submitted or a proof of their submission.
- You can change the text at the top of the confirmation message and in the PDF receipt (not supported with all account types)
- The confirmation email, PDF and printable receipts show a total of any fees/prices on the form (see FormSmarts payment integration syntax) to allow members to create invoices and allow cash payments on-site.
PDF receipts may not display correctly in non Western-European languages (Russian, Chinese,…) unless the language is set explicitly with the lang parameter.
Setup Instructions

Visit the Forms Tab of the form builder and click the icon showing a pen to edit the corresponding form. Towards the bottom of the Form Details screen (pictured above), change the On Submission action to ‘Show summary with print, email & PDF options’.
Posted on Oct 12th, 2010 in form builder.
13 Comments
Tags: business, confirmation email, form submission, form to pdf, paypal form, pdf receipt, pro
Web Form Builder Upgrade
This release of FormSmarts introduces over one hundred improvements, leading to our most powerful, reliable and generous offer yet.
Important Reminder
Please add FormSmarts sender email formsmarts-noreply@syronex.com to your contacts, whitelist, or list of allowed senders and instruct any other form recipients to do so too. This should ensure your web forms are (and continue to be) always correctly delivered to your Inbox.
Increased Input Fields Allowance
To allow all users to take advantage of the new Heading and Text Block widgets introduced with this release, we’ve increased the number of fields you can use on a form.
- FormSmarts Standard users can add up to 15 fields on each form using their referral points.
- FormSmarts Pro users can add up to 60 fields on each form.
Be a Good Web-Citizen
- Report bugs. However intense our testing efforts before releasing a new version of the form builder, bugs may remain due to the number of different browsers and versions in use. Please report any suspected bugs on the forum or by email.
- Show your support. Whether you are a Standard user getting the web form service for free or a FormSmarts Pro customer paying the price of a business lunch for a year of service, please show your support by pressing the “Like” button on our Facebook page and following us on Twitter.
Major Changes
If many of the changes are improvements to FormSmarts server-side software which are not directly visible to you, all affect the quality of the service we provide you.
- Form data storage and Excel reporting are coming out of Beta, and you can now activate those for each form in the Form Details screen of your account.
- We’ve improved several aspects of the form creator‘s interface.
- We now support headings and text blocks on forms; details in another post.
Posted on May 5th, 2010 in form builder.
4 Comments
Tags: form to excel, input field, news, paypal form
How to Add Headings & Text Blocks to a Form
Headings
Use headings to create logical sections within your forms. For example, you might want to split a job application form into a Contact Details and a Past Employment section.
To add a heading, select the Heading widget in the Fields tab of the form builder. Enter the text of the heading into the Text box and save.

Text Blocks
The Text Block widget that allows you to insert text anywhere on a form. Example uses include:
- Providing directions to guide respondents and help them fill out the form accurately
- Adding a short disclaimer or waiver at the bottom of a form
- Specifying an amount of money on a payment form
- Defining the terms of a digital contract e-signed by the user

Text blocks are limited to 2,000 characters (250 characters with Free/Basic accounts). To add a waiver, contract, or terms of service, use an Agreement widget instead.
To add a text block to a form, select the Text Block widget in the Fields tab of the form builder, as illustrated below.

Links and Formatting
The form builder allows you to insert links, specify bold text, and italicize and underline text using either the formatting toolbar (screenshot above) or with the wiki-style formatting syntax below:
| Text with Commands | Formatted Text | |
|---|---|---|
| Web Link | This is a [http://FormSmarts.com link to FormSmarts]. | This is a link to FormSmarts. |
| Email Link | This is an [joe@example.com email link]. | This is an email link. |
| Bold | This text is *important*. | This text is important. |
| Italics | So is **this one**. | So is this one. |
| Underlining | Use underlining __sparingly__! | Use underlining sparingly! |
| Unordered List | * red * green * blue |
|
| Ordered List | 1. red 2. green 3. blue |
|
Links and formatting commands are supported in text blocks, agreements, form filling instructions, form submission confirmation messages, confirmation emails, auto-responder messages and checkbox labels. Check out this example.
Ordered & unordered lists are only supported in agreements/waivers at this time.
- Links open in a new window
- Email links are not supported in checkbox labels at this time
Should You Show Text Blocks in Form Responses?
If you use text blocks to create a digital contract between you and the form respondent, the terms of the contract may need to appear in the copy of the submitted data given to both parties.
Instructions for filling out a form are only needed on the form itself, so by default text blocks are not shown in form responses or confirmation emails/PDF receipts.
Toggle on Show in form responses (see screenshot above) to display text blocks in both form responses and the confirmation email or PDF receipt issued to the person who submitted the form.
This option is not available with all types of accounts.
Posted on May 5th, 2010 in form builder.
20 Comments
Tags: digital contract, input field
Changes in Form Builder Payment Integration
The recent upgrade introduces some changes in FormSmarts Payment Integration (PayPal Form) feature.
- Chargeable items may now be placed in check boxes. This should prove valuable in situations where you’re building a form with one or several optional, individually priced items.
- Payment button instead of link. We’ve replaced the payment link on the confirmation page by a more outstanding button.
- Form ID now shown in PayPal report. Up to now, when you needed to reconcile a payment with the corresponding form submission, you could only rely on the FormSmarts Reference Number. This is the unique ID shown in the subject of emails containing form data and in Form to Excel reports. The same ID appears in the payment details in your Paypal account, and also in the CSV report you can generate. We’ve now added the Form ID (see screenshot) to the information available on PayPal, so you may quickly identify which form each payment is for.

We warmly welcome your feedback.
Posted on May 5th, 2010 in form builder.
4 Comments
Tags: payment integration, paypal, paypal form
New Form Templates: Tooltips, Mobile Forms,…
We’ve upgraded form templates over the last few days. This affects the look and feel of all web forms. Notable changes include:
- Tooltips — A help icon next to text fields now shows the field’s description and validation information on hover. You may want to review the field description you provided at the time you created your forms.
- Variable form width — The width of embedded forms can be resized down to 360px without side-effects, and should degrade well beyond that.
- Mobiles forms — Although our forms have always been accessible to mobile users, we now provide a specific template for standalone forms accessed from mobile devices. If your site visitors include a fair proportion of mobile users, you should also provide a link to the standalone form whenever you embed a form on your site.
If you installed the form embedding code on your website before August 2008, you should upgrade it to benefit from the new features.
Important: We’re now publishing most updates via our Twitter and Facebook pages. Please subscribe for updates and service status information.
Your feedback is most welcome.
Posted on Sep 18th, 2009 in form builder.
Post a Comment
Tags: mobile form
How to Export an Online Form to Excel
FormSmarts allows customers to collect online form responses on the cloud and export them to Excel. We also support a number of options to create custom reports.
Enable Form Data Storage for Export to Excel
Export to Excel requires that you turn on data storage for each of the forms for which you would like to use this feature.
For privacy reasons, form submissions were not saved on the cloud by default in the past. For Business accounts created after March 20, 2017, storage is now enabled by default. This does not apply to Pro accounts, for which storage is turned off by default and must be enabled for each form if needed. Note that the storage space available with Pro accounts is limited.
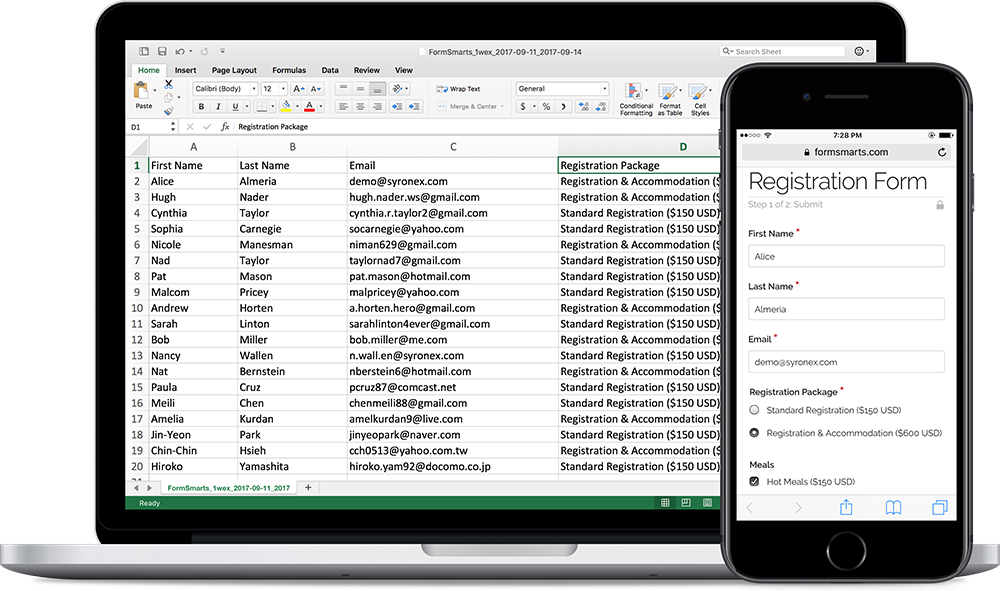
To enable stored form results and allow Excel reporting, visit the Submit Actions tab of the Form Details screen of each of the forms for which you would like to access form responses online, as shown in the video below.

You will then be able to download Excel reports from stored form responses in a few clicks with the report generator. Business-level members may also view individual form responses online and download a PDF Report.
To enable storage of form entries by default when you create a new form, check Turn on cloud storage for all new forms in the Settings Tab of the form builder. This option is only available in Business accounts and is turned on by default for accounts created after March 20, 2017.
This video shows how to set up a form to store form responses on the cloud for online access and export to Excel. Although it features an old version of FormSmarts, the information provided can still be used with the current version.
Updating Form Results
To ensure you get consistent and up-to-date data when you export form results as an Excel spreadsheet:
- If you find out a form response has incorrect or out-of-date information, edit it and amend the data
- After you submit a test run, remember to remove it.
Excel Report Generator Settings
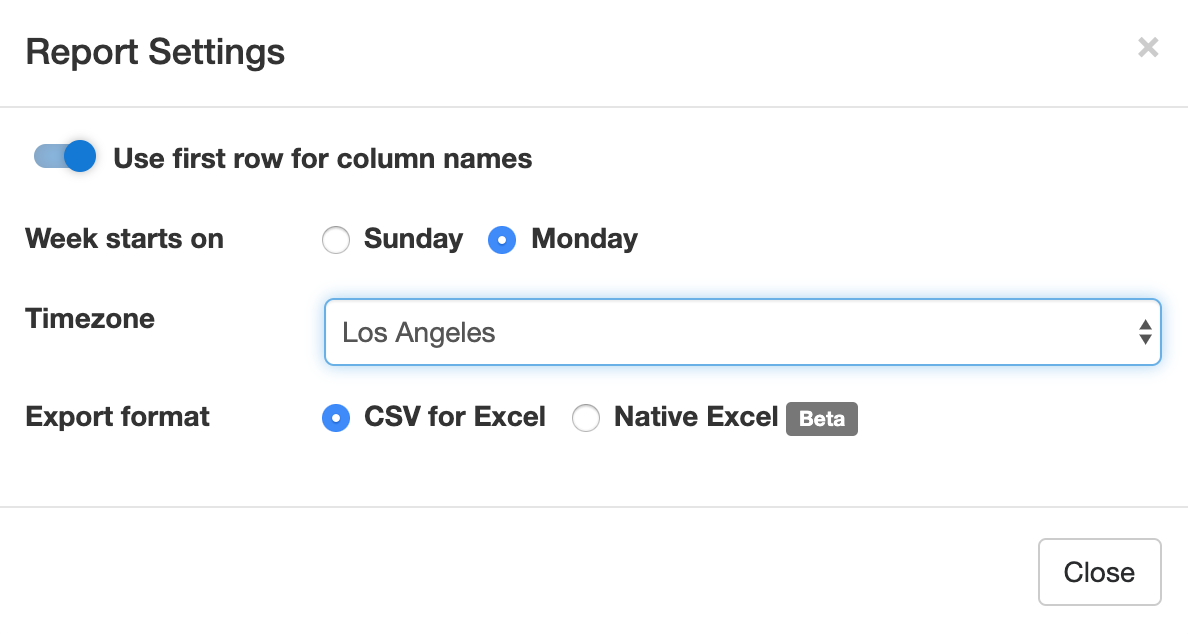
Show Field Names in the First Row
When toggled on, the first row of Excel spreadsheets shows the name of each field. This option is enabled by default.
Week Starts
The report generator allows you to specify the date range over which a report is generated by either picking a start & end date or choosing a preset period of time (This Week, Last Seven Days,…). For time periods that depend on the first day of the week (This Week, Last Week), we use the default first day of the week for your country (as set in your account). You can change the first day of the week with the Week Starts setting.
Select the Fields (Columns) Shown in the Spreadsheet

By default, Excel reports include:
- A column for each fields of a form
- Two columns for common metadata: the reference number of the form submission or a link to access it online, and the date and time the form was submitted
- Additional columns for payment details (payment forms only) and any context information passed to the form when it was submitted.
You can also create custom reports that only include the fields you need in the spreadsheet. To choose the fields/columns to include/exclude, check/uncheck the fields and metadata items listed in the Fields section of the Settings.
Time Zone
Preset time periods, date ranges and the form submission timestamp shown in Excel reports are now using your time zone (as defined in your computer settings). If you would like to generate a report using a different timezone, select the relevant city in the Timezone drop-down list. Note that the city selected by default may not be your city of residence, but it should be a city with the same UTC offset.
Filter Form Responses by Tags

If you have tagged form responses or a form has system tags set by FormSmarts when the form is submitted, you can create reports than only include form submission with the combination of tags and system tags you have specified.
You can for example create a report with all guests who registered and turned up at an event with the checked-in system tag. This tag is added when the event organizer checks-in attendees with the QR code in the confirmation email or PDF receipt.
Spreadsheet Format: CSV or XLSX
Choose a spreadsheet format from Comma-Separated Values (CSV) or native Excel (XLSX) format. We recommend you use the default CSV unless:
- Form submissions have data in a non-Western European language which doesn’t show correctly when you open the CSV spreadsheet
- Some of the characters like typographic curly quotes (‘, ’, “, ”) don’t display properly when you open the file with Microsoft Excel
If you experience one of these issues, download the report in Excel XLSX format. You can alternatively change the CSV text import settings in Excel as explained in the next section, or open the spreadsheet with another application like OpenOffice or Apple Numbers (on Mac OS X).
Importing an Excel Report When the Spreadsheet Contains Non-Western European Characters
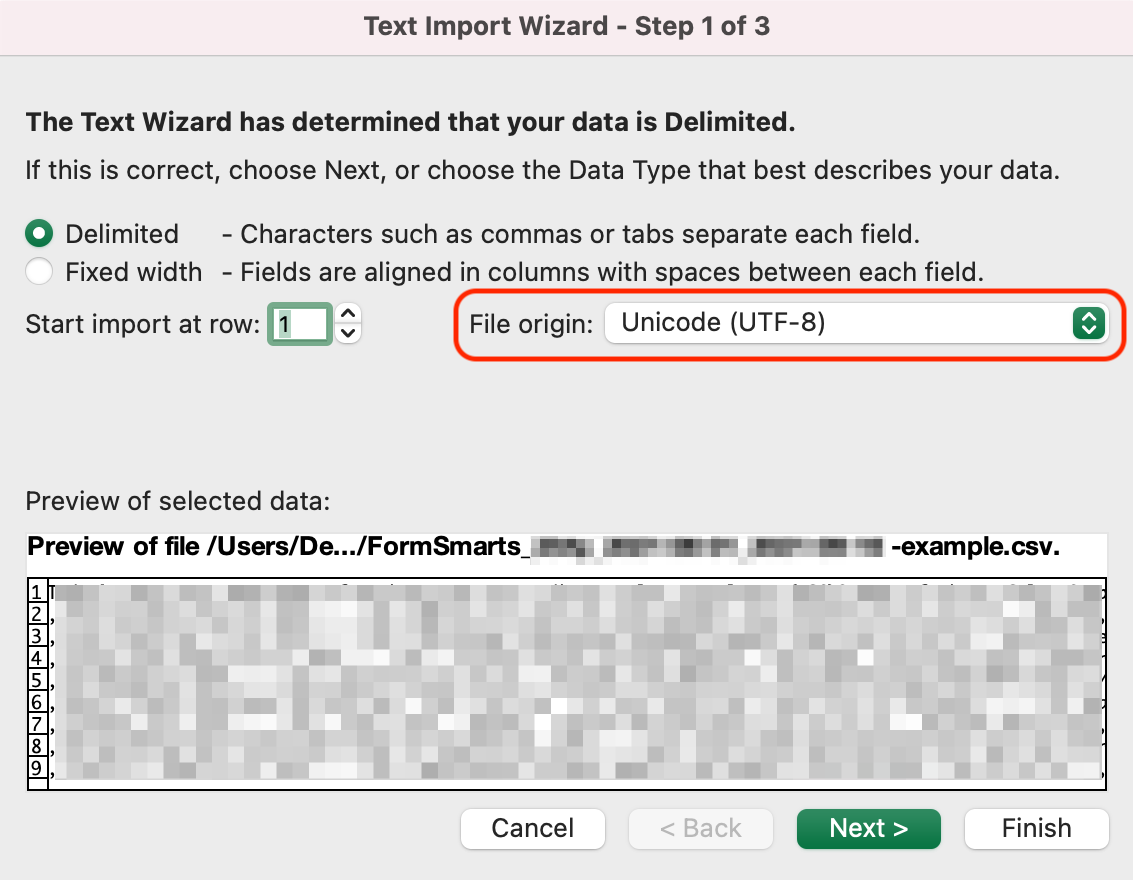
If an Excel (CSV) report contains text in a language other than English, you may need to change the character encoding to Unicode (UTF-8) in Excel’s Text Import Wizard, as illustrated below. The report may not display correctly for languages other than English unless the encoding is set to Unicode (UTF-8).
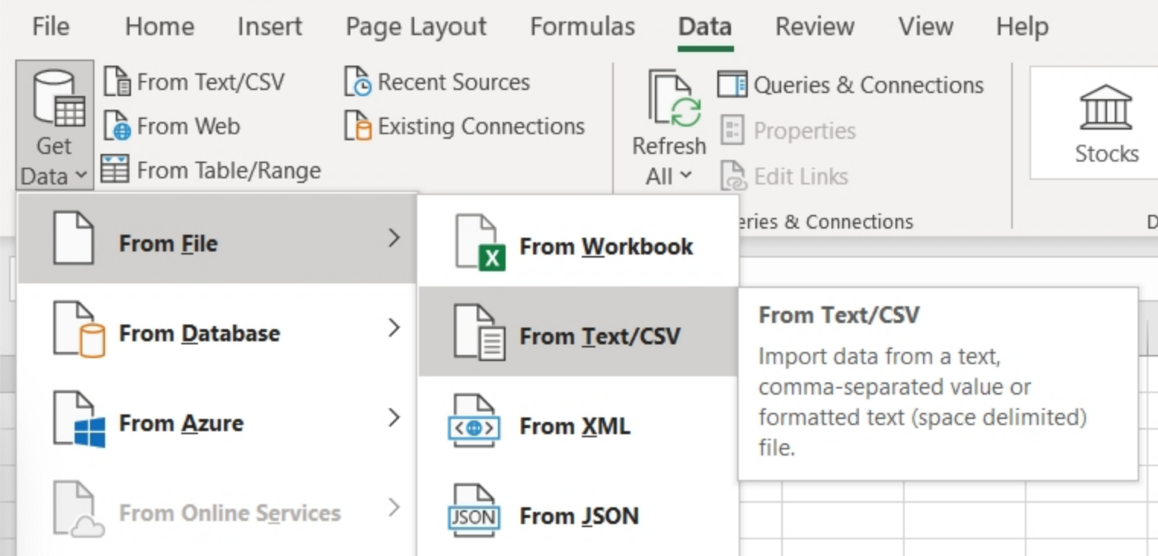
In the Data menu, click Get Data > From File > From Text/CSV
In Step 1 of the Text Import Wizard, set the file origin (character encoding) to Unicode (UTF-8):
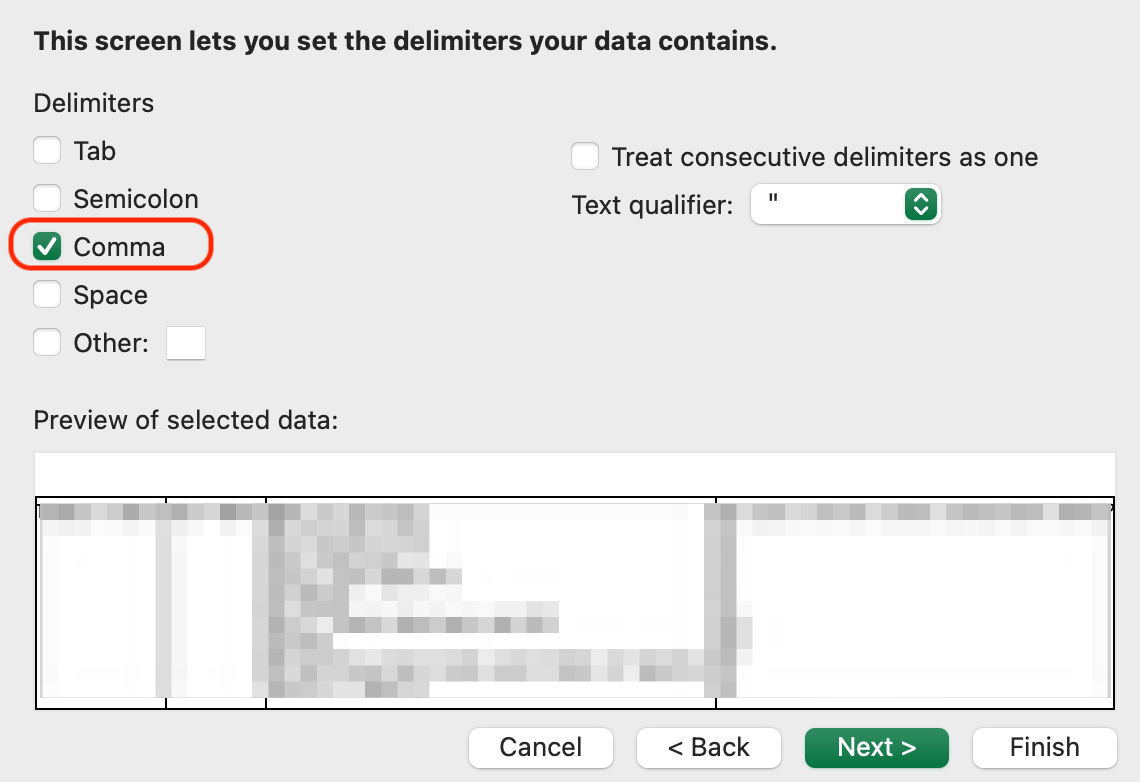
In Step 2 of the Text Import Wizard, set the delimiter to Comma:
Posted on Jul 8th, 2009 in form builder.
17 Comments
Tags: excel, form results, form to excel, form to pdf
About the Form Builder Blog
Categories
- booking (1)
- collaboration (7)
- event registration (4)
- file upload (2)
- form builder (54)
- form handler (9)
- form spam (5)
- HTML form (11)
- mobile form (1)
- online form (11)
- payment form (16)