Posts Tagged ‘payment integration’
PayPal Integration in Two Steps
FormSmarts PayPal integration is as easy to use as our popular PayPal form feature, but it provides several additional benefits, mainly:
- FormSmarts only notifies you of a new registration (or more generally, payment form submission) after the payment is confirmed and verified (no need for manual verification)
- Your customer receives an automated email receipt with a copy of the data submitted and a payment confirmation. For registration forms, this can work as an e-ticket.
- PayPal Integration works seamlessly with other FormSmarts features (export to Excel, PDF reports, API).
What Are the Benefits of PayPal Integration?
FormSmarts’ old PayPal integration was easy to use and set up as it required no change to your PayPal account. A downside to this was that FormSmarts had no way to know if the payment went through or not, and you — the seller — had to manually reconcile payments and the corresponding form responses using the FormSmarts Reference Number. That was usually not an issue for small sales volumes, but could quickly become so as sales increased. We’ve now fully automated payment processing and integrated it with the form processing platform. Here are the benefits:
- No need to manually reconcile form responses with payment notifications from PayPal
- The seller is only notified of a registration/order when the payment has gone through
- The transaction won’t appear in Excel exports until the buyer has paid
- FormSmarts verifies that the payment details match data submitted on the form (e.g. amounts, quantities)
- Excel exports combine data submitted through the form and details of the corresponding payments.
- FormSmarts sends a confirmation email to the buyer with both the order details and a payment confirmation. If you have verified your website and uploaded a logo, your site URL and logo will appear in the email.
- Payment processing is fully automated and if you’re using online/PDF reporting or export to Excel, your registration forms are on autopilot.
- You can further automate processing or integrate FormSmarts with your website or another web service using the FormSmarts API.
Setting Up PayPal Integration
This video shows how to set up your form and set up your PayPal account for PayPal Integration.
Add Fees to the Form & Set It Up to Integrate with PayPal
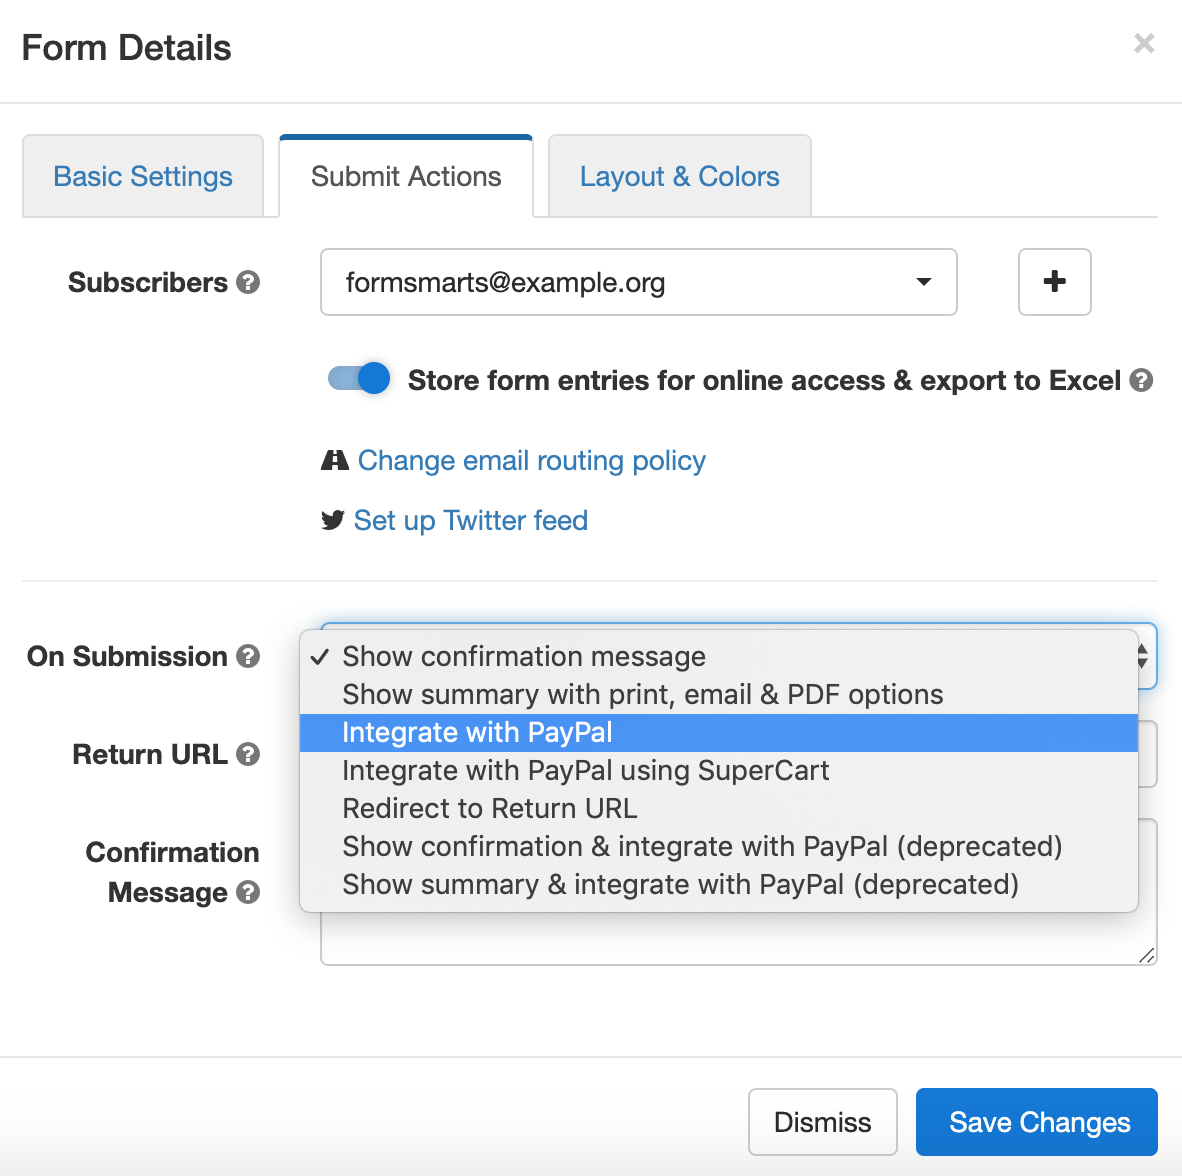
To set up PayPal integration, first create a payment form with prices formatted as shown in the PayPal integration page of the site. Then visit the Forms tab of the form builder and select Integrate with PayPal in the Submit Actions tab of the Form Details screen, as illustrated below.
Add Your FormSmarts Notification URL to PayPal
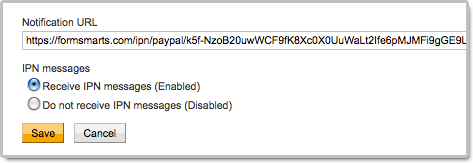
It’s now time to log in to your PayPal account to add your Notification URL. PayPal will use this URL to communicate with FormSmarts. You’ll find your notification URL in the Security Settings section of your FormSmarts account. The URL contains your private security key, so don’t share it with anyone.
Use this link to access the Instant Payment Notification (IPN) page of your PayPal account, then tap Edit Settings and paste your Notification URL in the box as shown on the screenshot below. Make sure Receive IPN messages is enabled before saving.
You can alternatively navigate to the IPN Settings screen from the homepage of your PayPal account.
Payment integration will not work until you have added your FormSmarts Notification URL to your PayPal account.
Did You Link Multiple Emails to PayPal?
If you’ve associated more than one email address to your PayPal account, the email you’ve selected as your Primary PayPal email must be the same as your FormSmarts login email.
You can either change your FormSmarts login or update your Primary PayPal email so both email addresses are the same.
FormSmarts will reject payments associated with an email address other than your FormSmarts login email for security reasons.
If PayPal shows an error on the checkout page when testing your first form, you may need to update your PayPal account settings.
Posted on Apr 28th, 2011 in payment form.
29 Comments
Tags: form builder, payment integration, paypal, paypal form
How to Build a PayPal Subscription Form
Many websites allow visitors to access online content and services for a monthly subscription fee. Creating a subscription form is somewhat different from creating a regular payment form, because it involves setting up a recurring payment, so that the buyer is automatically billed a fixed amount of money at a fixed interval until the subscription is canceled. The online form builder’s payment integration feature now supports PayPal Subscriptions.

Creating a Subscription Form
Creating a subscription form is quick and easy:
- If you haven’t got a FormSmarts account yet, sign up for a FormSmarts Business account, then create a form with the form generator
- In the Form Details screen of the form generator, set the On Submission option to Integrate with PayPal
- Add radio buttons, a drop-down list or a checkbox, and enter the description, price and duration of subscription options formatted as My Subscription ($19.99 USD/month), as shown on the screenshot above and in this demo.
Duration of a Subscription
The time before another payment is due can be specified in days, weeks, months, or years. The form builder understands the following formatting variations:
- Monthly Subscription ($9.99 USD/Month)
- 30-Day Subscription ($9.99 USD/30 days)
Trial Subscription
Like in the example presented in the first section, you may specify a trial period for the subscription. This is typically used to give a free trial subscription to the buyer before he is charged for the first billing cycle. The buyer will not have to pay anything if he cancels the subscription before the end of the trial period.
- The trial period doesn’t need to be free
- You may specify up to two trial periods
- Any trial periods must be placed on the form after the main subscription specification.
Payment in Installments
A payment in installments is a recurring payment where the number of payments is fixed.
FormSmarts supports installments with the following syntax:
- Payment in 12 Installments (12x$9.99 USD/month)
- Try this demo
Any Feedback?
As always, your feedback is important to us and is our primary source of inspiration for developing new features. You can also post your questions and comments on Facebook and Twitter (@FormSmarts).
Posted on Jan 17th, 2011 in payment form.
1 Comment
Tags: form builder, payment integration, paypal, paypal form
Changes in Form Builder Payment Integration
The recent upgrade introduces some changes in FormSmarts Payment Integration (PayPal Form) feature.
- Chargeable items may now be placed in check boxes. This should prove valuable in situations where you’re building a form with one or several optional, individually priced items.
- Payment button instead of link. We’ve replaced the payment link on the confirmation page by a more outstanding button.
- Form ID now shown in PayPal report. Up to now, when you needed to reconcile a payment with the corresponding form submission, you could only rely on the FormSmarts Reference Number. This is the unique ID shown in the subject of emails containing form data and in Form to Excel reports. The same ID appears in the payment details in your Paypal account, and also in the CSV report you can generate. We’ve now added the Form ID (see screenshot) to the information available on PayPal, so you may quickly identify which form each payment is for.

We warmly welcome your feedback.
Posted on May 5th, 2010 in form builder.
4 Comments
Tags: payment integration, paypal, paypal form
How to Make a PayPal Form
FormSmarts PayPal Integration is your best option when you need to collect data and get a payment on a form. It makes it very easy to receive PayPal payments on your forms, while giving you the power, flexibility and ease of use of a full-featured online form builder.
For example, you can easily build:
- an event registration form
- a membership form with recurring fees
- a booking form (booking form demo)
- an online order form (order form demo)
- a subscription form with recurring payments (PayPal subscription demo)
- a PayPal donation form or recurring donation form
- and any other online forms with which you want to collect fees with PayPal
Note: The demos above are hosted on FormSmarts, but you can also embed a form on your own website with the code snippet given by the form builder.
How to Create a PayPal Form in 3 Minutes: Video Tutorial
Receive Payments on a Form
To allow people to pay on a form:
- Sign up for a FormSmarts Business account and create a form with the form builder
- Add radio buttons, a drop-down list or a checkbox, and enter the description and fees (or item price) formatted as
Item Description ($30 USD), as shown on the screenshot below. - To complete PayPal integration, add your Notification URL to your PayPal account.

It’s as simple as that. We’ll pick up the items, fees or amounts and quantities that are selected on the form, and we’ll redirect the user to a pre-filled page on PayPal where they can enter their credit card info or sign in to pay with their PayPal account.
Payments are sent to the PayPal account matching your FormSmarts login email. Make sure the email address you use for PayPal and FormSmarts are the same. You can change your FormSmarts login if needed.
Charge for Multiple Items on a Form
You can as easily charge for several items on a form by adding more drop-down lists or radio buttons formatted as just described.
Add a Quantity to a Fee or Priced Item
There are several ways to let your customers choose a quantity for a fee or priced item, for example the number of tickets or guests on an event registration form.
The simplest way is to combine the ticket price or fee and a quantity selector into a single drop-down, as illustrated below:

If you want to allow your customers to buy an open-ended number of items, use a quantity box instead.
Build a Subscription Form with Recurring Payment
A membership or subscription involves paying a recurring amount each billing cycle until the subscription ends or is canceled. This article covers how to create a subscription form in detail.
In most cases, you just need to add the recurring fee to a form as Monthly Subscription ($19.99 USD/month)
You can also use a recurring payment to allow your customers to pay in installments. A payment in installments is a recurring payment where the number of payments is fixed.
The syntax is Payment in 12 Installments (12x$9.99 USD/month), as show in this demo.
Create a Donation Form
FormSmarts Payment Integration also supports PayPal Donations and recurring donations.
To create a contribution form:
- Add a Text Box to your form with the field name formatted as
My Donation ($ USD) - Set the field’s allowed content to Positive Number
You can add multiple donation boxes to a form to allow contributions towards multiple projects or causes on the same form like on this demo.
Offer a Discount on a PayPal Form
FormSmarts allows you to offer discounts on your online payments forms.
We support three types of discounts:
- Discount for a fixed amount (flat discount)
- Discount percentage
- Discount codes, which may be either for a fixed dollar amount or a percentage of the total amount due
Payment in Other Currencies
We demonstrate PayPal forms on this page with amounts in US dollars (USD) with a the dollar symbol ($), but FormSmarts also supports other currencies.
To specify another currency, change the three-letter currency code and currency symbol in the item’s description.
For example, use GA Ticket (€60 EUR) to get a paid in Euros, VIP Ticket (£60 GBP) for a payment in British Pounds, and Registration Fee ($60 CAD) to collect a fee in Canadian dollars.
The text of the button inviting the user to proceed to payment is displayed in their preferred language, in any of the supported languages.
How Payment Integration Works
Payment Flow

- A customer fills out the registration form for your event and picks the registration package and extras she wants
- After reviewing her submission and confirming, she taps the Proceed to Payment button
- FormSmarts directs her to a PayPal checkout page where she can choose to sign in to her PayPal account or enter her credit card detail
- PayPal confirms the payment is successful and, if you’ve set a form Return URL on FormSmarts, provides a button for the user to navigate to a thank you page on your site
- PayPal sends an automated message to FormSmarts notifying us of a new payment
- FormSmarts verifies that the amount paid is correct and confirms the registration
- We send email notifications to the destination emails of the form
- We also send a payment confirmation to the registrant, which she can use as an e-ticket
- You can now access the registration online and see it in Excel reports.
How We Identify the PayPal Account Receiving Funds
FormSmarts directs payments to the PayPal account under the email address you use to sign in to FormSmarts.
To ensure money is sent to the correct PayPal account, your primary PayPal email address must match your FormSmarts login. You can easily change your login if needed.
To avoid users having to enter the same information twice if paying by credit card (on the form and on the payment screen), FormSmarts tries to identify the person’s first name, last name, email, postal address, and country provided on the form, and if available pass them to PayPal.
- Make sure you call the First Name and Last Name fields exactly like this.
- To allow FormSmarts to recognize an address and populate the billing address on PayPal, mame the relevant fields like on this form or this one.
Redirect Users to Your Site After Payment
If you want to redirect users to a Thank You page on your website after they have completed payment on PayPal, visit the Form Details screen of the form builder and set the Return URL of the form to your site’s URL.
Posted on May 5th, 2009 in form builder.
53 Comments
Tags: payment integration, paypal, paypal form
How to Redirect Form Respondents to Your Site
The form builder allows you to set up a Return URL for each of your forms and automatically redirect users to that URL after they've submitted a form.
To change the Return URL of a form, use the button showing a pen to edit the form and update its Return URL in the Submit Actions tab.
Redirect Form Users to Your Site
You can set up a form to skip the Confirmation page and instead automatically redirect the user to a Thank You page or download URL on your site.
To activate redirect:
- Navigate to the Form Details screen of the form builder and set a form return URL in the Submit Actions tab
- Select Redirect to Return URL in the On Submission drop-down menu
Browsers won’t redirect from a secure HTTPS page (the form) to non-secure content for security reasons. Please make sure the Return URL starts with https://. If your site still doesn't support TLS/HTTPS, FormSmarts won't be able to redirect form respondents.
Note that form users will not get a FormSmarts Reference Number for their form submission if you redirect them to your site unless you also set up the form to send an automatic form confirmation email.
Redirect With Embedded Forms
If you have embedded a form onto your site and set it to redirect to its Return URL, some browsers may load the URL in the iframe that contains the form. Follow these instructions to ensure the Thank You page consistently loads in the top browser window or tab.
Return URL & Site Ownership Verification
Although the redirect option is only available with paid accounts, members with a Free account can still provide a button on the form confirmation page to allow respondents to navigate to a Thank You page or other URL.
To prevent abuse, FormSmarts only provides a link to the Return URL for Free accounts if you have verified your site.
To verify your site, visit the Settings tab of the form builder.
We use the return URLs of your forms to compute the list of websites in Settings > Websites, so make sure those are correct before you attempt to verify.
PayPal Landing Page for Payment Forms
If you use our PayPal form feature to collect dues, fees or donations on your form, the Return URL will be used as the PayPal landing page. Users will be redirected to that page by PayPal after the payment has been completed.
Posted on Jul 11th, 2008 in HTML form.
22 Comments
Tags: form builder, form owner, payment integration, paypal, return url, web forms, widget