Posts Tagged ‘payment integration’
How to Charge Recurring Fees with a Stripe Subscription
The Stripe integration supports two types of recurring payments: subscriptions and payments in installments. A subscription charges a customer at regular intervals until it is canceled, while a recurring payment in installments allows customers to pay in a set number of installments.
If you’re familiar with FormSmarts’ PayPal integration, the syntax for subscriptions and payments in installments remains the same. Simply add your Stripe API key to FormSmarts and set the form’s Submit Action to Integrate with Stripe.
Stripe Subscription
With Stripe, you can easily charge your customers a recurring membership or subscription fee. Once a customer has set up a Stripe subscription through FormSmarts, Stripe automatically charges them yearly, monthly, weekly, or even daily. The subscription runs indefinitely until cancelled.
In the example below, customers are charged $25 (Individual Membership) or $45 (Family Membership) monthly. They also have the option to make a donation each month.

Paying in Installments with Stripe
You can as easily allow your customers to pay in installments with Stripe. Once a customer has set up a Stripe subscription though FormSmarts, Stripe charges them for the installment amount monthly. In this example, individuals can choose to pay in two or four monthly installments.

Try Payment in Installments with Stripe
Advanced Recurring Payment Use Cases
Subscription for Multiple Products
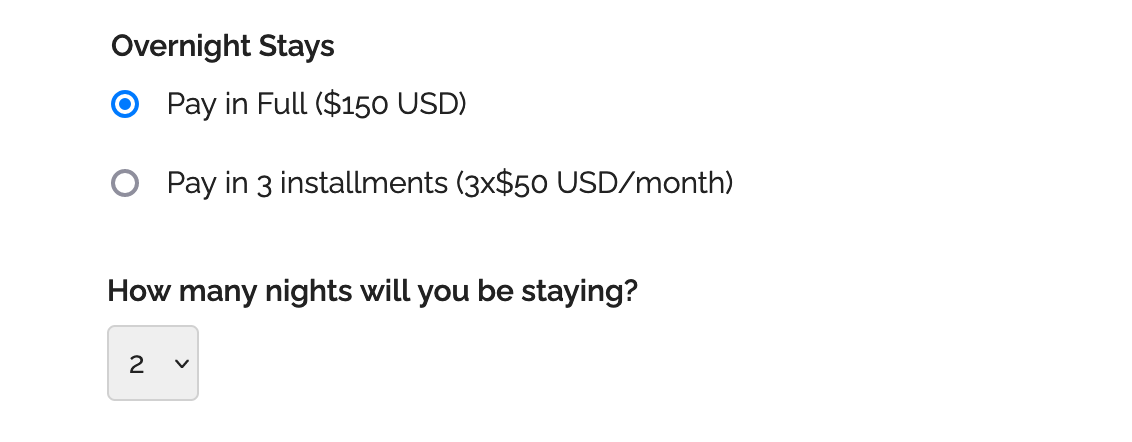
FormSmarts enables you to combine multiple recurring fees on a form, provided they have the same recurring period (i.e. yearly, monthly, …) and recurring times (number of installments). For instance, you could offer your customers options to pay in installments for both Days and Overnight Stays as shown on this demo. However, both must be paid in the same number of installments and recurring period (e.g., monthly in this example).
Recurring Donations
In addition to charging your customer recurring fixed amounts on a form, you can also invite them to make a donation with each payment by adding a donation box to the form. For instance, on the first demo presented on this page, we use a donation box to suggest our members make a monthly donation when they renew their membership. You can create multiple donation boxes to allow contributors to support different causes or projects.
Trial Subscriptions
The PayPal integration allows FormSmarts members to offer a trial period before a customer starts a paid subscription. However, we’ve noticed that few FormSmarts members ever use trials, so the Stripe integration doesn’t support them. If you need to use trials for your recurring payments, please reach out to our support team.
Posted on Dec 5th, 2024 in payment form.
Post a Comment
Tags: payment, payment integration, stripe
How to Create an Online Form With Stripe
Are you looking to streamline your online payment forms? With FormSmarts Stripe integration, accepting credit cards and collecting fees has never been easier.
To get started, simply follow these steps:
- Add fees to your form: Include the description, amount, and currency of each fee directly on your form. Check out our quick three-minute video tutorial for guidance. If you’ve used our popular PayPal integration, the format is the same.
- Integrate with Stripe: Edit your form and navigate to the Submit Actions tab in the Form Builder. Select Integrate with Stripe as shown on the screenshot below, and save your changes.

Stripe Configuration
To activate Stripe payments on your forms, you’ll need to add your Stripe API Key to FormSmarts. Don’t worry; this is a one-time setup unless you change your API Key.
Here’s how to do it:
- Log in to FormSmarts’ API Console.
- Select HTTP Method:
POST (Create). - Enter the Endpoint URL:
https://formsmarts.com/api/v1/integrations/stripe. - Open a new tab and access the Developers section of your Stripe account.
- Copy your Secret Key (or create a Restricted Key).
- Return to FormSmarts’ API Console and type
api_key =into the Request Data box - Paste your Stripe key as shown below and submit

That’s it! With FormSmarts Stripe integration, you can effortlessly accept payments and manage fees directly from your forms.
For additional information, please read the Stripe integration documentation. If you need help or have any questions, please feel free to post a comment below or contact us from the Help section of the website.
Posted on Jun 13th, 2024 in payment form.
2 Comments
Tags: payment integration, stripe
How to Accept Payments in Installments for Your Events
Allowing your customers to pay in installments on a form is as easy as collecting a one-off payment.
Consumers are increasingly demanding to be able to pay for goods and services in installments. If you organize an event that costs hundreds or thousands of dollars, you may have to provide an option for attendees to pay in several installments.
To offer a payment plan on a form, format the description of the fee, the number of installments and the amount of each installment as: Pay in 3 installments (3x$50 USD/month).
You can also propose weekly or bi-monthly installments or other payment plans that suit your needs. Remember to set up the form to collect a payment.
Payment Flow for Payments in Installments
The payment process for a payment in installments is slightly different from a standard payment:
- A registrants pays the amount of the first installment ($50 in this example) immediately when they submit the form
- When the payment goes through, FormSmarts sends the registration details to the destination emails of the form and also sends a confirmation email to the registrant
- The registrant is charged the same amount a month later and again the next month
- FormSmarts notifies form recipients of each installment payment
- You can view a registration and all associated payments on FormSmarts
Note that a payment plan is not a credit or buy now pay later scheme.
Payment in installments are not available with Starter accounts.
Posted on Jun 2nd, 2023 in payment form.
Post a Comment
Tags: payment, payment integration, paypal, paypal form
How to Offer an Early Bird Discount on a Registration Form
FormSmarts allows you to schedule when to end early bird pricing on your event registration forms.
What Is Early Bird Pricing?
An early bird package is a registration package offering a discount, usually available the moment registration opens until an expiration date you’ve specified. These discounts will often range between 10-20% off the standard pricing and offer registrants significant savings. End dates for early bird rates vary from event to event but commonly end between 2 and 3 months before the time of the event.
 registration package offering a discount on an event registration form")
Adding an Early Bird Registration Package
In this example, we create an event registration form with two registration packages (shown above). The early bird package is available from the moment registration opens until June 1. The standard package (full tuition) is available after early bird pricing ends at midnight on June 2.
- Log in to the form builder and create a registration form
- In the Fields tab of the form builder, add radio buttons or a drop-down list to the registration form
- Enter the pricing rules formatted as shown below
- Click Add Field

Edit the field you’ve just added. Click the button showing a clock face to schedule when each registration package should be available for purchase (enabled) or not (disabled).

Scheduling When the Early Bird Discount Expires
We schedule the early bird package to be disabled on June 2 at midnight.
- Select the Early Bird Field Option
- Set the action to Disable
- Choose Schedule to set the date and time when the early bird discount expires
- Pick a date and time, including timezone (the timezone of your account should be selected by default)
- Click Schedule

We also schedule the standard (full tuition) package to be disabled immediately (As soon as possible option) and enabled at midnight on June 2.
Note how the Scheduled Actions section now lists two scheduled events: the end of early bird pricing and the start of standard pricing.

Advanced Early Bird Pricing Strategies & More
In addition to common event registration forms that offer one or a few pricing options, FormSmarts allows you to make event registration forms with multiple fees. Each fee can have a price that changes at specific dates, as presented above. You could for example offer a limited number of registrations at a heavily discounted rate, followed by early bird registrations, then standard registrations.
Customers may also want disable/enable field options at a specific date and time for other reasons. For example, to disable a choice that is time-limited or no longer available.
We could also use this feature to create an application form that a user must submit within a specific 5-day window, but can start to fill out the preceding week.
Posted on May 2nd, 2023 in event registration.
Post a Comment
Tags: form builder, payment, payment integration, paypal, paypal form
How to Add Text to Form Responses
As online forms evolve to become digital contracts and documents e-signed online, we've updated Text Blocks to give customers more control over what to display in form responses, confirmation emails, and PDF receipts.
Adding Text & Links to a Form
You can insert chunks of text on a form with two form controls: Text Blocks and Agreements. Text Blocks let you to give directions and specify contractual statements on the form itself, while agreements provide a dedicated form control to allow users to view larger contracts in a scrollable section of the form and keep a copy of it.
Choosing the Text Shown in Form Responses
When we introduced Text Blocks in the early days of FormSmarts, the main purpose was to allow customers to provide instructions and comments on their forms. Form respondents only needed directions while they were filling out a form, so we didn't provide a way to show text blocks in form responses sent to form recipients and available online or in confirmation emails and PDF receipts.

Today, many customers use forms as fillable digital contracts with online signatures, so we've updated Text Blocks to allow members to pick which sections of text they want to display and which ones are just directions for the user that don't need to appear in form submissions.
When you create or edit a text block, toggle on Show in form responses (see screenshot above) to display text blocks in the copy of the submitted data given to both parties:
Form Respondents
- Form review and confirmation pages
- Opt-in and automated confirmation email, payment confirmation email
- PDF receipt
Form Recipients
- Notification emails
- Online form responses
- PDF form responses
This option is not available with all types of accounts.
Setting a Pricing Rule with a Text Block

One use of text blocks is to specify a pricing rule on PayPal forms. Text blocks provide an easy way to set a single registration fee on a form and to allow users to enter an item quantity with a Quantity Box.
Unlike other text blocks, those specifying a fee or amount of money are always displayed, for all types of accounts that support payment integration, even if Show in form responses is toggled off.
Posted on Jul 21st, 2021 in form builder.
Post a Comment
Tags: digital contract, payment integration, paypal form, signature
How to Make a Membership Form
Did you know you can offer paid memberships through a simple online form?
If you thought offering online memberships was challenging because it involved a recurring payment each year (or month), you’d be wrong. Making a membership or subscription form with FormSmarts is (almost) as easy as making a one-time payment form.
Creating a Recurring Membership Form with FormSmarts

What Is a Recurring Membership?
Before discussing how to make a membership form, let’s first define what a membership is: A member of an organization or membership site may take part in the activities or otherwise claim the benefits exclusively offered by the organization or site to its members during the period of time covered by the membership (one year or month or any other period of time) by paying a membership fee. To remain an active member after the initial period of time, a member needs to pay again. Because most members want renew their membership, membership fees tend to be recurring payments.
When someone signs up for a recurring payment, also called subscription, they agree to be charged a fee at the time they subscribe and again after each period of time specified — until they cancel their membership.
How Can I Make a Subscription or Recurring Membership Form?
The short answer is: simply by writing “Recurring Membership ($100 USD/year)” on a form. FormSmarts will understand that the person filling out the form should be charged US$100 each year for a membership called “Recurring Membership”.
Like with other types of payment forms, you may add a recurring fee to a form in a radio button option, check box, drop-down list option or text block.
FormSmarts supports the following recurring periods and (optional) number of installments:
Recurring Period
- Recurring Monthly Subscription ($15 USD/month)
- Recurring 6-Month Membership ($60 USD/6 months)
- Recurring Yearly Membership ($100 USD/year)
- options: day(s), week(s), month(s), year(s)
Recurring Times/Number of Installments
- Quarterly Subscription (4 x $20 USD/3 months)
- Optional, if Recurring Times is not specified, the recurring payment runs until it is canceled
- Think of Recurring Times (4 in this case) as a number of installments
Multiple Recurring Fees
You may allow users to select more than one recurring fee on a form like on the membership form shown on the screenshot above (feel free to try the demo), but all fees must then have the same Recurring Period and Recurring Times.
When someone selects multiple fees, FormSmarts will charge them each time for the total amount.
Offering a Trial Period
Many membership sites offer new members a trial period allowing them to access the site at a low or no cost before having to pay the full membership fee. A fee with terms (i.e. Recurring Period and Recurring Times) different from the first recurring fee listed on a form is interpreted by FormSmarts as a trial period. Our membership form demo has a trial period.
Integration with Other FormSmarts Features

- If cloud storage is enabled, the details of a membership and all associated payments are listed on FormSmarts on the page corresponding to the initial form entry. A link is provided in every email notification.
- FormSmarts sends a confirmation email to the subscriber after each successful payment
- FormSmarts notifies the account owner when a recurring payment is received
Posted on Oct 20th, 2016 in payment form.
2 Comments
Tags: payment integration, paypal
How to Create a Recurring Donation Form
FormSmarts has long supported one-time donations as part of a dedicated donation form, together with other fees on a registration form, or even on a form using our SuperCart shopping cart.
We are pleased to announce that FormSmarts now also supports recurring donations. A recurring donation allows a contributor to sign up for a donation plan to give the same amount at regular intervals, typically every month or year.
Creating a Recurring Donation Form
- Add a text box with the field name formatted as My Donation ($ USD/month)
- Set the field’s Allowed Content (aka. data type) to Number
- In the Form Details screen of the form builder, set the On Submission option to Integrate with PayPal using advanced integration.
FormSmarts supports the following variations:
Recurring Period
- Cause Description ($ USD/month)
- Cause Description ($ USD/2 weeks)
- options: day(s), week(s), month(s), year(s)
Recurring Times
- Cause Description (12 x $ USD/month)
- Think of Recurring Times (12 in this case) as a number of installments
- If Recurring Times is not specified, the recurring donation runs until it is canceled
Contribution to Multiple Causes
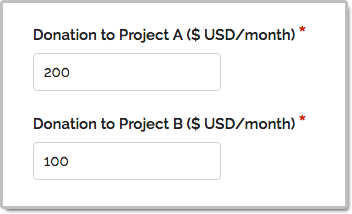
As illustrated on the screenshot above and in this demo, you may add multiple donation boxes to a form to give contributors the opportunity to choose the causes they wish to donate to and allow them to contribute to several causes in a single donation. In the example above, the donor is signing up to give a total of $300 each month; with $200 to support Project A and $100 going towards Projects B.
Posted on Oct 13th, 2016 in payment form.
Post a Comment
Tags: payment integration, paypal
Offering Discounts with PayPal Integration & Discount Codes
FormSmarts allows you to offer three types of discounts to your customers on your PayPal forms: discounts for a fixed amount, percentage discounts and discount codes.
Fixed Amount Discount
- Syntax: My Discount (-$5 USD)
- Example form with a fixed amount discount
- You may offer more than one discount, but not more than there are paid items selected.
Percentage Discount
- Syntax: Discount Percentage (-25%)
- Example form featuring a discount rate
- You may only add one discount rate to a form
- Percentage discounts are not supported on SuperCart forms
- If you’re offering a fixed discount on the same form, both may not be selected at the same time
Discount Codes
Last but not least, FormSmarts supports discount codes. With discount codes, the buyer only get the discount if they enter a valid coupon code on the form.
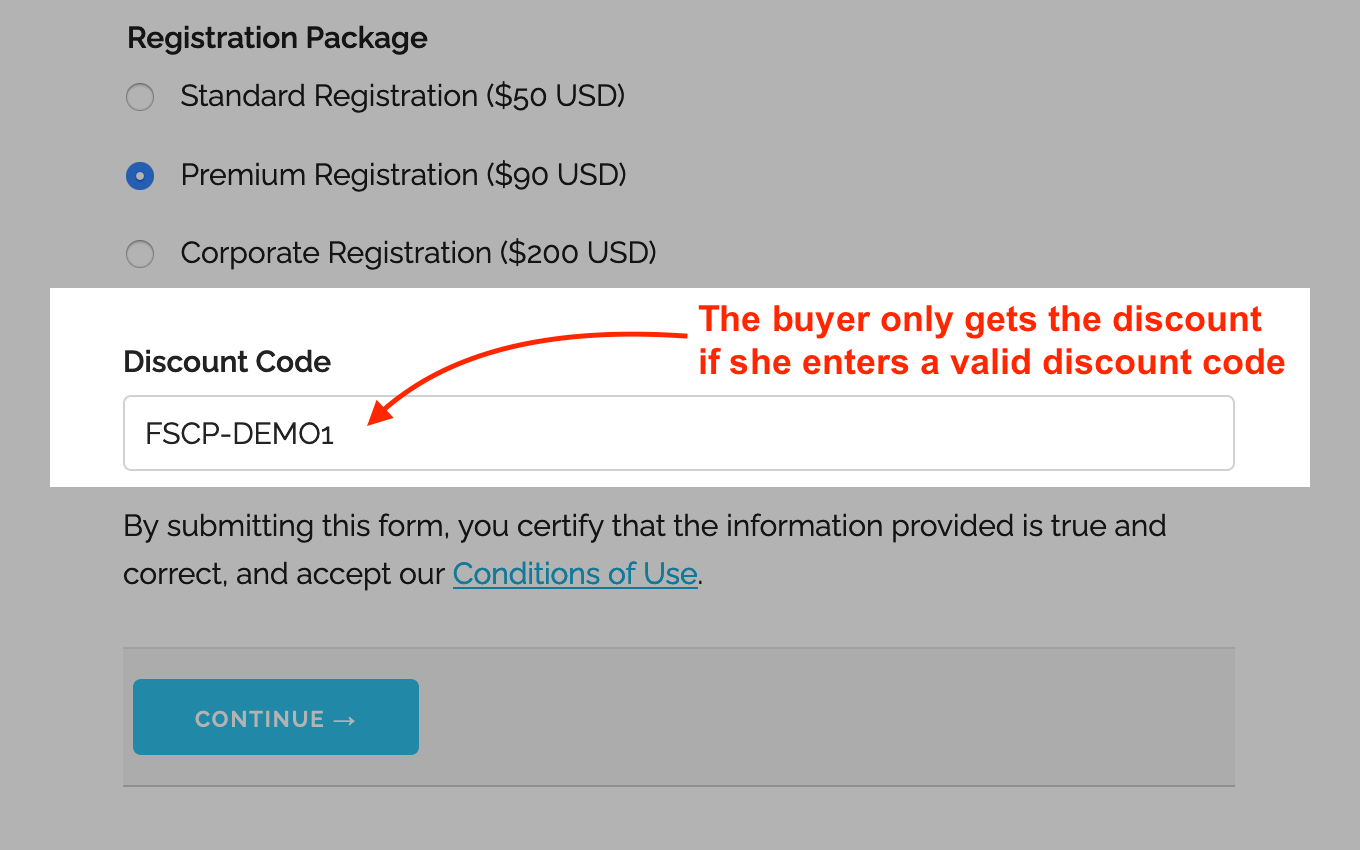
- A discount code offers either a percentage discount or fixed amount discount
- Try this example with the discount code FSCP-DEMO1
- You may set up a discount code with a validity period by providing a start and end date (not supported with Starter accounts)
Early Bird Discounts
To offer an early bird discount on a registration form, create a discount code with a start and end date. The discount will only be applied if the form is submitted between those dates.
How to Offer Discount Codes on a Form
To create a discount code and associate it with a form:
- Add a text box to the form selecting the data type Letters + Numbers
- Create the discount code on FormSmarts with the API Console as documented and shown in this video.
- Promo codes must start with FSCP- and may only contain alphanumeric characters and dash.
Posted on Feb 1st, 2013 in payment form.
8 Comments
Tags: payment integration, paypal, paypal form
How to Have Users Pay Once for Multiple Registrations or Orders
A little known feature of FormSmarts’ Advanced PayPal Integration is SuperCart. This feature allows a user to submit multiple online forms that include a payment and pay once for the total amount at the end, thereby providing the buyer with a better ‘shopping’ experience and reducing the seller’s PayPal fees. Let’s review two typical uses of SuperCart.
Note: This article discusses an early version of SuperCart. Although it content has been updated and is still relevant, please also read our introduction to the SuperCart Shopping Cart.

Use Case 1: Event Registration Form
The first typical use for SuperCart is to create an online form to register attendees for an event. For illustration purposes, I’ve made a registration form for a conference. We want each attendee to be able to choose a different registration package, pick the seminars they would like to attend and optionally add an accommodation package. With SuperCart, a user can register multiple delegates by submitting the registration form for each one, then pay for all of them at once. In the illustration above, we submit the form once to register Pat selecting the standard registration option, then again for Jim, opting this time for a premium registration and adding accommodation. We then proceed to PayPal to pay for both registrations. This short video shows how this works in practice.
Use Case 2: Order Form
Another common use of this feature is to create an order form allowing a buyer to purchase several products or services while being able to customize options for each one. I’ve built an order form demo to allow customers to configure and order goods (greetings cards in this example). Each product can be customized based on the options selected on the order form. With SuperCart, the buyer will be able to order as many products as they like by submitting an order form for each one, then pay for all of them at once.
How to Create a SuperCart Form
While understanding the concepts behind SuperCart may not appear straightforward, building a SuperCart form is easy:
- Set the Return URL of the form to the URL of the page the form is embedded into. If you’re using the standalone form, enter the FormSmarts.com URL given by the form builder instead.
- In the Form Details screen, set the On Submission option to Integrate with PayPal using SuperCart.
If you haven’t already done so, remember to set up your PayPal account for Advanced PayPal Integration.
When You Should and Shouldn’t Use SuperCart
Set up your PayPal forms with SuperCart whenever you would like to allow a buyer to pay once for multiple form submissions and providing a single form would affect the form’s usability because each registration/order has too many options or you expect someone will submit more two or three registrations/orders. If it’s unlikely buyers will submit more than one form you should use a regular payment with Advanced PayPal Integration instead.
Posted on Jan 4th, 2013 in payment form.
4 Comments
Tags: order form, payment integration, paypal, paypal form, registration form, shopping cart, supercart, video tutorial
How to Integrate with FormSmarts API
The Event Notification API allows you to have FormSmarts send a machine processable ‘push’ notification message to a script on your website (or for that matter to any URL) to process the information that has just been submitted through one of your online forms. You can use the Event API (a.k.a. Web Hooks) to integrate FormSmarts with your database, website or any online service or application.
How to Integrate
Whereas this feature is mainly targeted at developers, creating a script that does something useful with the data received from FormSmarts is actually not difficult. The API is fully documented with examples in PHP.
- You first need to create a program/script to process form data and upload it to your web server. Data is sent in JSON format, which is supported natively by all modern programming languages.
- Then register the script’s URL with FromSmarts
- Whenever a form is submitted, FormSmarts will send the data submitted through the form as well as other data pertaining to the form response (e.g. payment information if the form involves a payment) to the URL you have registered.
Have a Great Idea?
If you have a great idea about how you could use FormSmarts API, let us know: we have several Business Starter subscriptions to give away.
Posted on May 31st, 2012 in form builder.
2 Comments
Tags: API, automation, business, howto, payment integration