Enhancing Your Reporting Experience: New Features in the Report Generator
We’re excited to announce two additions to our Report Generator, designed to empower our users to create custom Excel reports according to their unique needs.
Choose the Fields (Columns) Shown in Excel Reports

Our Excel reports now offer even more flexibility by allowing you to customize the displayed fields/columns. By default, reports include essential information like form fields, submission reference numbers, submission links, submission timestamps, payment details (for payment forms), and contextual information passed during submission.
However, we understand that your reporting needs may vary. That’s why we’ve introduced the ability to create tailored reports, that include only the specific fields relevant to your analysis. Simply navigate to the Fields section in the Settings and check/uncheck the desired fields and metadata items to include/exclude them in your report. It’s that simple!
Filter Form Responses by Tags

We’ve taken customization a step further by introducing the option to filter form responses based on tags. If you’ve assigned tags to form responses or if our system has automatically tagged submissions, you can now generate reports that exclusively include submissions matching specific tag criteria.
For instance, imagine creating a report highlighting all event attendees who not only registered but also checked in. This can be achieved by filtering submissions with the “checked-in” system tag, added when the event organizer scans QR codes from FormSmarts confirmation emails or PDF receipts.
These new features are designed to enhance your reporting experience, providing you with better control over the information presented in your Excel reports. We believe that by offering these customization options, we’re empowering you to extract precisely the insights you need.
We’d love to hear your thoughts—share your feedback with us!
Posted on Nov 15th, 2023 in event registration, form builder.
Post a Comment
Tags: excel, form results, form to excel, report generator
eSign a Form With Your Phone
eSign a form with your phone — even when you submit it with a computer.
When you submit a form with a phone or tablet, you can e-sign it directly on the screen, exactly as you would write your signature on a paper document.
FormSmarts provides several signing options on devices without a touchscreen like computers or smart TVs. First, you can write your eSignature on paper and scan it with the device’s camera. You can also eSign the form with your mouse or trackpad. Last but not least, you can easily capture your eSignature with your phone.
How to Sign a Form With Your Phone
FormSmarts suggests the best way to sign a form based on the capabilities of your device. On a computer, we usually recommend that you write your signature on paper and scan it with the camera (demo video). But you can also sign on your phone and instantly transfer the signature to the form on your computer.
To get started, click on the signature box of a form on your computer.
If the form reports that no camera is available or when your browser asks you to permit FormSmarts to use the camera of your computer, click the Sign on your phone link.

A QR code appears on screen
Scan the QR Code With Your Phone
Open the camera app of your phone and point the camera at the QR code. Tap the formsmarts.com banner to open the link with the browser of your phone, as shown below.

This screenshot shows how to scan the QR code on an iPhone, but it works the same way on Android.
Draw Your eSignature
Draw your eSignature on your phone and tap the Use This Signature button to transfer the signature to the form on your computer. If needed, use the Clear button to reset the signature pad and try again. The signature pad works both when holding your phone in portrait and landscape mode (shown below).

Posted on Jul 2nd, 2023 in online form.
Post a Comment
Tags: esignature
How to Accept Payments in Installments for Your Events
Allowing your customers to pay in installments on a form is as easy as collecting a one-off payment.
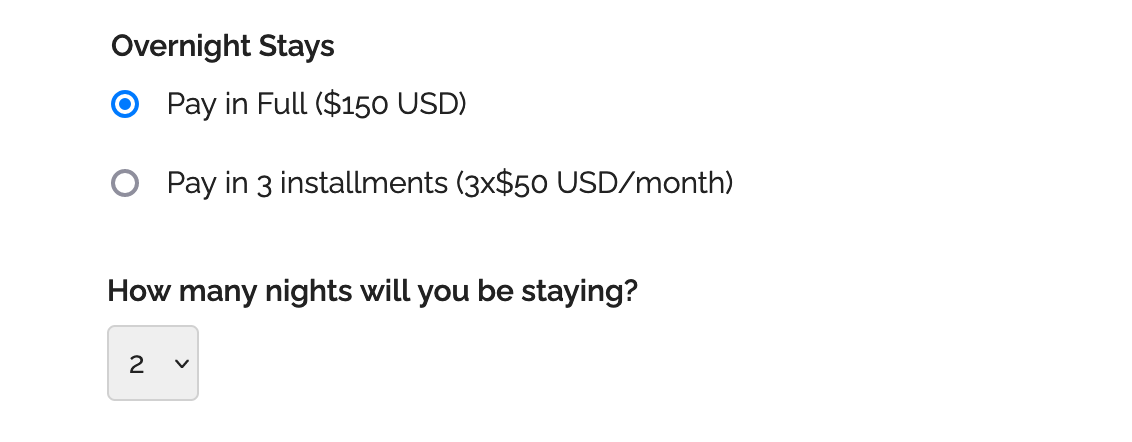
Consumers are increasingly demanding to be able to pay for goods and services in installments. If you organize an event that costs hundreds or thousands of dollars, you may have to provide an option for attendees to pay in several installments.
To offer a payment plan on a form, format the description of the fee, the number of installments and the amount of each installment as: Pay in 3 installments (3x$50 USD/month).
You can also propose weekly or bi-monthly installments or other payment plans that suit your needs. Remember to set up the form to collect a payment.
Payment Flow for Payments in Installments
The payment process for a payment in installments is slightly different from a standard payment:
- A registrants pays the amount of the first installment ($50 in this example) immediately when they submit the form
- When the payment goes through, FormSmarts sends the registration details to the destination emails of the form and also sends a confirmation email to the registrant
- The registrant is charged the same amount a month later and again the next month
- FormSmarts notifies form recipients of each installment payment
- You can view a registration and all associated payments on FormSmarts
Note that a payment plan is not a credit or buy now pay later scheme.
Payment in installments are not available with Starter accounts.
Posted on Jun 2nd, 2023 in payment form.
Post a Comment
Tags: payment, payment integration, paypal, paypal form
How to Offer an Early Bird Discount on a Registration Form
FormSmarts allows you to schedule when to end early bird pricing on your event registration forms.
What Is Early Bird Pricing?
An early bird package is a registration package offering a discount, usually available the moment registration opens until an expiration date you’ve specified. These discounts will often range between 10-20% off the standard pricing and offer registrants significant savings. End dates for early bird rates vary from event to event but commonly end between 2 and 3 months before the time of the event.
 registration package offering a discount on an event registration form")
Adding an Early Bird Registration Package
In this example, we create an event registration form with two registration packages (shown above). The early bird package is available from the moment registration opens until June 1. The standard package (full tuition) is available after early bird pricing ends at midnight on June 2.
- Log in to the form builder and create a registration form
- In the Fields tab of the form builder, add radio buttons or a drop-down list to the registration form
- Enter the pricing rules formatted as shown below
- Click Add Field

Edit the field you’ve just added. Click the button showing a clock face to schedule when each registration package should be available for purchase (enabled) or not (disabled).

Scheduling When the Early Bird Discount Expires
We schedule the early bird package to be disabled on June 2 at midnight.
- Select the Early Bird Field Option
- Set the action to Disable
- Choose Schedule to set the date and time when the early bird discount expires
- Pick a date and time, including timezone (the timezone of your account should be selected by default)
- Click Schedule

We also schedule the standard (full tuition) package to be disabled immediately (As soon as possible option) and enabled at midnight on June 2.
Note how the Scheduled Actions section now lists two scheduled events: the end of early bird pricing and the start of standard pricing.

Advanced Early Bird Pricing Strategies & More
In addition to common event registration forms that offer one or a few pricing options, FormSmarts allows you to make event registration forms with multiple fees. Each fee can have a price that changes at specific dates, as presented above. You could for example offer a limited number of registrations at a heavily discounted rate, followed by early bird registrations, then standard registrations.
Customers may also want disable/enable field options at a specific date and time for other reasons. For example, to disable a choice that is time-limited or no longer available.
We could also use this feature to create an application form that a user must submit within a specific 5-day window, but can start to fill out the preceding week.
Posted on May 2nd, 2023 in event registration.
Post a Comment
Tags: form builder, payment, payment integration, paypal, paypal form
How to Make a Form You Can Save, Edit and Share
FormSmarts supports complex application forms that an individual may start to complete, save and come back to edit over the course of several weeks. They may also invite a partner, co-signer or customer to fill out part of the form.
Save & Resume Forms
Standard forms are are short and transactional. An individuals starts filling out a form and submits it within a few minutes.
FormSmarts also offers Save & Resume forms. Save & Resume forms are long-lived. A user may save a form and come back to edit it as much as needed for a period as long as 30 days.
Collaborative Submission
When a person saves a form, they can invite someone else to continue the same form entry.
This supports application like:
- Online applications and reports with multiple parties, where each person fills out and signs part of a form and any of the contributors can submit it
- Online applications for services like loans and insurances where an agent starts an application with a customer on the phone or online chat, then hands off the application to the customer for them to complete and submit.
Comparing Standard and Save & Resume Forms
The table below outlines the main benefits of the Save & Resume feature and compares Save & Resume forms to standard forms.
| Standard form | Save & Resume form | Save & Resume form with Submit for Review | |
|---|---|---|---|
| Submitter can come back to edit a form | No | Yes | Yes |
| Multiple individuals may complete a form together | No | Yes | Yes |
| Staff reviews forms before they are submitted permanently | No | No | Yes | Staff can edit form responses after they have been submitted | Yes | Yes | Yes |
Save & Resume forms have an optional Submit for Review workflow. When enabled, a member of your team needs to review and approve or reject each form submitted to ensure it complies with your requirements.
Posted on Apr 17th, 2023 in collaboration.
Post a Comment
Tags: collaboration, digital contract, esignature, team
Why You Should Add a Calendar Invite to Registration Confirmation Emails
A calendar invitation is a type of email attachment that allows the person to easily add an event to their calendar, often by just accepting a prompt on their phone.
When you create an event registration form, you should always customize the confirmation email and set up a calendar invitation with the details of your event.
Calendar invites are supported by most mail and calendar apps. They typically provide a seamless experience, allowing users to import the calendar entry with your event details by simply accepting a prompt on their phone or computer.
Adding a calendar entry helps people organize their time and save the date of your event. And of course, reminds them to attend!
Calendar invitations are supported by Microsoft Outlook, Apple Mail and Calendar on iOS and Mac OS, and the Gmail and Google Calendar apps on Android, iOS and on the web.
Feel free to try this demo and add the test event to your calendar.
Setting Up a Calendar Invitation for an Event
FormSmarts supports calendar invitations with the confirmation emails associated with all types of forms: the registration and payment confirmation emails we send on payment forms, standard auto-responder emails, and the opt-in confirmation emails users can request on the summary page of a form.

To add a calendar invite to an event registration confirmation email:
- Sign in to the form builder and find the registration form for the event
- Click the button showing a pencil to edit it
- In the Submit Actions tab, click or tap into the Confirmation Email Text box
- Edit the confirmation email text as needed
- Click the button showing a calendar (outlined with a red circle on the image above) to set up an event calendar invitation
Edit Event Information
FormSmarts needs some information about your event to create the calendar invite:
- The event title, which is pre-filled with the form’s title
- The event start date, time, and timezone
- The event location (or URL for an online event)
- The event organizer email. Note that the organizer email is shared in the invite, so use the public email address of the your organization if you have privacy concerns.
- Finally, the organizer name and the event end date and time are optional.

Keep Event Details Up-to-Date
Calendar invites are linked to a specific one-time event, so unlike most form settings, they are not inherited when you make a copy of a form.
Remember to add your event details when you create a new registration form or update them if you use the same form for several events.
Posted on Feb 6th, 2023 in event registration.
Post a Comment
Tags: confirmation email, e-ticket, payment
Explore Form Results with Data Search
The Data Search function allows you to access past interactions with your customers, discover related form entries, and explore form data collected in your account.

When we create just about any online forms other than anonymous surveys, we ask users to provide their contact details so we can reply. That makes email addresses and phone numbers almost universal identifiers for the individual or organization associated with a form submission.
The Search function allows you to look up form responses by email address or phone number across all your forms. FormSmarts considers all email addresses and phone numbers present on a form, as long as you set the corresponding input field to the email or phone datatype.
Which Processes Could Benefit From Search?
We anticipate many customers will start using this feature in their daily workflows to:
- Quickly find all forms submitted by a person; for example, all applications submitted by a customer
- Identify customer records, so members of your team can view them online, add notes, update incorrect information, organize and change the status of an entry with tags, or remove data, for example when required by privacy laws
- Discover related form responses
- Monitor the latest forms submitted with the latest command.
We plan to further develop this tool to include additional options to search by tag, dates, and customer-defined ID. If you have needs not covered by the current version, please let us know in the comments section.
Team Access: Results Depend on the User
FormSmarts has two types of members: account owners (admins) and invited users with whom they’ve shared online forms.
All users may search form entries, but invited users only see results if they have permissions to access aggregate form responses on a form. Note: the permission setting is somewhat confusingly named Generate Report in the User Dashboard.
Invited users can view the forms shared with them and the permission they were given in their account.
Searching Phone Numbers
When looking up a phone number, please be aware that:
- A local number like (220) 222-2002 won’t match the same number with an international dialing code: +1 220 222 2002 and conversely
- Phone number extensions are ignored.
Parting Thoughts on Automation
Although we only discussed the interactive Search page here, customers can also automate tasks with the Search API. The same applies to most FormSmarts features.
Posted on Nov 29th, 2022 in online form.
Post a Comment
Tags: automation, form results, stored form results
How We Format Phone Numbers on Your Forms
To make the most of the data you collect via your online forms, it help to understand how FormSmarts interprets and formats telephone numbers.

FormSmarts interprets the telephone numbers individuals enter on your online forms based the person’s location, and we format them according to the formatting rules that apply in that location.
Local Phone Number
When a user enters a phone number without an international dialing code, we interpret it based on the person’s location, and format it accordingly. For example, if an individual located in the US types the phone number 2202222002, FormSmarts understands this is a valid US number and formats it as (220) 222-2002.
International Phone Number
If an individual inputs a phone number with an international dialing code, for example +447887848484, we understand this is a UK phone number (international dialing code +44) and format it as is common in the UK: +44 7887 848484.
We assume that when a person gives their phone number to an organization in a different country, they are aware of this and will provide a number with an international dialing code. Customers who collect information across borders should include a country selector on their forms, so they can get correct and useful data, even if the person types a local number.
Using Telephone Number Links in Emails and Reports
Phone numbers in email notifications, PDF documents and online are links you can directly use to call on device that support calling. This works with all phones, and also on many desktop computers.
Telephone Extension
FormSmarts supports phone number extensions. We should be able to recognize an extensions as long as it is entered in a format commonly used in at least one country, for example: 220 222 2002 extension 34, (220) 222-2002 ext. 34 or 0207 848484 x12.
The Phone Number Datatype
When you add a phone number input field to a form in the Fields tab of the form builder, make sure you select the Phone Number data type (Allowed Content setting). Do not use the Number type.
Phone numbers are not numbers because they may contain characters other than numbers. Another difference is that a leading zero is significant in a phone number, but not in a number. For example, 07887 848484 is a valid phone number in the United Kingdom. The leading zero would be lost if the field was stored as a number.
Posted on Nov 7th, 2022 in online form.
Post a Comment
Updating File Uploads
You can update the documents and images uploaded to your online forms.
To edit a form response, view it online and click or tap the Edit button, as shown below.

Browse and select a file or drag the new document to the area around the Browse button.
Once the file upload is complete, use the Save button to confirm.

Differences With Editing Other Types of Fields
When a user edits any fields other than a file upload field, FormSmarts keeps track of all changes.
For upload fields, FormSmarts doesn’t keep older versions of uploaded documents. When a form attachment is updated, the previous version is deleted after three days.
Although we don’t keep the content of the file, we retain other relevant information: the file’s name, its FormSmarts Upload ID, a signature of the file, who uploaded the file and when.
Who Can Update an Uploaded File?
The account admin and any user associated with the account with Edit permissions on a form may update form attachments.
This feature is not included with all types of accounts.
Posted on Sep 23rd, 2022 in file upload.
Post a Comment
Adding Check & Cash Payment Options to a Payment Form
It’s now much simpler to allow form users who prefer not to pay online to pay later by check, cash on site or with their favorite payment app.
Most FormSmarts members who collect fees on their registration and membership forms want guests to complete the whole process online. If all guests register and pay online, the event organizer doesn’t need to manually verify everyone has paid the correct amount because we do this automatically.
But we know that a number of customers need to allow some guests to register online and pay later by check or cash on site. FormSmarts already allowed this, but we recommended using two separate forms, while customers understandably preferred that all guests register with the same form.

FormSmarts members can now provide a PDF/email invoice option on their payment forms. When this feature is enabled, guests can choose on the confirmation page of the form to either pay online via PayPal or get an invoice (screenshot above) to pay later by check, cash or with a payment app. Please try this demo and share your feedback in the comments section.
If you would like to allow guests to pay later/offline, toggle on Offer invoice option in the Submit Actions screen of the form builder shown below.

We don’t recommend turning on this feature unless you specifically need to allow guests to pay later, because you will then have to make sure that each and every form submission has been paid for:
- To track registrations paid online with PayPal, check that each registration shows payment details (amount paid, PayPal transaction ID) in the Excel report or email notification.
- To track cash and check payments, we suggest you tag form entries as “paid” when the person pays and document the corresponding payment with a note.
Posted on Apr 18th, 2022 in payment form.
Post a Comment
About the Form Builder Blog
Categories
- booking (1)
- collaboration (6)
- event registration (3)
- file upload (2)
- form builder (52)
- form handler (9)
- form spam (5)
- HTML form (11)
- mobile form (1)
- online form (9)
- payment form (13)