Posts Tagged ‘form results’
Enhancing Your Reporting Experience: New Features in the Report Generator
We’re excited to announce two additions to our Report Generator, designed to empower our users to create custom Excel reports according to their unique needs.
Choose the Fields (Columns) Shown in Excel Reports

Our Excel reports now offer even more flexibility by allowing you to customize the displayed fields/columns. By default, reports include essential information like form fields, submission reference numbers, submission links, submission timestamps, payment details (for payment forms), and contextual information passed during submission.
However, we understand that your reporting needs may vary. That’s why we’ve introduced the ability to create tailored reports, that include only the specific fields relevant to your analysis. Simply navigate to the Fields section in the Settings and check/uncheck the desired fields and metadata items to include/exclude them in your report. It’s that simple!
Filter Form Responses by Tags

We’ve taken customization a step further by introducing the option to filter form responses based on tags. If you’ve assigned tags to form responses or if our system has automatically tagged submissions, you can now generate reports that exclusively include submissions matching specific tag criteria.
For instance, imagine creating a report highlighting all event attendees who not only registered but also checked in. This can be achieved by filtering submissions with the “checked-in” system tag, added when the event organizer scans QR codes from FormSmarts confirmation emails or PDF receipts.
These new features are designed to enhance your reporting experience, providing you with better control over the information presented in your Excel reports. We believe that by offering these customization options, we’re empowering you to extract precisely the insights you need.
We’d love to hear your thoughts—share your feedback with us!
Posted on Nov 15th, 2023 in event registration, form builder.
Post a Comment
Tags: excel, form results, form to excel, report generator
Explore Form Results with Data Search
The Data Search function allows you to access past interactions with your customers, discover related form entries, and explore form data collected in your account.

When we create just about any online forms other than anonymous surveys, we ask users to provide their contact details so we can reply. That makes email addresses and phone numbers almost universal identifiers for the individual or organization associated with a form submission.
The Search function allows you to look up form responses by email address or phone number across all your forms. FormSmarts considers all email addresses and phone numbers present on a form, as long as you set the corresponding input field to the email or phone datatype.
Which Processes Could Benefit From Search?
We anticipate many customers will start using this feature in their daily workflows to:
- Quickly find all forms submitted by a person; for example, all applications submitted by a customer
- Identify customer records, so members of your team can view them online, add notes, update incorrect information, organize and change the status of an entry with tags, or remove data, for example when required by privacy laws
- Discover related form responses
- Monitor the latest forms submitted with the latest command.
We plan to further develop this tool to include additional options to search by tag, dates, and customer-defined ID. If you have needs not covered by the current version, please let us know in the comments section.
Team Access: Results Depend on the User
FormSmarts has two types of members: account owners (admins) and invited users with whom they’ve shared online forms.
All users may search form entries, but invited users only see results if they have permissions to access aggregate form responses on a form. Note: the permission setting is somewhat confusingly named Generate Report in the User Dashboard.
Invited users can view the forms shared with them and the permission they were given in their account.
Searching Phone Numbers
When looking up a phone number, please be aware that:
- A local number like (220) 222-2002 won’t match the same number with an international dialing code: +1 220 222 2002 and conversely
- Phone number extensions are ignored.
Parting Thoughts on Automation
Although we only discussed the interactive Search page here, customers can also automate tasks with the Search API. The same applies to most FormSmarts features.
Posted on Nov 29th, 2022 in online form.
Post a Comment
Tags: automation, form results, stored form results
Protect the Confidentiality of Form Responses with Encrypted Email
FormSmarts Encrypted Email (S/MIME) allows you to protect the confidentiality of the data submitted through your forms, while keeping the convenience of receiving form responses by email.
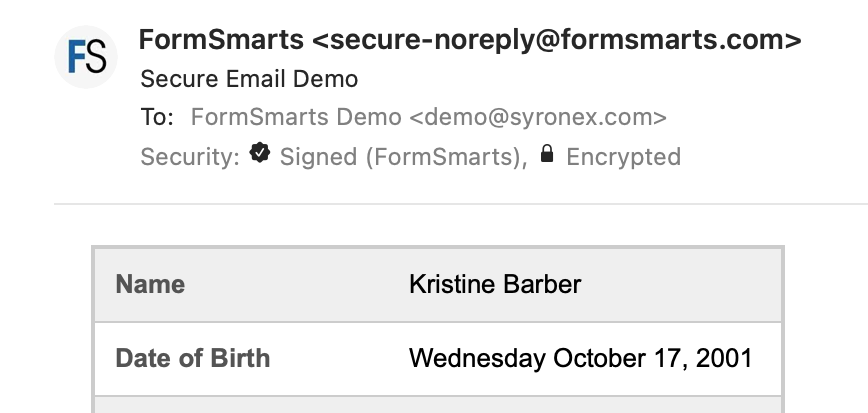
FormSmarts encrypted email uses asymmetric encryption (also known as public-key cryptography) to encrypt a message before it is sent in such a way that only the form recipient can decrypt it. The email message itself is encrypted, not just the connection used to deliver it to its destination.
With encrypted email, a form response is encrypted in FormSmarts' backend and only decrypted by the email app on your computer or phone.
FormSmarts secure email is based on the Secure/Multipurpose Internet Mail Extensions (S/MIME), an Internet standard that is supported by most desktop and mobile email apps.
Should I Use Encrypted Email for My Forms?
Any form that collects personal identifiable information (PII) like Social Security Numbers, health or financial data should be a prime candidate for being delivered by encrypted email.
S/MIME encrypted email is often an alternative to Secure Access, which requires form recipients to log in to FormSmarts to access form responses.
How Does Encrypted Email Compare with Standard Email?
| Encrypted Email | Standard Email | |
|---|---|---|
| Message | Encrypted | Not encrypted |
| Connection | Encrypted | Usually encrypted |
| Permanent Storage | Encrypted (message is only decrypted in your inbox) | May be encrypted |
How Can I Start Using S/MIME Email?
All you need to start receiving form submissions by secure email are:
- An email software or app that supports S/MIME (most do)
- A S/MIME certificate from a Certificate Authority (CA), which you can get free from the CA listed here after verifying your email address
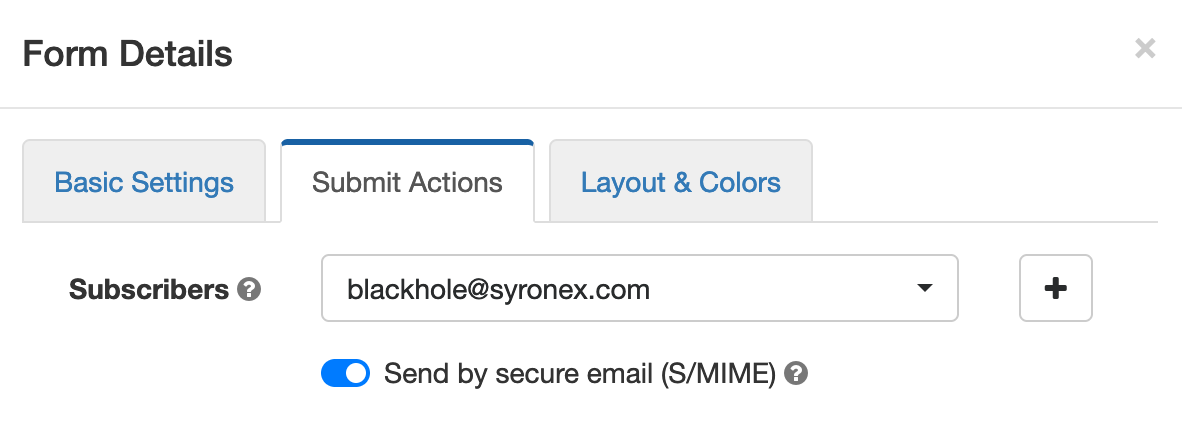
You then need to install the S/MIME certificate and register it with FormSmarts:
- Install the certificate on the devices where you want to access encrypted messages
- Send an email digitally signed with the certificate to FormSmarts from one of the devices where you've installed the certificate.
- Edit each of the forms you want to protect and toggle on Send by secure email (S/MIME) in the Submit Actions tab, as shown on the screenshot above.
Posted on Jun 2nd, 2021 in online form.
Post a Comment
Tags: email notification, form results, privacy, secure form
How to Edit Submissions Made on Your Forms
There are occasionally situations when you need to amend the information submitted on a form:
- A customer reaches out after submitting a form, realizing they had entered incorrect information
- Some time after they registered for an event via one of your forms, an individual contacts you saying they had moved or changed phone numbers

Instead of asking the customer to submit the form again, find the reference number of the form submission and view it online, then use the Edit and Revision History buttons illustrated above to update the relevant data fields.
If you’re viewing the form entry on a mobile device, the Edit and Revision History buttons may be hidden to avoid cluttering the page. Tap Show Editing in the main menu to show the buttons.
Editing & Revision History
When you update a data field, the new value will show online, in PDF documents and in Excel reports. But it's important to understand that the original value submitted and all changes are kept on FormSmarts and can be viewed in the Revision History.
In the example below, we've changed the email address associated with a form entry where Sheryl was mistyped as Sherly, making the address invalid. The characters removed (crossed out with red background) and added (underlined with green background) are clearly visible.

Built for Teams
Each modification made to a form entry is associated with the FormSmarts user (account admin or invited user) who made it, allowing all users to know who made each change. In the example above, the amendment was made by the user viewing the changes, noted as Me. Other users would see that person’s name.
Regulatory & Compliance Considerations
Auditing and Compliance
When an individual submits an online form, they may be under contractual obligation to provide accurate information — or need to certify that the information submitted is true and accurate to the best of their knowledge.
Although FormSmarts allow members to alter the information originally submitted on a form, changes are made in such a way that we preserve the original value submitted and all changes made.
- Changes are append-only, they cannot be undone or retracted
- The precise change is preserved
- Each revision is associated with the user who made it
- A timestamp is kept for auditing
GDPR
If you are processing information about individuals in the European Union, use this feature to allow users to exercise their legal right to rectification (right to have inaccurate personal data rectified) under the GDPR regulation.
Posted on May 4th, 2020 in collaboration.
Post a Comment
Tags: form response, form results, form submission
When Should You Export Forms to Native Excel (XLSX) instead of CSV?
FormSmarts allows customers to collect online form submissions on the cloud and download aggregated entries in a format, CSV, which is supported by all spreadsheet applications (including Microsoft Excel, Apple Numbers and Apache OpenOffice) and many other data analysis tools. We’ve recently added the option to export form responses to native Excel format (.xlsx or .xls) instead of the default CSV for Excel.
The main reason we decided to support the new export format is to solve an issue with phone number fields that may not be displayed correctly when Excel opens a CSV file. The Excel XLSX format also has a few other benefits, but we expect most members to continue using the default CSV format in the foreseeable future. Please read on to find out if and when you would benefit from using the new format.
Benefits of the Excel .xlsx Format
Phone Number Fields
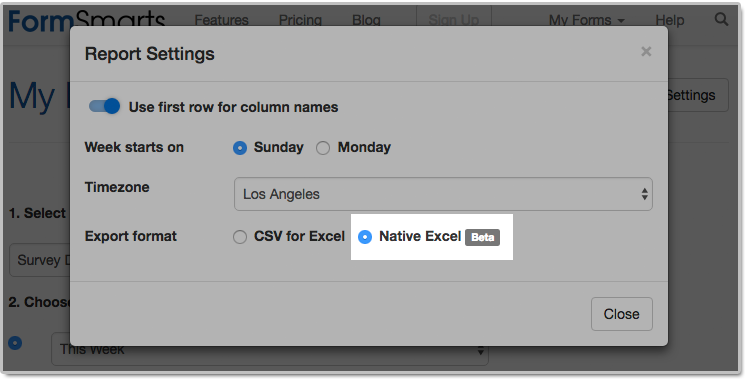
Provided you have set the Allowed Content (data type) of phone input fields to Phone Number, FormSmarts stores phone numbers as character strings rather than numbers to ensure any leading zero is not dropped from phone numbers. Unfortunately, Excel interprets character strings that only contain digits as numbers, thus removing leading zeros. Members who collect phone numbers on their forms, especially in locales where phone numbers may start with a zero (some US states and part of Asia & Europe), should set the Export Format to the Native Excel option in the Report Generator settings, as illustrated above.
If you find out when opening a CSV spreadsheet from FormSmarts that leading zeros were dropped from phone numbers, update the export format and create another report. Provided phone input fields were correctly created as phone number fields, the correct information, with any leading zeros, is stored on FormSmarts. No information was lost, any errors is due to the Excel import process and can be easily fixed by generating a new report after changing the export format.
All settings of the Report Generator but the timezone are kept in your browser, so as long as you use the same browser and allow FormSmarts to store information in your browser, your export preference will be saved from one session to the next.
Form Results with Data in a Non Western-European Language
When a spreadsheet contains data in a language other than English or another Western-European language, customers need to make sure when opening an Excel/CSV report from FormSmarts they select the UTF-8 (Unicode) encoding in Excel’s Import Wizard. The content of the spreadsheet may otherwise not be displayed properly. Alternatively, exporting form entries to a native Excel (.xlsx, .xls) spreadsheet removes the need to select the correct text encoding.
Note that FormSmarts stores data with a universal encoding (UTF-8) that supports all languages, so if you find out that a report appears corrupted when opening the spreadsheet, open the file again and select the UTF-8 encoding or switch the export format to Native Excel: no data was lost or corrupted.
Other Benefits
The native Excel format offers a few other benefits and we expect their number to grow in the future:
- The URLs of form attachments are clickable links
- The FormSmarts Reference Number (the penultimate column in the spreadsheet) links to the form response on FormSmarts. Use this link to add a note to a form submission, check where it was submitted from (IP address, approximate location), export it to PDF, print it, delete it and more. As we add more functionality to the page showing individual form responses (like the ability to tag and edit a form response), we expect more and more customers to rely on links in the spreadsheet as part of their workflow.
The native Excel format is supported with Business Plus accounts and above.
Posted on Jul 26th, 2018 in online form.
Post a Comment
Tags: excel, form results, form to excel
Introducing Multi-User Accounts
FormSmarts supports accounts with multiple users, allowing an account owner to give invited users access to selected online forms.

How to Enable Multiple User Accounts
- Set up an account alias
- Create users
- Manage user permissions
Set Up an Account Alias
Before allowing sub-users to sign in to FormSmarts, you first need to set up an alias for your account. The alias must be unique and easy for users to memorize. A good choice is probably your organization or department’s name. Users will need to enter the account alias on the log in screen.
To create an account alias, visit the Account Overview panel of your account.
Create a User
To create a user, head to the User Management Dashboard.
- Users sign in to FormSmarts with their email address, account alias and password
- Before creating a user, add their email address to your account in the Settings Tab of the Form Builder and verify it
- Users can change their password in the Security Settings panel of their account if they know their current password
- The account administrator can reset a user’s password in the User Management Dashboard.
Manage User Permissions
For each form, you can grant a user permissions to:
- access individual form entries online or download a PDF (e.g. from the link in email notifications)
- download form attachments (file uploads)
- generate Excel reports
- add tags and notes to a form entry
- edit or delete a form entry
You can also give a user account-level permissions to:
- renew your subscription or upgrade your account (billing permissions)
To set account-level permissions, please contact Support.
How to Sign In as an Invited User
We’ve updated the log in screen to allow all FormSmarts members to sign in on the same page. Account owners (aka account admins) can sign in in the usual way with their email address and password. Invited users also need to enter the account alias provided by their account admin as shown in this video.
Multiple users are available with our Business Plus package and above.
Posted on Jul 10th, 2014 in collaboration, form builder.
Post a Comment
Tags: business, collaboration, form attachment, form results, form to excel, form to pdf, howto, team, user
Engage Users via Twitter & Facebook to Increase Form Conversion
FormSmarts allows you to better engage with your user community by adding a social component to your online forms. The assumption with social networks is that a user is more likely to perform an online action such as filling out a form, registering for an event or sign up for a class if she knows that her friend or colleague has already done so.
Online Forms Get Social
For each form, FormSmarts allows you to set up a message template that will be used to post an update to social networks when the form is submitted. The message can incorporate any information entered on the form.
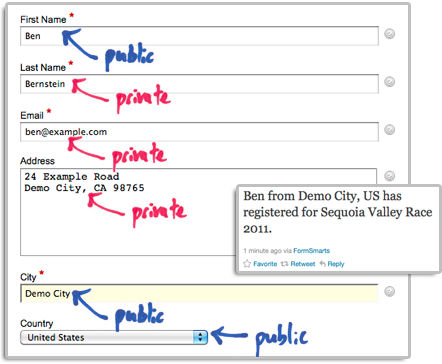
The user’s expectation when filling out online forms is that the information submitted will only be disclosed to the form owner, and you clearly need to ensure you don’t leak personal information (more about this in the last section). We define two types of input fields on a form. Those which will be populated by information which—taken out context—is so general that it can be safely disclosed, and those which should be kept private. In the example below, we deem First Name, City and Country as public, while all other fields are deemed private.
How to Set Up FormSmarts to Post Twitter Updates
First connect your Twitter account with FormSmarts to allow FormSmarts to post tweets on your behalf. You will be taken to Twitter for authentication and asked to authorize FormSmarts to post updates using your account. You will only need to do this once. Note that FormSmarts will not have access to your Twitter password. Once this is done, Twitter will send you back to FormSmarts.
Next click on Twitter Feed Setup in the Form Details screen of the form builder. Enter a short text using placeholders $1, $2, $3,… where you want the value of the corresponding input field to be inserted. Use $1 for the value of the first input field, $2 for the second, etc., in the order fields appear on the form.

Posting Updates to Your Facebook Wall
When someone submits a form, FormSmarts can post an update to your Facebook wall via the Twitter App for Facebook. First set up FormSmarts to post updates to Twitter as described in the previous section, then add the Twitter App to your Facebook page or profile. We will add native support for Facebook if there is demand—please let us know here. (Note: if you ended up here while looking for information on integrating an online form to Facebook, read this).
Respecting the Privacy of User Information
Protecting the information of your users is of paramount importance. When someone submits his information via an online form, he does it with the implicit understanding that his personal information will not be disclosed.
- Add a privacy note on the form (like on this demo) to ensure people understand that some none-personal information will be posted to social networks. Say what information will be published.
- Make sure you’re using the correct placeholder (e.g. $1, $2,…) in the message template. Remember that $1 will be replaced by the value of the first input field in the order they appear on the form, $2 will be replaced by the value of the second input field, etc.
- If you change the order of fields on the form, don’t forget to update the message template with the correct placeholder name.
- Always test the form after setting up a Twitter feed or changing field order.
To further prevent the leak of confidential information, FormSmarts will not publish Twitter updates for SSL secure online forms, even if this has been set up through the online form builder.
How to Disable a Twitter Feed
If you no longer want FormSmarts to post a Twitter update when a form is submitted, simply erase the message template in the Twitter Feed Setup screen (pictured above) and save changes.
Posted on Dec 13th, 2011 in form builder.
1 Comment
Tags: facebook, form builder, form recipient, form results, form submission, pro, twitter
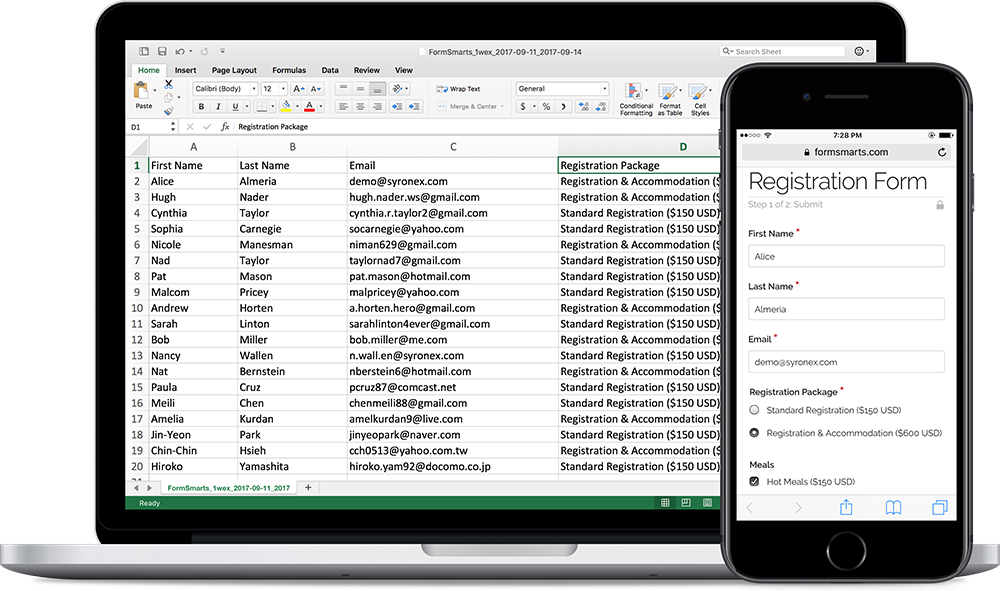
How to Export an Online Form to Excel
FormSmarts allows customers to collect online form responses on the cloud and export them to Excel. We also support a number of options to create custom reports.
Enable Form Data Storage for Export to Excel
Export to Excel requires that you turn on data storage for each of the forms for which you would like to use this feature.
For privacy reasons, form submissions were not saved on the cloud by default in the past. For Business accounts created after March 20, 2017, storage is now enabled by default. This does not apply to Pro accounts, for which storage is turned off by default and must be enabled for each form if needed. Note that the storage space available with Pro accounts is limited.
To enable stored form results and allow Excel reporting, visit the Submit Actions tab of the Form Details screen of each of the forms for which you would like to access form responses online, as shown in the video below.

You will then be able to download Excel reports from stored form responses in a few clicks with the report generator. Business-level members may also view individual form responses online and download a PDF Report.
To enable storage of form entries by default when you create a new form, check Turn on cloud storage for all new forms in the Settings Tab of the form builder. This option is only available in Business accounts and is turned on by default for accounts created after March 20, 2017.
This video shows how to set up a form to store form responses on the cloud for online access and export to Excel. Although it features an old version of FormSmarts, the information provided can still be used with the current version.
Updating Form Results
To ensure you get consistent and up-to-date data when you export form results as an Excel spreadsheet:
- If you find out a form response has incorrect or out-of-date information, edit it and amend the data
- After you submit a test run, remember to remove it.
Excel Report Generator Settings
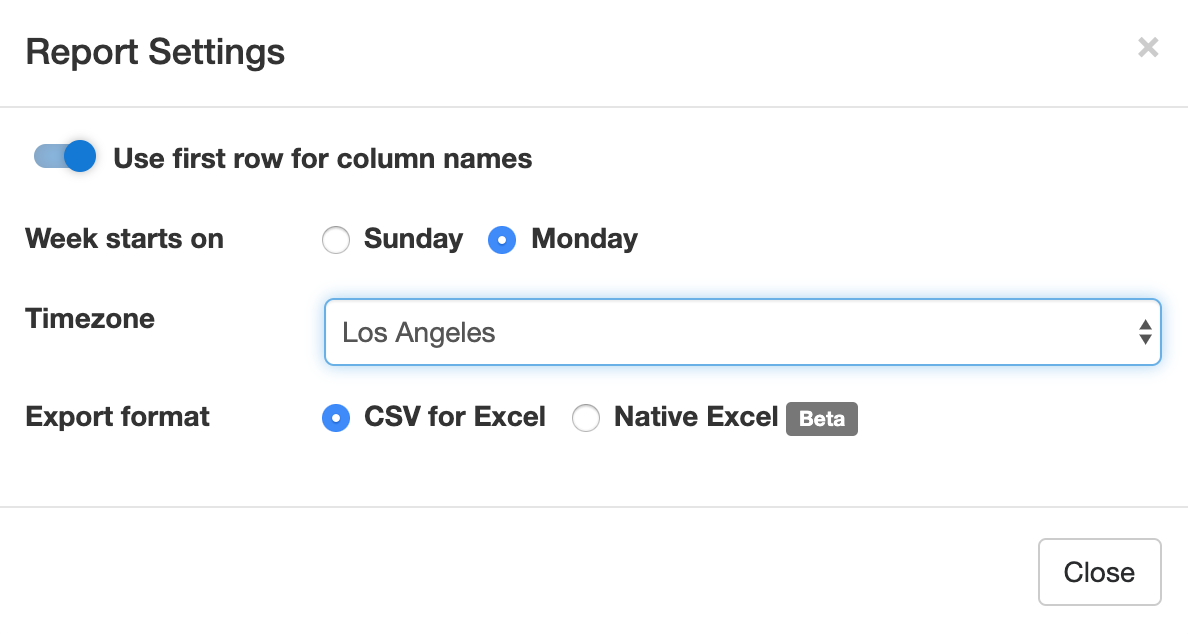
Show Field Names in the First Row
When toggled on, the first row of Excel spreadsheets shows the name of each field. This option is enabled by default.
Week Starts
The report generator allows you to specify the date range over which a report is generated by either picking a start & end date or choosing a preset period of time (This Week, Last Seven Days,…). For time periods that depend on the first day of the week (This Week, Last Week), we use the default first day of the week for your country (as set in your account). You can change the first day of the week with the Week Starts setting.
Select the Fields (Columns) Shown in the Spreadsheet
By default, Excel reports include:
- A column for each fields of a form
- Two columns for common metadata: the reference number of the form submission or a link to access it online, and the date and time the form was submitted
- Additional columns for payment details (payment forms only) and any context information passed to the form when it was submitted.
You can also create custom reports that only include the fields you need in the spreadsheet. To choose the fields/columns to include/exclude, check/uncheck the fields and metadata items listed in the Fields section of the Settings.
Time Zone
Preset time periods, date ranges and the form submission timestamp shown in Excel reports are now using your time zone (as defined in your computer settings). If you would like to generate a report using a different timezone, select the relevant city in the Timezone drop-down list. Note that the city selected by default may not be your city of residence, but it should be a city with the same UTC offset.
Filter Form Responses by Tags
If you have tagged form responses or a form has system tags set by FormSmarts when the form is submitted, you can create reports than only include form submission with the combination of tags and system tags you have specified.
You can for example create a report with all guests who registered and turned up at an event with the checked-in system tag. This tag is added when the event organizer checks-in attendees with the QR code in the confirmation email or PDF receipt.
Spreadsheet Format: CSV or XLSX
Choose a spreadsheet format from Comma-Separated Values (CSV) or native Excel (XLSX) format. We recommend you use the default CSV unless:
- Form submissions have data in a non-Western European language which doesn’t show correctly when you open the CSV spreadsheet
- Some of the characters like typographic curly quotes (‘, ’, “, ”) don’t display properly when you open the file with Microsoft Excel
If you experience one of these issues, download the report in Excel XLSX format. You can alternatively change the CSV text import settings in Excel as explained in the next section, or open the spreadsheet with another application like OpenOffice or Apple Numbers (on Mac OS X).
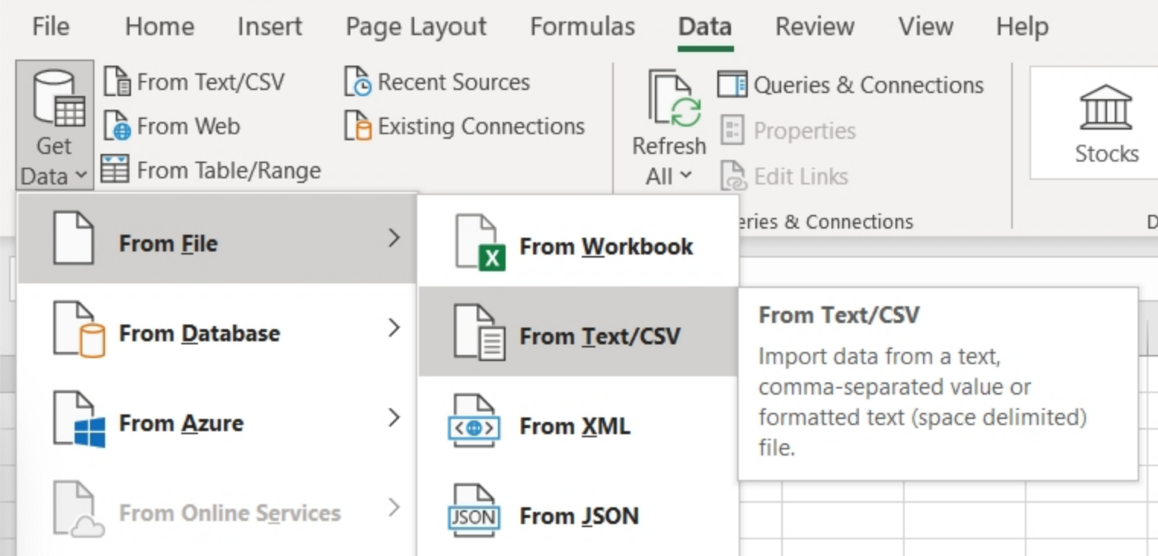
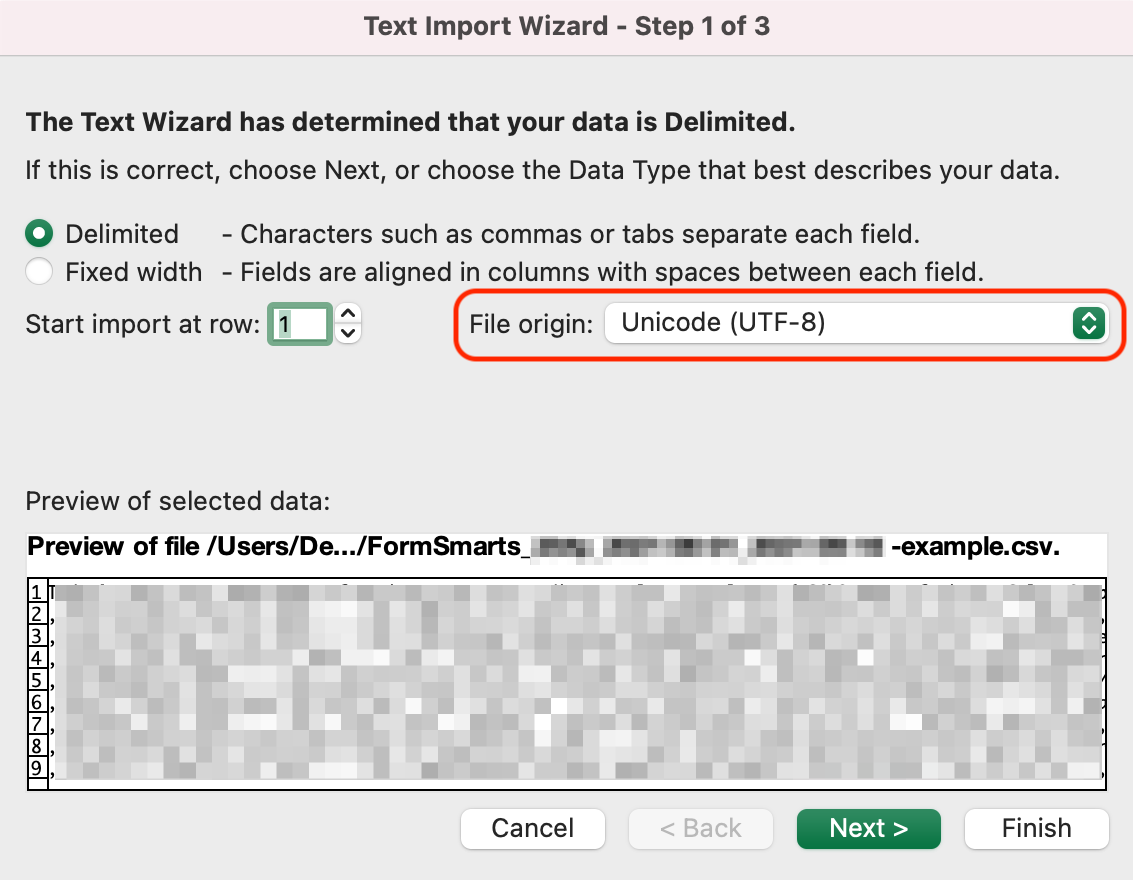
Importing an Excel Report When the Spreadsheet Contains Non-Western European Characters
If an Excel (CSV) report contains text in a language other than English, you may need to change the character encoding to Unicode (UTF-8) in Excel’s Text Import Wizard, as illustrated below. The report may not display correctly for languages other than English unless the encoding is set to Unicode (UTF-8).
In the Data menu, click Get Data > From File > From Text/CSV
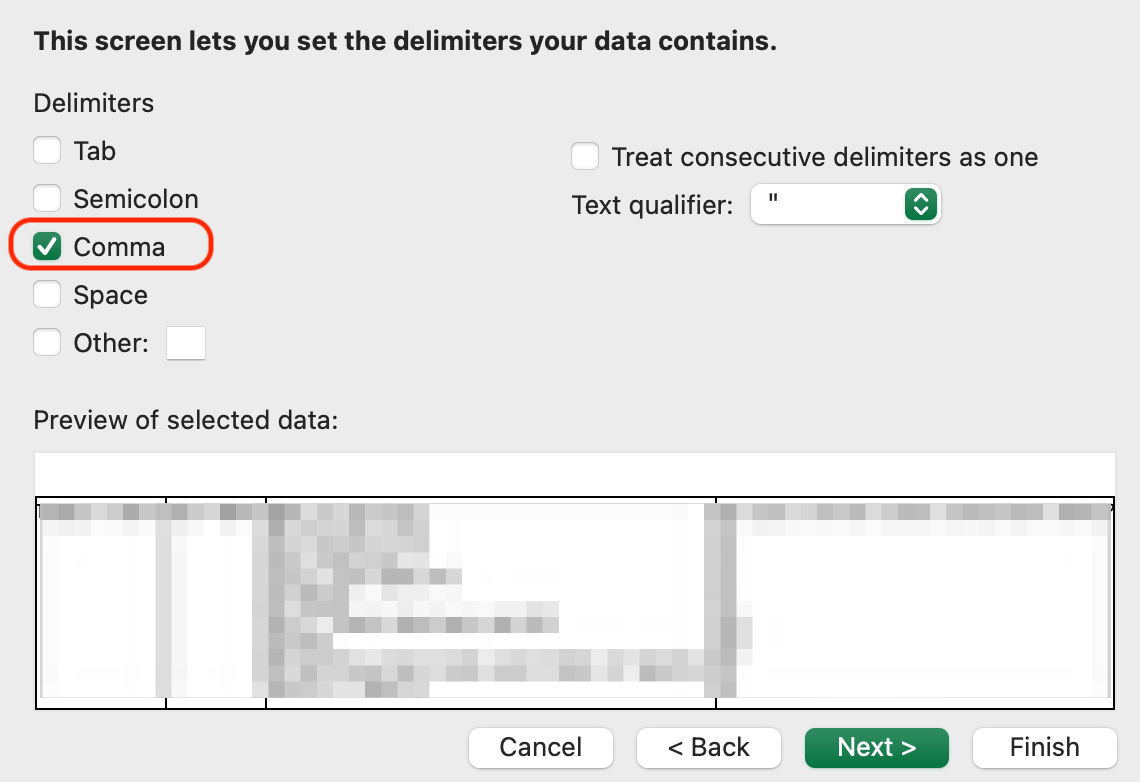
In Step 1 of the Text Import Wizard, set the file origin (character encoding) to Unicode (UTF-8):
In Step 2 of the Text Import Wizard, set the delimiter to Comma:
Posted on Jul 8th, 2009 in form builder.
17 Comments
Tags: excel, form results, form to excel, form to pdf
Get Online Forms as HTML Email or PDF
The email format we use to send form responses is flexible and supported by all desktop, web-based, and mobile email clients. Plain-text emails however become tedious to read and process for long forms and when form results must be printed for processing, e.g. for mortgage application forms, quote request forms, and many types of forms in the insurance and real estate industries.
Get Form Responses in Rich-Text Format
FormSmarts users now have the option to have form submissions sent formatted as a table in a rich text (HTML) email.

The main advantages of HTML emails are:
- Form reports are shorter
- Look is more appealing online and printed
- Email addresses, web links, and callto links (e.g for Skype) will launch the relevant application when clicked, as long as the field type as been set correctly.
To start receiving form results in HTML, change the Email Format to HTML Email in the Settings tab of your account.
Customize the Subject of Form Response Emails
With Business accounts, the subject line of form response emails can be customized on a form-by-form basis via the API Console as explained in the API documentation. The subject line template may include parameters that will be replaced with the form’s name, its ID, the FormSmarts reference number of the form submission, or the value of a particular input field.
| Parameter | Description |
|---|---|
| $form_name | Form name |
| $form_id | Form ID, e.g. 196x for form http://f8s.co/196x |
| $fs_ref_num | The FormSmarts reference number of the form submission |
| $1, $2,… $n | The value of the nth input field. The data type of the field must be one of Letters Only, Letters+Numbers, Positive Integer, Number, Country, Date, or the value of a drop-down list, radio buttons or checkbox. |
Email subjects can’t be customized via the form builder at this time.
View Form Responses Online or Get a PDF Report
Business-level customers can view form data online and download a copy in PDF using the links located at the bottom of email notifications.
Note: This feature requires that data storage be enabled for each of the forms for which you would like to be able to access form responses online.

Download a PDF
To download a form response in PDF, use the Download PDF link at the bottom of the email notification. If you’ve deleted the message (or have turned off email notifications), generate an Excel report and locate the form entry. Use the link corresponding to the form entry to access it on FormSmarts and download a PDF.
View & Manage Individual Form Responses
FormSmarts allows users to view and manage each individual form entry online via the View online & add notes link in the email notification. If email notifications are turned off or you have deleted the message, download an Excel report and locate the form entry. Use the link corresponding to the form entry to access it on FormSmarts.
You can also work out the URL of a form response if you know its Reference Number: assuming the Reference Number of a form entry is QR6SADIWB4THC6H9S94635LA, its URL is https://f8s.co/e/2QR6SADIWB4THC6H9S94635LA.
Manage a Form Response
View a form response on FormSmarts add notes or comments about it, download a copy in PDF or delete it.
Form Response Metadata
In addition to form data, the page contains additional information that is not accessible by other means like the timestamp associated with the entry and the IP address and approximate location from where the form was submitted.
Posted on Jun 4th, 2009 in form handler.
15 Comments
Tags: email notification, form recipient, form results, form to pdf
Send Form Results to Multiple Email Addresses
We’ve updated FormSmarts form builder and form processing back-end to allow several email subscribers for each form. We’ll be releasing more subscription mechanisms later this month.
Before using an email address as a form recipient, you first need to add it to your account, and verify it. You can change the recipients of a form in the Form Details screen of your account.
The number of email subscribers allowed for each form depends on your plan.
Posted on May 31st, 2009 in form builder.
4 Comments
Tags: collaboration, form recipient, form results