Archive for the ‘form builder’ Category
« Older Entries Newer Entries »
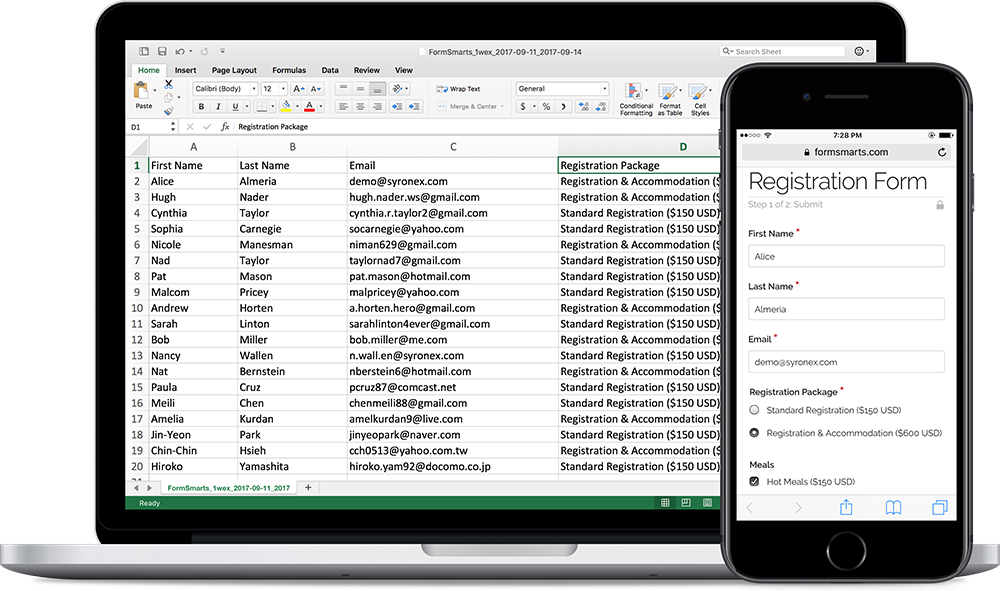
How to Export an Online Form to Excel
FormSmarts allows customers to collect online form responses on the cloud and export them to Excel. We also support a number of options to create custom reports.
Enable Form Data Storage for Export to Excel
Export to Excel requires that you turn on data storage for each of the forms for which you would like to use this feature.
For privacy reasons, form submissions were not saved on the cloud by default in the past. For Business accounts created after March 20, 2017, storage is now enabled by default. This does not apply to Pro accounts, for which storage is turned off by default and must be enabled for each form if needed. Note that the storage space available with Pro accounts is limited.
To enable stored form results and allow Excel reporting, visit the Submit Actions tab of the Form Details screen of each of the forms for which you would like to access form responses online, as shown in the video below.

You will then be able to download Excel reports from stored form responses in a few clicks with the report generator. Business-level members may also view individual form responses online and download a PDF Report.
To enable storage of form entries by default when you create a new form, check Turn on cloud storage for all new forms in the Settings Tab of the form builder. This option is only available in Business accounts and is turned on by default for accounts created after March 20, 2017.
This video shows how to set up a form to store form responses on the cloud for online access and export to Excel. Although it features an old version of FormSmarts, the information provided can still be used with the current version.
Updating Form Results
To ensure you get consistent and up-to-date data when you export form results as an Excel spreadsheet:
- If you find out a form response has incorrect or out-of-date information, edit it and amend the data
- After you submit a test run, remember to remove it.
Excel Report Generator Settings
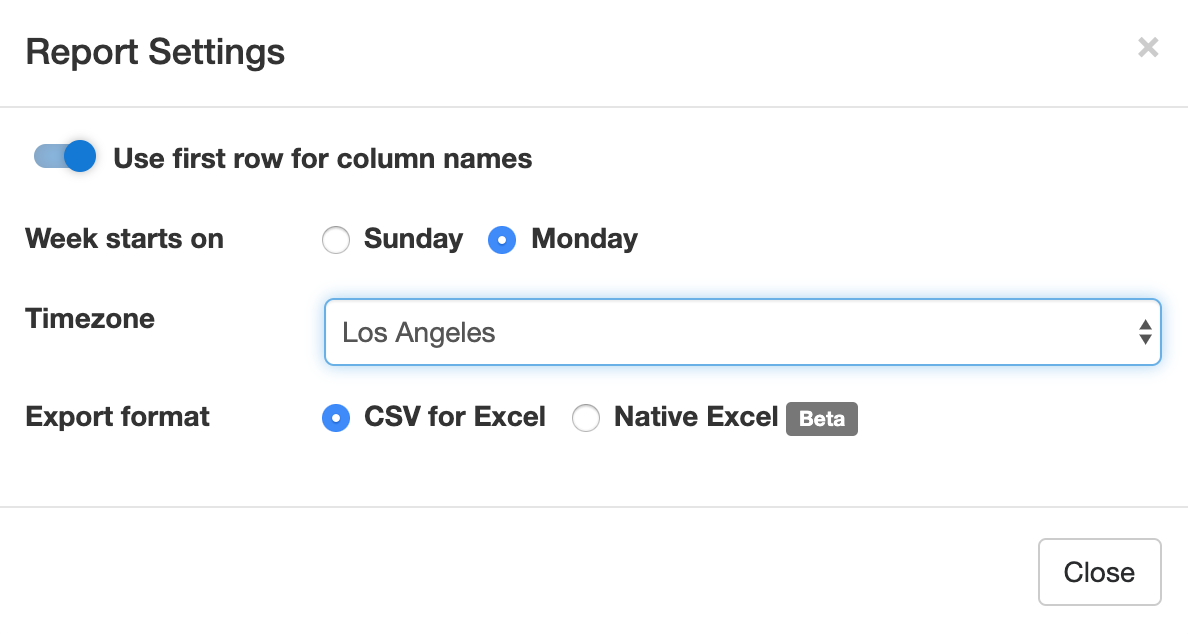
Show Field Names in the First Row
When toggled on, the first row of Excel spreadsheets shows the name of each field. This option is enabled by default.
Week Starts
The report generator allows you to specify the date range over which a report is generated by either picking a start & end date or choosing a preset period of time (This Week, Last Seven Days,…). For time periods that depend on the first day of the week (This Week, Last Week), we use the default first day of the week for your country (as set in your account). You can change the first day of the week with the Week Starts setting.
Select the Fields (Columns) Shown in the Spreadsheet

By default, Excel reports include:
- A column for each fields of a form
- Two columns for common metadata: the reference number of the form submission or a link to access it online, and the date and time the form was submitted
- Additional columns for payment details (payment forms only) and any context information passed to the form when it was submitted.
You can also create custom reports that only include the fields you need in the spreadsheet. To choose the fields/columns to include/exclude, check/uncheck the fields and metadata items listed in the Fields section of the Settings.
Time Zone
Preset time periods, date ranges and the form submission timestamp shown in Excel reports are now using your time zone (as defined in your computer settings). If you would like to generate a report using a different timezone, select the relevant city in the Timezone drop-down list. Note that the city selected by default may not be your city of residence, but it should be a city with the same UTC offset.
Filter Form Responses by Tags

If you have tagged form responses or a form has system tags set by FormSmarts when the form is submitted, you can create reports than only include form submission with the combination of tags and system tags you have specified.
You can for example create a report with all guests who registered and turned up at an event with the checked-in system tag. This tag is added when the event organizer checks-in attendees with the QR code in the confirmation email or PDF receipt.
Spreadsheet Format: CSV or XLSX
Choose a spreadsheet format from Comma-Separated Values (CSV) or native Excel (XLSX) format. We recommend you use the default CSV unless:
- Form submissions have data in a non-Western European language which doesn’t show correctly when you open the CSV spreadsheet
- Some of the characters like typographic curly quotes (‘, ’, “, ”) don’t display properly when you open the file with Microsoft Excel
If you experience one of these issues, download the report in Excel XLSX format. You can alternatively change the CSV text import settings in Excel as explained in the next section, or open the spreadsheet with another application like OpenOffice or Apple Numbers (on Mac OS X).
Importing an Excel Report When the Spreadsheet Contains Non-Western European Characters
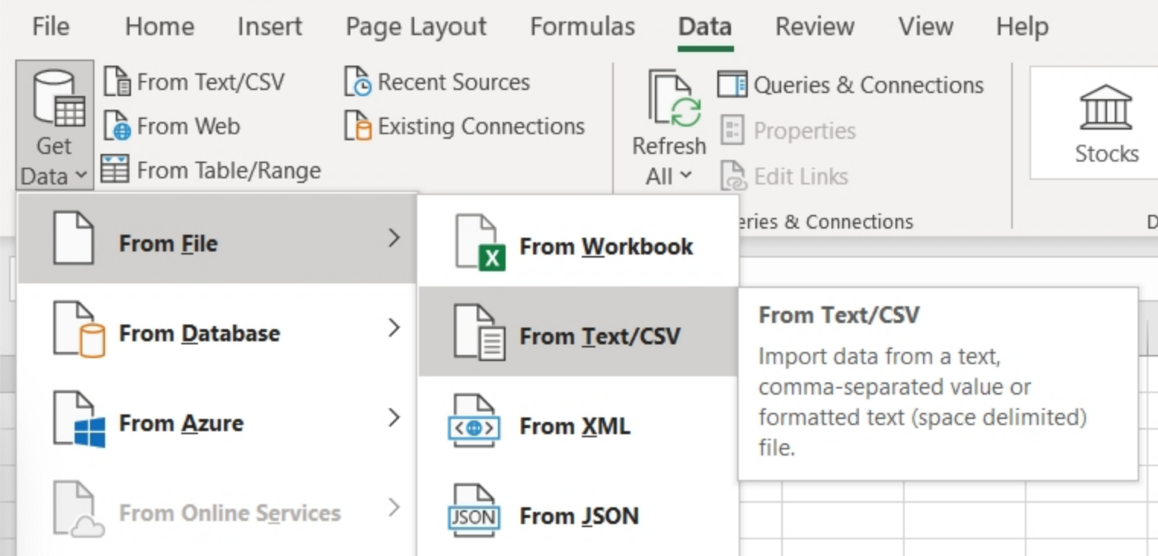
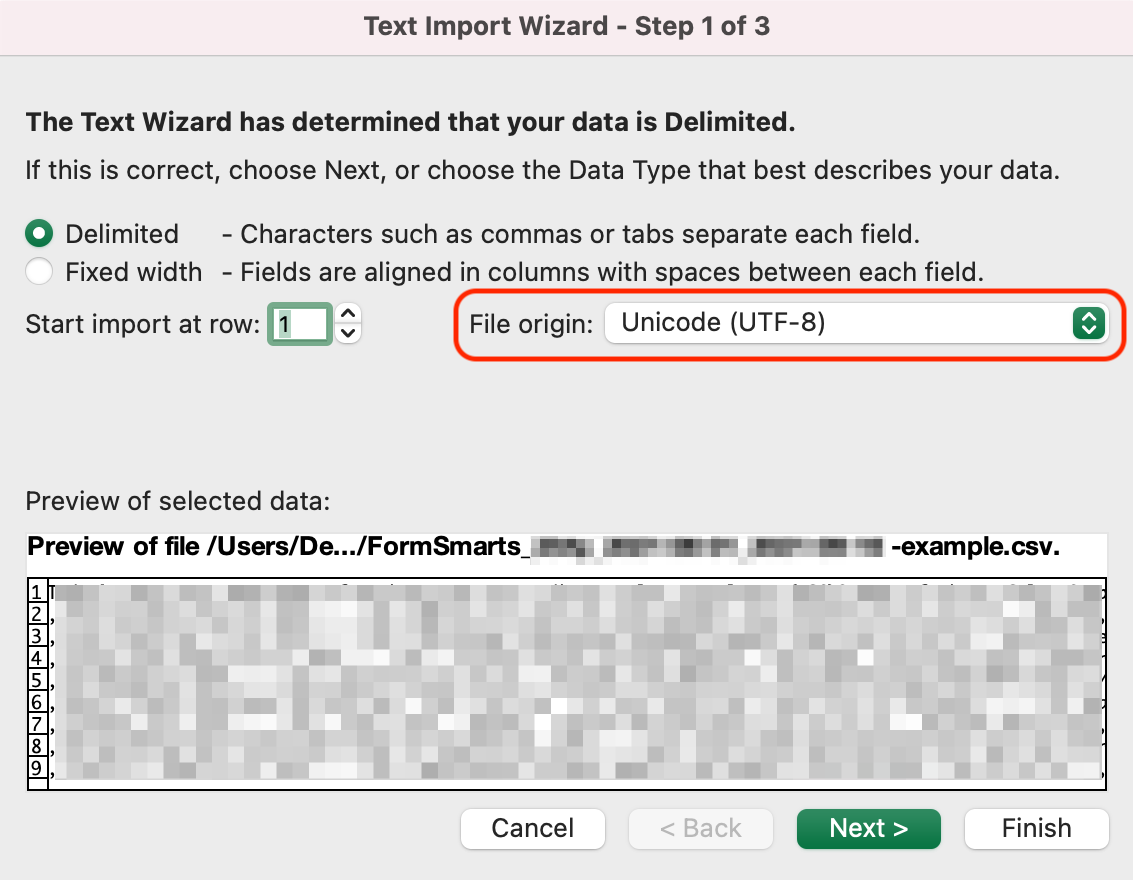
If an Excel (CSV) report contains text in a language other than English, you may need to change the character encoding to Unicode (UTF-8) in Excel’s Text Import Wizard, as illustrated below. The report may not display correctly for languages other than English unless the encoding is set to Unicode (UTF-8).
In the Data menu, click Get Data > From File > From Text/CSV
In Step 1 of the Text Import Wizard, set the file origin (character encoding) to Unicode (UTF-8):
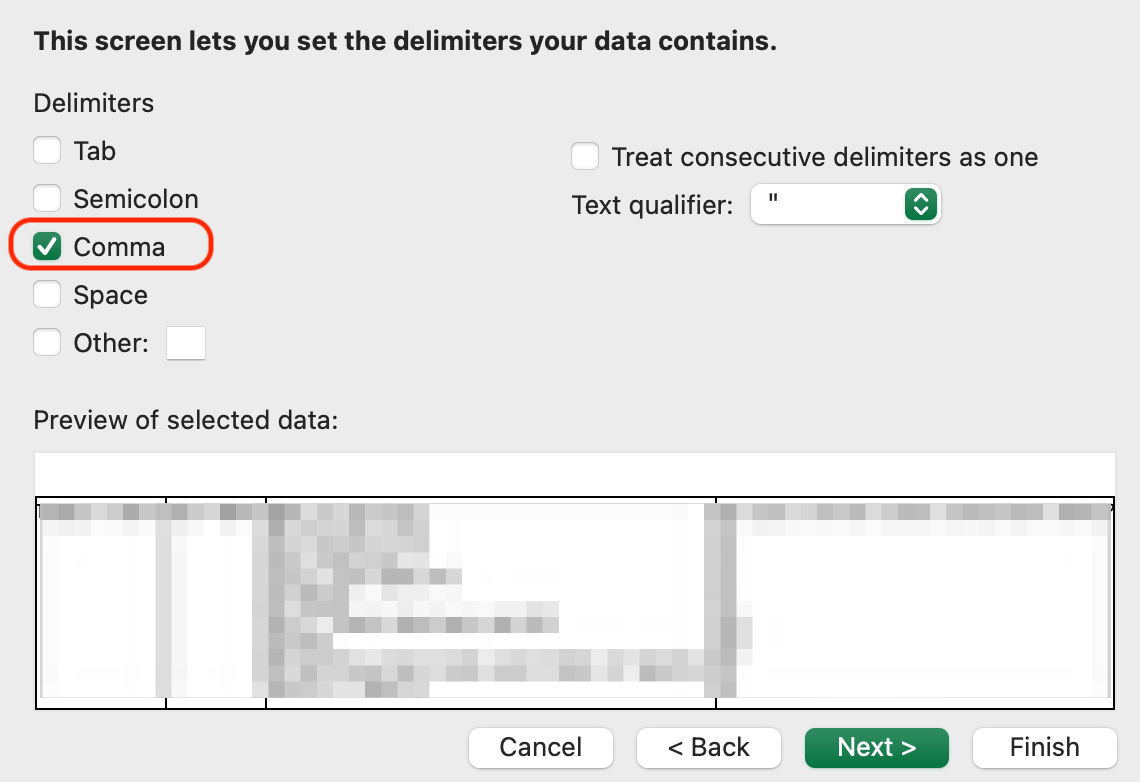
In Step 2 of the Text Import Wizard, set the delimiter to Comma:
Posted on Jul 8th, 2009 in form builder.
17 Comments
Tags: excel, form results, form to excel, form to pdf
Send Form Results to Multiple Email Addresses
We’ve updated FormSmarts form builder and form processing back-end to allow several email subscribers for each form. We’ll be releasing more subscription mechanisms later this month.
Before using an email address as a form recipient, you first need to add it to your account, and verify it. You can change the recipients of a form in the Form Details screen of your account.
The number of email subscribers allowed for each form depends on your plan.
Posted on May 31st, 2009 in form builder.
4 Comments
Tags: collaboration, form recipient, form results
How to Make a PayPal Form
FormSmarts PayPal Integration is your best option when you need to collect data and get a payment on a form. It makes it very easy to receive PayPal payments on your forms, while giving you the power, flexibility and ease of use of a full-featured online form builder.
For example, you can easily build:
- an event registration form
- a membership form with recurring fees
- a booking form (booking form demo)
- an online order form (order form demo)
- a subscription form with recurring payments (PayPal subscription demo)
- a PayPal donation form or recurring donation form
- and any other online forms with which you want to collect fees with PayPal
Note: The demos above are hosted on FormSmarts, but you can also embed a form on your own website with the code snippet given by the form builder.
How to Create a PayPal Form in 3 Minutes: Video Tutorial
Receive Payments on a Form
To allow people to pay on a form:
- Sign up for a FormSmarts Business account and create a form with the form builder
- Add radio buttons, a drop-down list or a checkbox, and enter the description and fees (or item price) formatted as
Item Description ($30 USD), as shown on the screenshot below. - To complete PayPal integration, add your Notification URL to your PayPal account.

It’s as simple as that. We’ll pick up the items, fees or amounts and quantities that are selected on the form, and we’ll redirect the user to a pre-filled page on PayPal where they can enter their credit card info or sign in to pay with their PayPal account.
Payments are sent to the PayPal account matching your FormSmarts login email. Make sure the email address you use for PayPal and FormSmarts are the same. You can change your FormSmarts login if needed.
Charge for Multiple Items on a Form
You can as easily charge for several items on a form by adding more drop-down lists or radio buttons formatted as just described.
Add a Quantity to a Fee or Priced Item
There are several ways to let your customers choose a quantity for a fee or priced item, for example the number of tickets or guests on an event registration form.
The simplest way is to combine the ticket price or fee and a quantity selector into a single drop-down, as illustrated below:

If you want to allow your customers to buy an open-ended number of items, use a quantity box instead.
Build a Subscription Form with Recurring Payment
A membership or subscription involves paying a recurring amount each billing cycle until the subscription ends or is canceled. This article covers how to create a subscription form in detail.
In most cases, you just need to add the recurring fee to a form as Monthly Subscription ($19.99 USD/month)
You can also use a recurring payment to allow your customers to pay in installments. A payment in installments is a recurring payment where the number of payments is fixed.
The syntax is Payment in 12 Installments (12x$9.99 USD/month), as show in this demo.
Create a Donation Form
FormSmarts Payment Integration also supports PayPal Donations and recurring donations.
To create a contribution form:
- Add a Text Box to your form with the field name formatted as
My Donation ($ USD) - Set the field’s allowed content to Positive Number
You can add multiple donation boxes to a form to allow contributions towards multiple projects or causes on the same form like on this demo.
Offer a Discount on a PayPal Form
FormSmarts allows you to offer discounts on your online payments forms.
We support three types of discounts:
- Discount for a fixed amount (flat discount)
- Discount percentage
- Discount codes, which may be either for a fixed dollar amount or a percentage of the total amount due
Payment in Other Currencies
We demonstrate PayPal forms on this page with amounts in US dollars (USD) with a the dollar symbol ($), but FormSmarts also supports other currencies.
To specify another currency, change the three-letter currency code and currency symbol in the item’s description.
For example, use GA Ticket (€60 EUR) to get a paid in Euros, VIP Ticket (£60 GBP) for a payment in British Pounds, and Registration Fee ($60 CAD) to collect a fee in Canadian dollars.
The text of the button inviting the user to proceed to payment is displayed in their preferred language, in any of the supported languages.
How Payment Integration Works
Payment Flow

- A customer fills out the registration form for your event and picks the registration package and extras she wants
- After reviewing her submission and confirming, she taps the Proceed to Payment button
- FormSmarts directs her to a PayPal checkout page where she can choose to sign in to her PayPal account or enter her credit card detail
- PayPal confirms the payment is successful and, if you’ve set a form Return URL on FormSmarts, provides a button for the user to navigate to a thank you page on your site
- PayPal sends an automated message to FormSmarts notifying us of a new payment
- FormSmarts verifies that the amount paid is correct and confirms the registration
- We send email notifications to the destination emails of the form
- We also send a payment confirmation to the registrant, which she can use as an e-ticket
- You can now access the registration online and see it in Excel reports.
How We Identify the PayPal Account Receiving Funds
FormSmarts directs payments to the PayPal account under the email address you use to sign in to FormSmarts.
To ensure money is sent to the correct PayPal account, your primary PayPal email address must match your FormSmarts login. You can easily change your login if needed.
To avoid users having to enter the same information twice if paying by credit card (on the form and on the payment screen), FormSmarts tries to identify the person’s first name, last name, email, postal address, and country provided on the form, and if available pass them to PayPal.
- Make sure you call the First Name and Last Name fields exactly like this.
- To allow FormSmarts to recognize an address and populate the billing address on PayPal, mame the relevant fields like on this form or this one.
Redirect Users to Your Site After Payment
If you want to redirect users to a Thank You page on your website after they have completed payment on PayPal, visit the Form Details screen of the form builder and set the Return URL of the form to your site’s URL.
Posted on May 5th, 2009 in form builder.
53 Comments
Tags: payment integration, paypal, paypal form
Personalize the Confirmation Message Shown After a Form Submission
FormSmarts allows you to personalize the confirmation message that is displayed after a form has been submitted successfully.
To personalize the confirmation message of a form, visit the Forms tab of the form builder, and click the Edit icon. This feature is only available for Pro and Business accounts.
Default Confirmation Message
Like all messages shown during the form submission process, the default confirmation message is localized. If you change the confirmation message, users will see your personalized message instead of the default confirmation message in their own language.
You can always revert to the default confirmation message by erasing the text in the Personalized Message box.
Links & Formatting
You may insert links in the confirmation message and add basic formatting with this wiki-like syntax.
Posted on Apr 11th, 2009 in form builder.
3 Comments
Tags: form submission, international, pro
Attaching Multiple Email Recipients to a Form
With the new version of FormSmarts, Pro users can now subscribe to form results using one or more of the following mechanisms:
- Email subscription. Subscribe one or more email recipients.
- Stored form results. Aggregate form submissions on FormSmarts, and
download them later as Microsoft Excel documents.
A notable change is of course the ability to send forms to several email addresses. The allowance of one email recipient per form for users of the free service stays unchanged.
The new subscription mechanism should best fit the needs of most users. We welcome your feedback about this development.
Posted on Jan 20th, 2009 in form builder.
2 Comments
Tags: form results, pro
How to Create Multi-Language Forms
We’ve now released the first international version of FormSmarts. Form users now see instructions, error messages, and confirmation messages in their preferred language. FormSmarts is already available in 27 languages, and more translations are under way.
The languages supported are: Arabic, Bulgarian, Chinese (Traditional), Chinese (Simplified), Czech, Danish, Dutch, English, Finnish, French, German, Greek, Hebrew, Hindi, Italian, Korean, Malay, Norwegian, Polish, Portuguese (Brazil), Portuguese, Russian, Spanish, Swedish, Thai, Turkish and Ukrainian . If your language is not listed and you are willing and able to translate FormSmarts into your language, sign up here.
Other changes worth mentioning:
- Create forms in any language. Because of the character encoding that was used, web forms could before only be designed using a West-European language. FormSmarts now supports all languages.
- Now using ISO date format. The date format accepted was changed to the ISO format YYYY-MM-DD. Note that because most users enter dates with a date-picker, the impact of this change is very small in practice. The format used on the confirmation page and in email notifications has not been changed.
- New form URL format. The default form URL format was changed to accommodate forms which title is not in English. The previous URL format that was based on form title is still supported for backward compatibility.
How the Language of a Form is Selected
Each time a form is loaded, FormSmarts customizes it based on the language preferences set in the user’s browser. Common text, error, help and confirmation messages will be displayed in the form user’s preferred language, not necessarily in the language you used to create the form. For example, if you built a form in English but some of your visitors have set Spanish as their preferred language, those users will see the form questions and the text you entered in English, and help and confirmation messages in Spanish.
Setting a Form to Use a Specific Language
Dynamic language selection explained in the last section provides the best user experience in most cases. This approach however becomes awkward when the main language of the form and the preferred language of the form user employ a different reading direction. If you have built a form in a right-to-left (RTL) language (Arabic or Hebrew) and expect all form users to understand that language and a number of them to use a browser set to a left-to-right (LTR) language auch as English, then you should set the language of the form as explained next.
Dynamic language selection most-usually provides the best user experience and we recommend against setting forms to a specific language except in the case discussed above.
To set the language of a form to a specific language, set the lang parameter of the form URL to the ISO code of that language. So if the URL of your form is http://formsmarts.com/form/lqh and you would like to set it to always display in Hebrew, you would need to use the URL http://formsmarts.com/form/lqh?lang=he or change the URL in the form snippet published on your site to http://formsmarts.com/form/lqh?mode=embed&lay=1&lang=he.
PayPal Integration
If you’re using FormSmarts' PayPal integration on a payment form aimed at users in locales with a non-Western European language, you need to set up your PayPal account to use the UTF-8 encoding.
Give Feedback
We welcome your feedback about this new version of FormSmarts. Please report any problems you may find.
Posted on Nov 30th, 2008 in form builder.
4 Comments
Tags: international, web forms
Calling Embedded Form Users!
Form Widget Size Calculation Upgraded
To accommodate users who need to create forms with a large number of fields, we’ve recently introduced a much more sophisticated way to calculate form widget size. If forms on your site currently display a scrollbar, we strongly advise you to upgrade the form embedding code.
Refresh the Code on Your Website When You Add a Field
Once you have inserted the HTML code for the form widget on your site, we cannot resize it at our end. That means that whenever you add more input fields, you must refresh the code on your website. If you don’t do it, a scrollbar may show up, and some users may not be able to see the bottom of the form.
Space at the Bottom of Web Forms Is Normal
The spare space at the bottom of web forms is there for a reason: leaving enough space for error messages that may occur during form submission. Here again, if you remove that space, a scrollbar may show up, and some users may not see the bottom of the form.
Optimizing form widget size is not a simple issue because it depends on the rendering characteristics of the diverse web browsers, as well as on the different aspects of each form. If you believe the size of a form you’ve created is not optimal, let us know.
Posted on Aug 15th, 2008 in form builder.
Post a Comment
Tags: widget
Form Color Settings
Like many FormSmarts users, you may sometimes want to customize the style of your web forms. This may be because you want the forms to match the rest of your website, or because you want a form to stand out on a web page.
The form builder allows you to easily change the text and background color of your forms. Visit the Form Details screen in the Forms tab to set color preferences for a particular form.

Things to note:
- color settings only affect embedded forms, not forms access by their FormSmarts URL
- because your color settings are stored in our servers, you can change settings and see the result immediately. You don’t need to update the form embed code on your website.
How to Change Form Colors
- By default, form text is black, and form background is transparent. This should fit the needs of most users, and if you’re happy with this, you don’t need to do anything.
- If you do want to change a color, the easiest way is to choose one of the popular colors we’ve preselected. Just click on the color you want.
- If you prefer to use your own colors, you may type any valid 6-digit HTML color code directly. For example, 808080 is a shade of gray.
Usability Note
It’s important to preserve the accessibility of your forms to visually impaired visitors, and their usability under poor reading conditions (e.g. bright sunshine). Always keep a high color contrast.
Advanced Form Customization
You may further customize many visual aspects of a form by providing your own CSS stylesheet. For usability reasons, we don’t recommend dramatically changing the form layout.
Posted on Jul 6th, 2008 in form builder.
9 Comments
Tags: embed, form builder, usability, web forms, widget
Form Owner Verification with Google Page Creator
To verify you own a website, we ask you to create a file with a specific name on your web host. If you use Google Page Creator, proceed as follows to verify your site:
- create a new page
- enter the verification file name (e.g. syronex8800…2523.html) as the page title
- publish the new page
Form ownership verification is optional but recommended to build trust with your visitors. It is required you intend to advertise a web form URL by email.
Recent Issues with Google Page Creator
Although hundreds of Google Page Creator users have successfully verified their site, we’ve had a few issues in the last few days. Google was redirecting some of the requests to googlepages.com to the same page on google.com, thus preventing us to check the verification file exists. We obviously have a limited scope for action, but we identified a likely cause and took technical measures that seem to have solved the problem. Leave a comment if you experience any more problems.
Posted on Jul 2nd, 2008 in form builder.
1 Comment
Tags: embed, form builder, google page creator, widget
Ever Wished You Could Reorder Fields?
The set of form-making operations supported by FormSmarts form builder was up to now almost complete, allowing to:
- create a form
- delete a form
- edit form properties (name, title, return URL, form filling instructions, recipient email account)
- add a form input field
- delete a field
- edit field properties (name, description, field type, input widget, optional/required)
The last unsupported operation was to allow users to easily change the order in which fields appear on a form. This is often needed to:
- group fields logically
- group optional fields together at the bottom of a form
- insert a field in a existing form
- move fields around to increase the visual appeal of a form
Reordering fields manually is tedious, as it involves deleting and re-creating fields.
No more. Reordering fields is now a trivial drag & drop: in the fields tab, drag the field you want to move, and drop it in the position you want.
As usual, we welcome your comments and suggestions about this feature.
Posted on Jun 20th, 2008 in form builder.
5 Comments
Tags: form builder, form design, input field