Archive for the ‘form builder’ Category
« Older Entries Newer Entries »
Engage Users via Twitter & Facebook to Increase Form Conversion
FormSmarts allows you to better engage with your user community by adding a social component to your online forms. The assumption with social networks is that a user is more likely to perform an online action such as filling out a form, registering for an event or sign up for a class if she knows that her friend or colleague has already done so.
Online Forms Get Social
For each form, FormSmarts allows you to set up a message template that will be used to post an update to social networks when the form is submitted. The message can incorporate any information entered on the form.
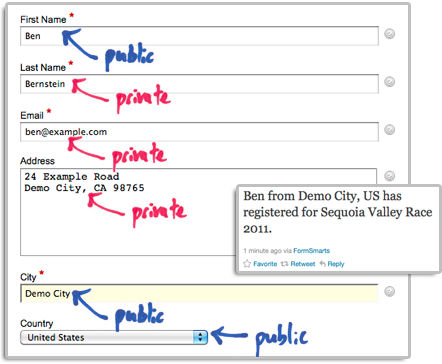
The user’s expectation when filling out online forms is that the information submitted will only be disclosed to the form owner, and you clearly need to ensure you don’t leak personal information (more about this in the last section). We define two types of input fields on a form. Those which will be populated by information which—taken out context—is so general that it can be safely disclosed, and those which should be kept private. In the example below, we deem First Name, City and Country as public, while all other fields are deemed private.
How to Set Up FormSmarts to Post Twitter Updates
First connect your Twitter account with FormSmarts to allow FormSmarts to post tweets on your behalf. You will be taken to Twitter for authentication and asked to authorize FormSmarts to post updates using your account. You will only need to do this once. Note that FormSmarts will not have access to your Twitter password. Once this is done, Twitter will send you back to FormSmarts.
Next click on Twitter Feed Setup in the Form Details screen of the form builder. Enter a short text using placeholders $1, $2, $3,… where you want the value of the corresponding input field to be inserted. Use $1 for the value of the first input field, $2 for the second, etc., in the order fields appear on the form.

Posting Updates to Your Facebook Wall
When someone submits a form, FormSmarts can post an update to your Facebook wall via the Twitter App for Facebook. First set up FormSmarts to post updates to Twitter as described in the previous section, then add the Twitter App to your Facebook page or profile. We will add native support for Facebook if there is demand—please let us know here. (Note: if you ended up here while looking for information on integrating an online form to Facebook, read this).
Respecting the Privacy of User Information
Protecting the information of your users is of paramount importance. When someone submits his information via an online form, he does it with the implicit understanding that his personal information will not be disclosed.
- Add a privacy note on the form (like on this demo) to ensure people understand that some none-personal information will be posted to social networks. Say what information will be published.
- Make sure you’re using the correct placeholder (e.g. $1, $2,…) in the message template. Remember that $1 will be replaced by the value of the first input field in the order they appear on the form, $2 will be replaced by the value of the second input field, etc.
- If you change the order of fields on the form, don’t forget to update the message template with the correct placeholder name.
- Always test the form after setting up a Twitter feed or changing field order.
To further prevent the leak of confidential information, FormSmarts will not publish Twitter updates for SSL secure online forms, even if this has been set up through the online form builder.
How to Disable a Twitter Feed
If you no longer want FormSmarts to post a Twitter update when a form is submitted, simply erase the message template in the Twitter Feed Setup screen (pictured above) and save changes.
Posted on Dec 13th, 2011 in form builder.
1 Comment
Tags: facebook, form builder, form recipient, form results, form submission, pro, twitter
How to Customize the Look of Your Forms with CSS
The online form builder allows you to easily change the layout and colors of your forms when these are embedded into your website. This article discusses how to further customize the look of your online forms by providing your own CSS stylesheet. You can create one (or more) CSS stylesheet for each form.
Disclaimer
The feature discussed in this article is UNOFFICIAL. It is NOT PART OF ANY FORMSMARTS COMMERCIAL OFFERS and we do not provide direct support for it. Feel free to post questions at the bottom of this page. Changing the layout of a form may prevent it to display consistently across browsers.
Verify Your Site & Upload a Logo
To be able to use your own CSS stylesheet, your first need to verify your site and upload a site logo. Uploading a logo creates a website profile on FormSmarts and will allow you to provide your own CSS stylesheet. The logo will be shown on the standalone version of your forms and also on PayPal if you’re using Advanced Payment Integration.
Create a CSS Stylesheet
The CSS code in your stylesheet will be loaded after the default FormSmarts CSS, so any instructions specified in it will override the default. We give a few examples of customizations in the Example section below. More will follow.
Update the Embed Code on Your Site
In the HTML snippet given in the Form Publishing Info screen of the form creator, change the query string portion of the URL from mode=embed&lay=1 to mode=embed&lay=1&style=form.css, where form.css is the path to the CSS file relative to the root of your website. For example, if your website’s URL is http://www.example.com, the CSS file should be at http://www.example.com/form.css.
CSS Styling Examples
Changing the Font and Color of Headings
h2{
font-family:serif;
font-size:14px;
color:orange;
}
Changing the Layout of a Form to Multiple Columns
Logical sections defined by headings can be made into separate columns using the following CSS code and changing the iframe width accordingly.
#section_1{
width:350px;
float:left;
}
#section_2{
width:350px;
float:right;
}

Posted on Nov 21st, 2011 in form builder.
21 Comments
Tags: embed, form design, howto, usability, widget
How to Use QR Codes to Deliver Online Forms to Mobile Users
As more users are accessing online forms through a mobile device, we’ve added two ways to share a form with mobile users. Each form now comes with it own QR code and short URL, to be found in the Form Publishing Options screen of the form creator. We’ve also made it easier to embed a form on Facebook.
Why Mobile Users Are Important
- Users are increasingly accessing online forms on the go through their iPhone, smartphone, iPad or other tablet. Recent figures from market research firm IDC suggest that by 2015 more US users will access the Internet through mobile devices than through traditional PCs.
- Online form publishers can and should take advantage of the QR code scanning functionality available on mobile devices to bridge the gap between offline and online content. A QR code is a type of two-dimensional (2D) barcode popular in the mobile industry and for which free scanning apps are readily available for (if not built in) most mobile platforms. By printing the QR code provided by the form builder on ads, posters, fliers, and any paper form or document (mobile tagging), you’re allowing mobile users to access an online form without typing, simply by scanning its QR code with their phone. Avoiding typing is a convenience for users, and it also eliminates the risk of errors when entering the URL.

QR Code vs. Short URL
For those cases where distributing a QR code is not practicable and for mobile users who haven’t yet installed a QR code scanner on their phone or don’t know how to use it, we’ve also made all online forms accessible via a short URL such as https://f8s.co/7kb. If this doesn’t fully eliminate typing, it at least makes typing a form URL a less frustrating experience and shows mobile users you do care. And again, it reduces the risk of making an error when typing the URL.
Posted on Oct 3rd, 2011 in form builder.
1 Comment
Tags: embed, facebook, mobile form, qrcode
Excel Report Generator Upgrade
If you’re using FormSmarts’ Export to Excel feature, you may have already noticed that we’ve updated the report generator. As well as several other minor changes, we’ve added a second way to specify the date range over which the report is generated (in addition to selecting a start and end date) by choosing a preset time period. This is meant to further simplify the task of generating a report. The preset periods available are Today, Yesterday, This Week, Last Week, Last Seven Days, This Month, Last Month, Last 30 Days.
For the time period options that depend on the first day of the week (This Week, Last Week), we use the default for your country, as set in your account. You can change this in the Report Generator under More Options.
Give Us Feedback
Do you find the new date range feature useful? Which one do you anticipate you will use most? Should we add more (e.g. quarter)? Please give us feedback by posting a comment, via Facebook or Twitter.
Posted on Sep 16th, 2011 in form builder.
4 Comments
Tags: excel, form to excel
A Tip to Increase Form Conversion: Use Required Fields Wisely
When creating a form, the form builder allows you to specify whether your want each input field to be required or optional. The meaning of required is obvious: form users will not be able to submit the form unless a value has been entered for each and every required fields. For radio buttons and drop-down lists, that means users will have to explicitly select an option between the ones provided. The decision to make a field required is not to be made lightly, because that could frustrate the user and affect the form’s conversion rate.

The meaning of optional is more subtle as it is different for text input fields (text boxes, multi-line text areas) on the one hand, and radio buttons and drop-down lists on the other hand. That’s because in the latter case users only have a limited set of options to choose from, and the first option in the list is always selected by default.
In the example illustrated below, we’re building a registration form for an event. The form should accommodate up to two delegates. The first delegate is required, but the second one is optional. It turns out that:
- The first set of radio buttons or drop-down list should be required.
- The second set of radio buttons or drop-down list should be optional, with None as the default option.

Because None is selected by default, the form user won’t have to do anything in the most likely scenario where he’s only registering one attendee. This will save him time and frustration, and will statistically increase the form conversion rate and reduce form abandonment.
Posted on Apr 12th, 2011 in form builder.
4 Comments
Tags: form conversion, form design, HTML form, input field
Detailed Form Confirmation Page (Summary Page)
FormSmarts supports a number of options to complement the default confirmation page that is displayed when someone submits a form.
You can:
- Redirect form users to your site
- Allow form users to pay a registration fee via PayPal
- Show a detailed confirmation page where users can choose to receive a confirmation email or download a PDF receipt
Detailed Form Confirmation Page
The detailed confirmation page, also called Summary Page, shows a summary of the data submitted and allows form users to:
- Have a confirmation email sent to them
- Download a PDF receipt
- Print a copy of the form data.
Feel free to try this demo.
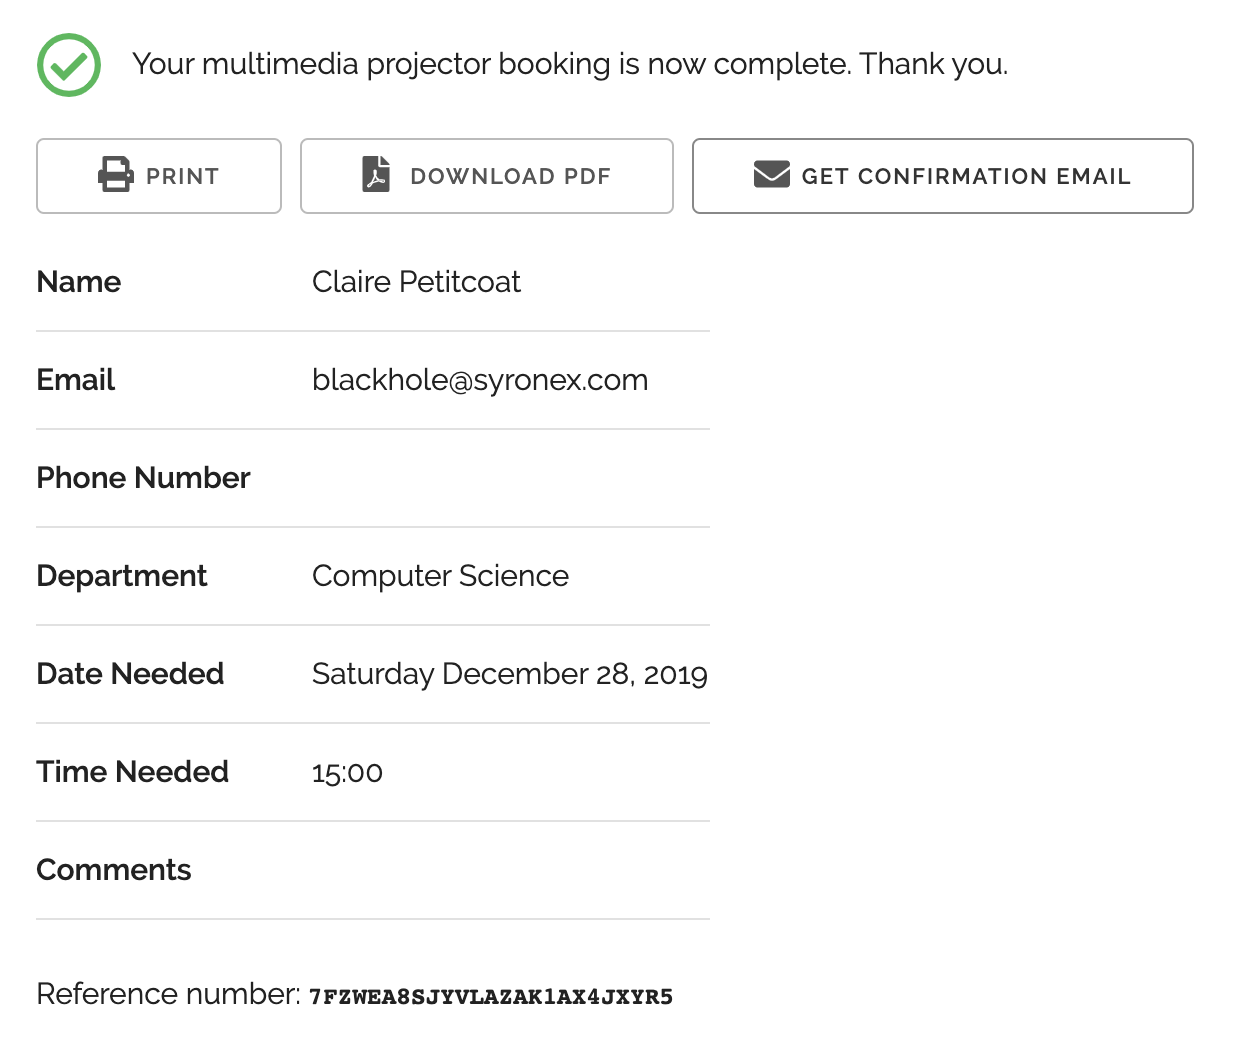
Use the summary page whenever you want users to be able to keep a copy of the information they’ve submitted or a proof of their submission.
- You can change the text at the top of the confirmation message and in the PDF receipt (not supported with all account types)
- The confirmation email, PDF and printable receipts show a total of any fees/prices on the form (see FormSmarts payment integration syntax) to allow members to create invoices and allow cash payments on-site.
PDF receipts may not display correctly in non Western-European languages (Russian, Chinese,…) unless the language is set explicitly with the lang parameter.
Setup Instructions

Visit the Forms Tab of the form builder and click the icon showing a pen to edit the corresponding form. Towards the bottom of the Form Details screen (pictured above), change the On Submission action to ‘Show summary with print, email & PDF options’.
Posted on Oct 12th, 2010 in form builder.
13 Comments
Tags: business, confirmation email, form submission, form to pdf, paypal form, pdf receipt, pro
Web Form Builder Upgrade
This release of FormSmarts introduces over one hundred improvements, leading to our most powerful, reliable and generous offer yet.
Important Reminder
Please add FormSmarts sender email formsmarts-noreply@syronex.com to your contacts, whitelist, or list of allowed senders and instruct any other form recipients to do so too. This should ensure your web forms are (and continue to be) always correctly delivered to your Inbox.
Increased Input Fields Allowance
To allow all users to take advantage of the new Heading and Text Block widgets introduced with this release, we’ve increased the number of fields you can use on a form.
- FormSmarts Standard users can add up to 15 fields on each form using their referral points.
- FormSmarts Pro users can add up to 60 fields on each form.
Be a Good Web-Citizen
- Report bugs. However intense our testing efforts before releasing a new version of the form builder, bugs may remain due to the number of different browsers and versions in use. Please report any suspected bugs on the forum or by email.
- Show your support. Whether you are a Standard user getting the web form service for free or a FormSmarts Pro customer paying the price of a business lunch for a year of service, please show your support by pressing the “Like” button on our Facebook page and following us on Twitter.
Major Changes
If many of the changes are improvements to FormSmarts server-side software which are not directly visible to you, all affect the quality of the service we provide you.
- Form data storage and Excel reporting are coming out of Beta, and you can now activate those for each form in the Form Details screen of your account.
- We’ve improved several aspects of the form creator‘s interface.
- We now support headings and text blocks on forms; details in another post.
Posted on May 5th, 2010 in form builder.
4 Comments
Tags: form to excel, input field, news, paypal form
How to Add Headings & Text Blocks to a Form
Headings
Use headings to create logical sections within your forms. For example, you might want to split a job application form into a Contact Details and a Past Employment section.
To add a heading, select the Heading widget in the Fields tab of the form builder. Enter the text of the heading into the Text box and save.

Text Blocks
The Text Block widget that allows you to insert text anywhere on a form. Example uses include:
- Providing directions to guide respondents and help them fill out the form accurately
- Adding a short disclaimer or waiver at the bottom of a form
- Specifying an amount of money on a payment form
- Defining the terms of a digital contract e-signed by the user

Text blocks are limited to 2,000 characters (250 characters with Free/Basic accounts). To add a waiver, contract, or terms of service, use an Agreement widget instead.
To add a text block to a form, select the Text Block widget in the Fields tab of the form builder, as illustrated below.

Links and Formatting
The form builder allows you to insert links, specify bold text, and italicize and underline text using either the formatting toolbar (screenshot above) or with the wiki-style formatting syntax below:
| Text with Commands | Formatted Text | |
|---|---|---|
| Web Link | This is a [http://FormSmarts.com link to FormSmarts]. | This is a link to FormSmarts. |
| Email Link | This is an [joe@example.com email link]. | This is an email link. |
| Bold | This text is *important*. | This text is important. |
| Italics | So is **this one**. | So is this one. |
| Underlining | Use underlining __sparingly__! | Use underlining sparingly! |
| Unordered List | * red * green * blue |
|
| Ordered List | 1. red 2. green 3. blue |
|
Links and formatting commands are supported in text blocks, agreements, form filling instructions, form submission confirmation messages, confirmation emails, auto-responder messages and checkbox labels. Check out this example.
Ordered & unordered lists are only supported in agreements/waivers at this time.
- Links open in a new window
- Email links are not supported in checkbox labels at this time
Should You Show Text Blocks in Form Responses?
If you use text blocks to create a digital contract between you and the form respondent, the terms of the contract may need to appear in the copy of the submitted data given to both parties.
Instructions for filling out a form are only needed on the form itself, so by default text blocks are not shown in form responses or confirmation emails/PDF receipts.
Toggle on Show in form responses (see screenshot above) to display text blocks in both form responses and the confirmation email or PDF receipt issued to the person who submitted the form.
This option is not available with all types of accounts.
Posted on May 5th, 2010 in form builder.
20 Comments
Tags: digital contract, input field
Changes in Form Builder Payment Integration
The recent upgrade introduces some changes in FormSmarts Payment Integration (PayPal Form) feature.
- Chargeable items may now be placed in check boxes. This should prove valuable in situations where you’re building a form with one or several optional, individually priced items.
- Payment button instead of link. We’ve replaced the payment link on the confirmation page by a more outstanding button.
- Form ID now shown in PayPal report. Up to now, when you needed to reconcile a payment with the corresponding form submission, you could only rely on the FormSmarts Reference Number. This is the unique ID shown in the subject of emails containing form data and in Form to Excel reports. The same ID appears in the payment details in your Paypal account, and also in the CSV report you can generate. We’ve now added the Form ID (see screenshot) to the information available on PayPal, so you may quickly identify which form each payment is for.

We warmly welcome your feedback.
Posted on May 5th, 2010 in form builder.
4 Comments
Tags: payment integration, paypal, paypal form
New Form Templates: Tooltips, Mobile Forms,…
We’ve upgraded form templates over the last few days. This affects the look and feel of all web forms. Notable changes include:
- Tooltips — A help icon next to text fields now shows the field’s description and validation information on hover. You may want to review the field description you provided at the time you created your forms.
- Variable form width — The width of embedded forms can be resized down to 360px without side-effects, and should degrade well beyond that.
- Mobiles forms — Although our forms have always been accessible to mobile users, we now provide a specific template for standalone forms accessed from mobile devices. If your site visitors include a fair proportion of mobile users, you should also provide a link to the standalone form whenever you embed a form on your site.
If you installed the form embedding code on your website before August 2008, you should upgrade it to benefit from the new features.
Important: We’re now publishing most updates via our Twitter and Facebook pages. Please subscribe for updates and service status information.
Your feedback is most welcome.
Posted on Sep 18th, 2009 in form builder.
Post a Comment
Tags: mobile form